At Uniqlo flagship store in Ginza, Tokyo, there was this T-shirt with an encoded shell script.


Well, I had to decode it and see the result.
Read MoreRamblings, essays and tips about Linux and the Open Source universe.

At Uniqlo flagship store in Ginza, Tokyo, there was this T-shirt with an encoded shell script.
Well, I had to decode it and see the result.
Read MoreHere is a short shell script to show last logins from SSH, XRDP, SUDO and Cockpit. In addition it show potential disk problems from S.M.A.R.T.
#!/bin/sh

default_since='-1days'
default_priority=info

read -r -d "" data << END_OF_DATA
System login         ^ systemd-logind          ^ info  ^         ^ New session
XRDP                 ^ xrdp-sesman             ^ debug ^ -5days  ^ logged in|Received system login request
Cockpit login        ^ cockpit-session         ^       ^         ^ session opened
SUDO                 ^ sudo                    ^       ^         ^ session opened
Storage problems     ^ smartd                  ^       ^ -1days  ^ uncorrectable|unreadable
END_OF_DATA

trim() {
    local s="$*"

    # remove leading whitespace
    s="${s#"${s%%[![:space:]]*}"}"

    # remove trailing whitespace
    s="${s%"${s##*[![:space:]]}"}"

    printf '%s' "$s"
}

IFS="^"
echo "$data" | while read title slid priority since grep; do
	effective_since=$default_since
	effective_priority=$default_priority

	[[ -n "$(trim $since)" ]] && effective_since="$(trim $since)"
	[[ -n "$(trim $priority)" ]] && effective_priority="$(trim $priority)"

	echo "$(trim $title)"
	journalctl \
		--no-pager \
		--no-tail \
		--since $effective_since \
		--priority $effective_priority \
		--reverse \
		--grep "$(trim $grep)" \
		-- SYSLOG_IDENTIFIER="$(trim $slid)"

	echo; echo
done
I made it with the help of Cockpit Logs feature that shows the actual command being executed based on how you configure it.
The most important part of the script is the journalctl command. Everything else are defaults, the list of desired syslog identifiers and what to extract from them, and output formatting.

Here are simple good practices to ensure health of your HDDs, using SMART.
Read More
In this extensive article, Jon “MadDog” delves into the behind-the-scenes narrative of how Linux and Open Source gained acceptance within the corporate sphere, eventually establishing itself as the dominant platform in today’s enterprise information technology. It has become the operating system powering contemporary cloud infrastructure and, most notably, has transformed into the primary methodology for driving software innovation.
Read More
First allow the Unix user that will make backups (root, in my case) to access MariaDB without a password (works only if accessing from same host that the server is running):
GRANT ALL PRIVILEGES ON *.* TO `root`@`localhost` IDENTIFIED VIA unix_socket WITH GRANT OPTION;
Command line on Windows (10+) nowadays doesn’t have to be only PuTTY to a remote Linux machine. In fact many Linux concepts were incorporated on Windows.
First, activate WSL. Since I enjoy using Fedora, and not Ubuntu, this guide by Jonathan Bowman has helped me to set WSL exactly as I like. The guide points to some old Fedora images, so pay attention to its links to get a newer one. Then, the guide also explains how to initialize the Fedora image, customize it as default, configure your user etc.
Yes, it has tools from OpenSSH, such as the plain ssh client, ssh-agent and others. No need for PuTTY.
This guide by Chris Hastie explains how to activate SSH Agent with your private key. I’m not sure it is fairly complete, since I didn’t test yet if it adds your key in session startup for a complete password-less experience. I’m still trying.
Basically, you need to activate a Windows service and have your private key in $HOME\.ssh\id_rsa, exactly like under Linux.
The old command prompt is very limited, as we know, and obsolete. Luckily, Microsoft has released a new, much improved, Terminal application that can be installed from the Store. On Windows 11, the Terminal app is already there for you.

It allows defining sessions with custom commands as wsl (to get into the Fedora WSL container installed above), cmd, ssh. I use tmux in all Linux computers that I connect, so my default access command is:
ssh -l USERNAME -A -t HOSTNAME "tmux new-session -s default -n default -P -A -D"
Windows Terminal app is highly customizable, with colors and icons. And this repo by Mark Badolato contains a great number of terminal color schemes. Select a few from the windowsterminal folder and paste their JSON snippet into the file %HOME%\AppData\Local\Packages\Microsoft.WindowsTerminal_8wekyb3d8bbwe\LocalState\settings.json.
macOS Catalina doesn’t ship with Python 3, only 2. But you can still get 3 from Apple, updated regularly through system’s official update methods. You don’t need to get the awful Anaconda on you Mac to play with Python.
Python 3 is shipped by Xcode Command Line Tools. To get it installed (without the heavy Xcode GUI), type this in your terminal:
xcode-select --install
This way, every time Apple releases an update, you’ll get it.
Settings window will pop so wait 5 minutes for the installation to finish.
If you already have complete Xcode installed, this step was unnecessary (you already had Python 3 installed) and you can continue to the next section of the tutorial.
In case you already have Python installed under your user and modules downloaded with pip, remove it:
rm -rf ${HOME}/Caches/com.apple.python/${HOME}/Library/Python \
${HOME}/Library/Python/ \
${HOME}/Library/Caches/pip
Now that you get a useful Python 3 installation, use pip3 to install Python modules that you’ll need. Don’t forget to use –user to get things installed on your home folder so you won’t pollute your overall system. For my personal use, I need the complete machine learning, data wrangling and Jupyter suite:
pip3 install --user sqlalchemy
pip3 install --user matplotlib
pip3 install --user pandas
pip3 install --user jupyterlab
pip3 install --user PyMySQL
pip3 install --user configobj
pip3 install --user requests
pip3 install --user seaborn
pip3 install --user bs4
pip3 install --user xgboost
pip3 install --user scikit_learn
But you might need other things as Django or other sqlalchemy drivers. Set yourself at home and install them with pip3.
For modules that require compilation and special library, say crypto, do it like this:
CFLAGS="-I/Library/Developer/CommandLineTools/Library/Frameworks/Python3.framework/Versions/3.7/include" \
LDFLAGS="-L/Library/Developer/CommandLineTools/Library/Frameworks/Python3.framework/Versions/3.7/lib" \
pip3 install --user pycrypto
For some reason, Apple installs many different Python 3 binaries in different places of the system. The one that gets installed on /usr/bin/python3 has problems loading some libraries and instrumentation with install_name_tool would be required. So lets just use the binary that works better:
export PATH=/Library/Developer/CommandLineTools/usr/bin:$PATH
Commands installed by pip3 will be available in the ~/Library/Python/3.7/bin/ folder, so just add it to your PATH:
export PATH=$PATH:~/Library/Python/3.7/bin/
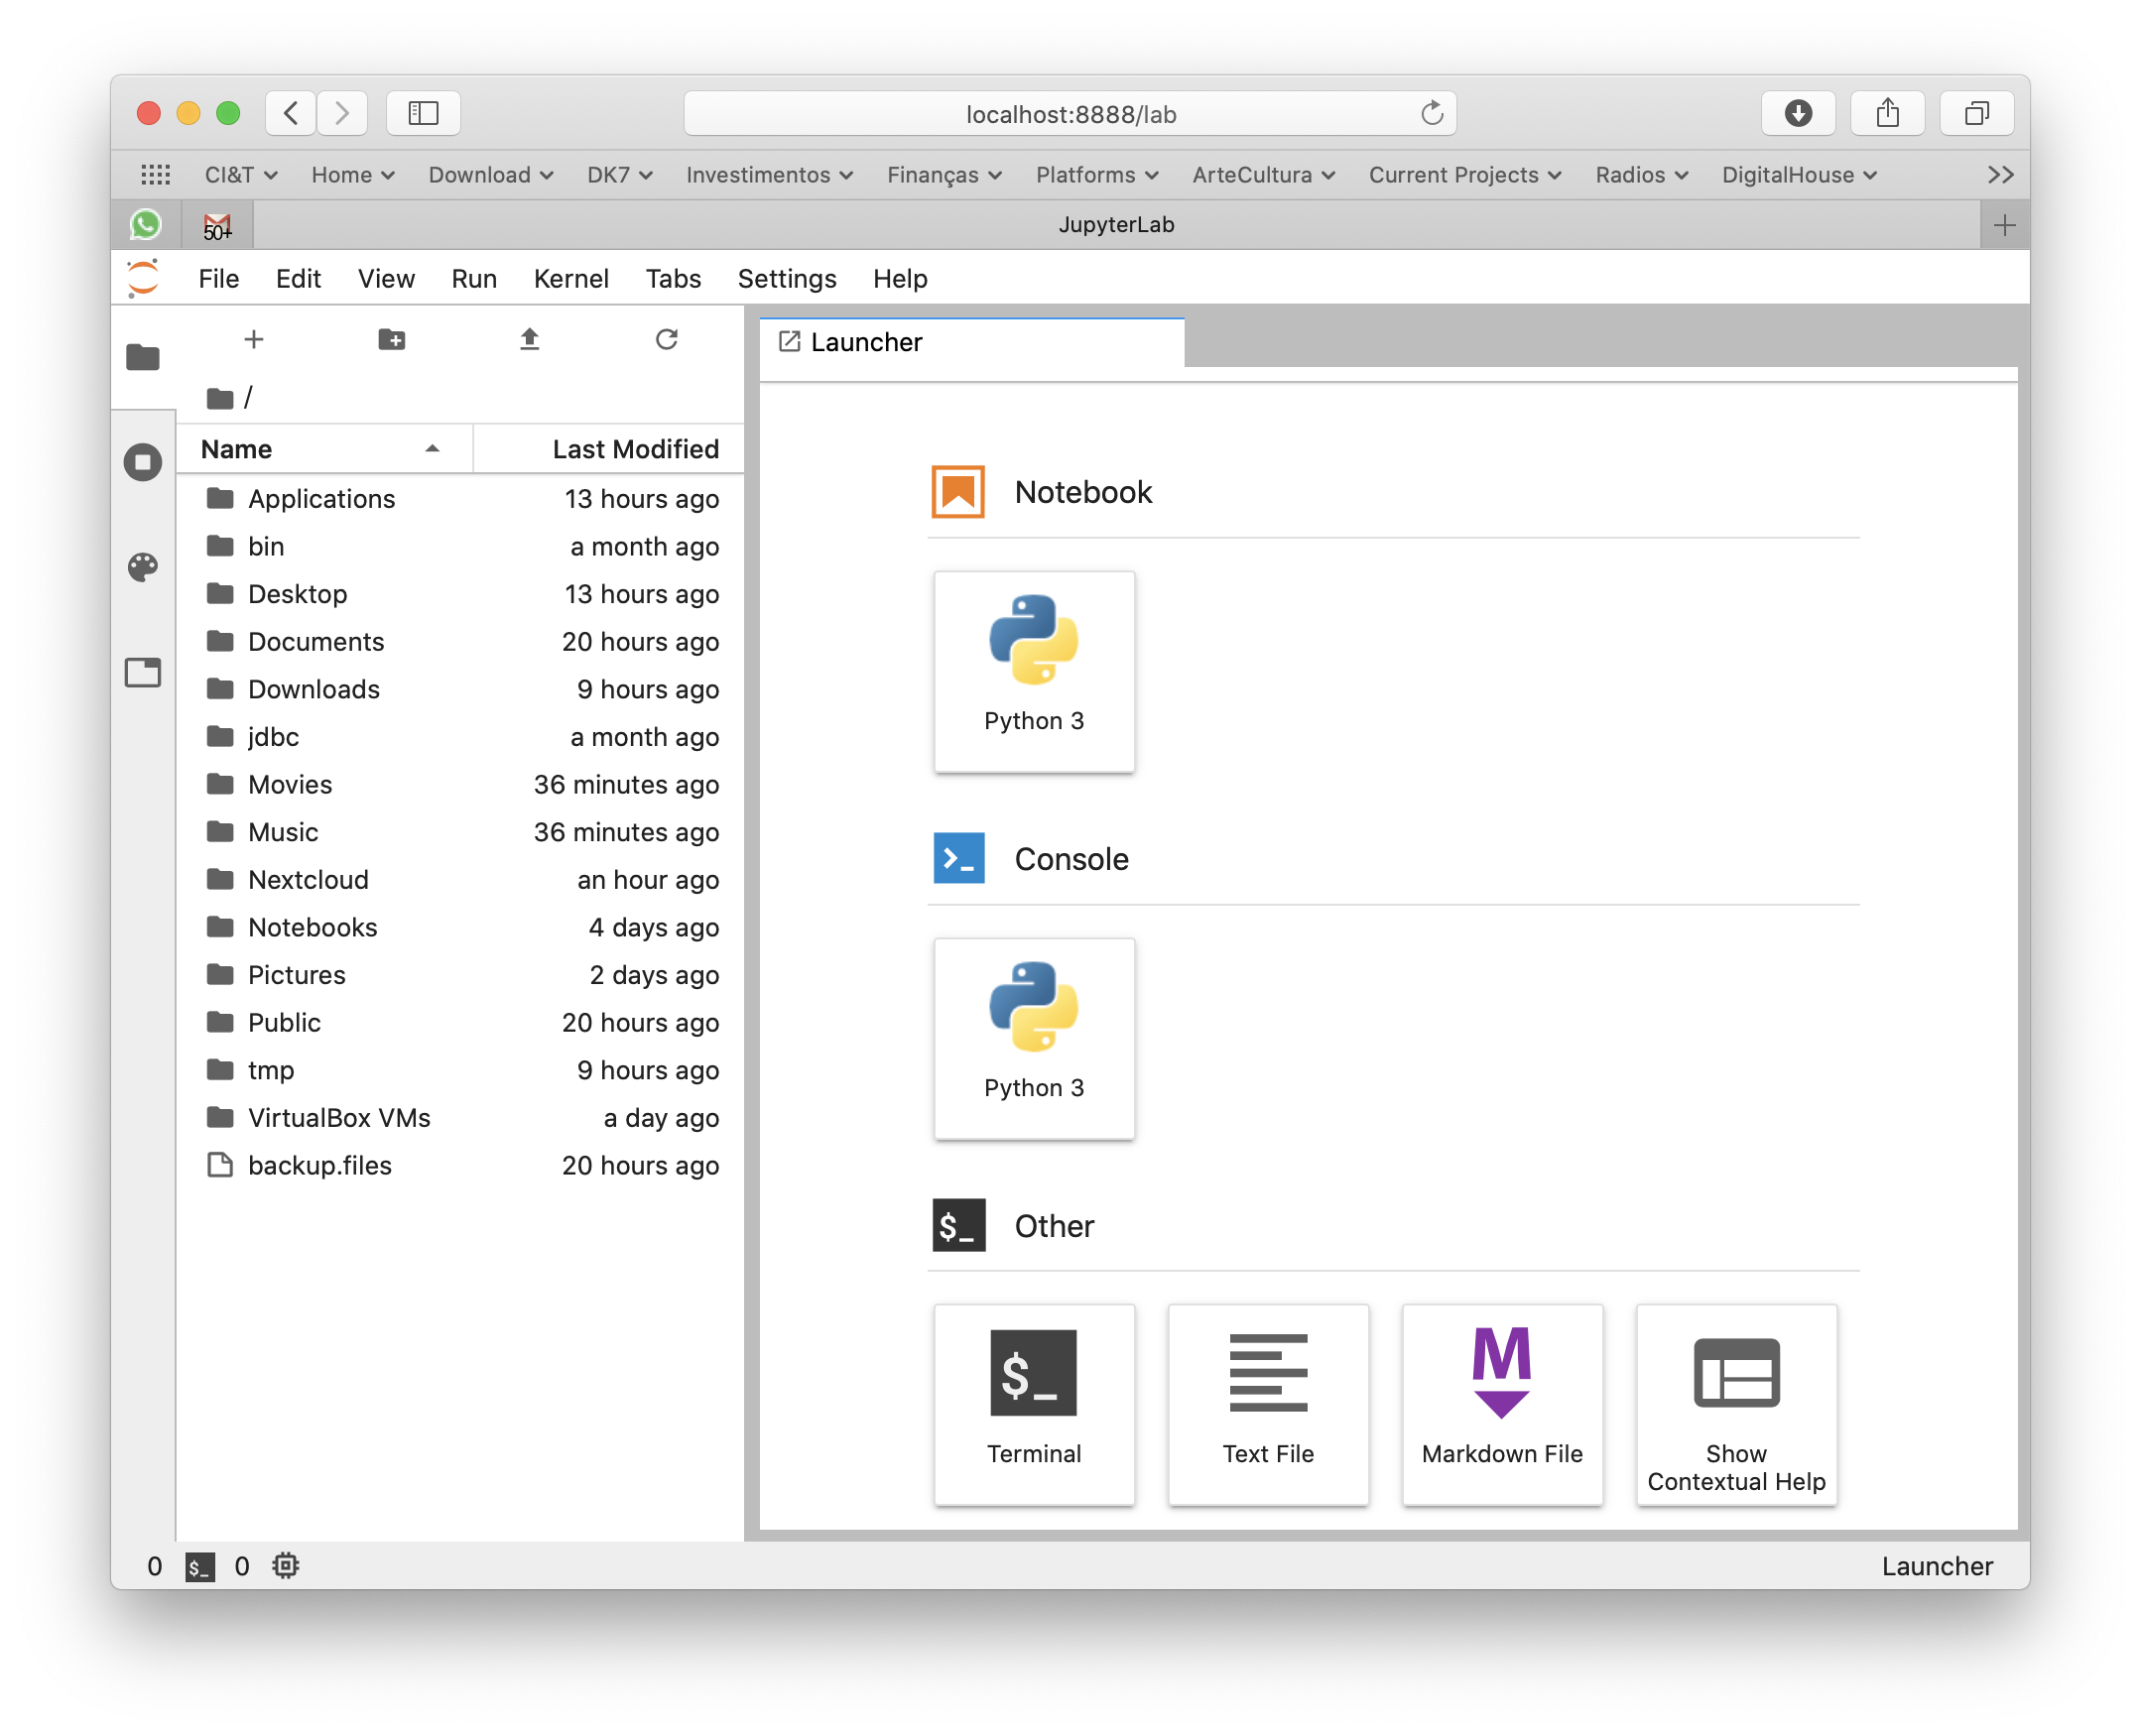
Now I can simply type jupyter-lab anywhere in the terminal or command line to make it fire my browser and get a Jupyter environment.
Xcode Command Line Tools will get you a full hand of other useful developer tools, such as git, subversion, GCC and LLVM compilers and linkers, make, m4 and a complete Python 3 distribution. You can see most of its installation on /Library/Developer/CommandLineTools folder.
For production and high end processing I’ll still use Python on Linux with my preferred distribution’s default packages (no Anaconda). But this method of getting Python on macOS is fastest and cleanest to get you going on your own data scientist laptop without a VM nor a container.
Se você está numa encruzilhada para escolher uma linguagem de computador para aprender a programar, escolha Python.
Read MoreJupyter Notebooks are the elegant way that Data Scientists work and all software needed to run them are already pre-packaged on Fedora (and any other Linux distribution). It is encouraged to use your distribution’s packaging infrastructure to install Python packages. Avoid at any cost installing Python packages with pip, conda, anaconda and from source code. The reasons for this good practice are security, ease of use, to keep the system clean and to make installation procedures easily reproducible in DevOps scenarios.


When Sun and then Oracle bought MySQL AB, the company behind the original development, MySQL open source database development governance gradually closed. Now, only Oracle writes updates. Updates from other sources — individuals or other companies — are ignored. MySQL is still open source, but it has a closed governance.
MySQL is one of the most popular databases in the world. Every WordPress and Drupal website runs on top of MySQL, as well as the majority of generic Ruby, Django, Flask and PHP apps which have MySQL as their database of choice.
When an open source project becomes this popular and essential, we say it is gaining momentum. MySQL is so popular that it is bigger than its creators. In practical terms, that means its creators can disappear and the community will take over the project and continue its evolution. It also means the software is solid, support is abundant and local, sometimes a commodity or even free.
In the case of MySQL, the source code was forked by the community, and the MariaDB project started from there. Nowadays, when somebody says he is “using MySQL”, he is in fact probably using MariaDB, which has evolved from where MySQL stopped in time.
Open source software’s momentum serves as a powerful insurance policy for the investment of time and resources an individual or enterprise user will put into it. This is the true benefit behind Linux as an operating system, Samba as a file server, Apache HTTPD as a web server, Hadoop, Docker, MongoDB, PHP, Python, JQuery, Bootstrap and other hyper-essential open source projects, each on its own level of the stack. Open source momentum is the safe antidote to technology lock-in. Having learned that lesson over the last decade, enterprises are now looking for the new functionalities that are gaining momentum: cloud management software, big data, analytics, integration middleware and application frameworks.
On the open domain, the only two non-functional things that matter in the long term are whether it is open source and if it has attained momentum in the community and industry. None of this is related to how the software is being written, but this is exactly what open governance is concerned with: the how.
Open source governance is the policy that promotes a democratic approach to participating in the development and strategic direction of a specific open source project. It is an effective strategy to attract developers and IT industry players to a single open source project with the objective of attaining momentum faster. It looks to avoid community fragmentation and ensure the commitment of IT industry players.
Open governance alone does not guarantee that the software will be good, popular or useful (though formal open governance only happens on projects that have already captured some attention of IT industry leaders). A few examples of open source projects that have formal open governance are CloudFoundry, OpenStack, JQuery and all the projects under the Apache Software Foundation umbrella.
For users, the indirect benefit of open governance is only related to the speed the open source project reaches momentum and high popularity.
Open governance is important only for the people looking to govern or contribute. If you just want to use, open source momentum is far more important.
Subject tagCreator tag based on camera modelThere was a time that Apple macOS was the best platform to handle multimedia (audio, image, video). This might be still true in the GUI space. But Linux presents a much wider range of possibilities when you go to the command line, specially if you want to:
The Open Source community has produced state of the art command line tools as ffmpeg, exiftool and others, which I use every day to do non-trivial things, along with Shell advanced scripting. Sure, you can get these tools installed on Mac or Windows, and you can even use almost all these recipes on these platforms, but Linux is the native platform for these tools, and easier to get the environment ready.
These are my personal notes and I encourage you to understand each step of the recipes and adapt to your workflows. It is organized in Audio, Video and Image+Photo sections.
I use Fedora Linux and I mention Fedora package names to be installed. You can easily find same packages on your Ubuntu, Debian, Gentoo etc, and use these same recipes.
ffprobe file.mp3
ffprobe file.m4v
ffprobe file.mkv
ls *flac | while read f; do
	ffmpeg -i "$f" -acodec alac -vn "${f[@]/%flac/m4a}" < /dev/null;
done
ls *flac | while read f; do
   ffmpeg -i "$f" -qscale:a 2 -vn "${f[@]/%flac/mp3}" < /dev/null;
done
First, make sure you have Negativo17 build of FFMPEG, so run this as root:
dnf config-manager --add-repo=http://negativo17.org/repos/fedora-multimedia.repo
dnf update ffmpeg
Now encode:
ls *flac | while read f; do
   ffmpeg -i "$f" -vn -c:a libfdk_aac -vbr 5 -movflags +faststart "${f[@]/%flac/m4a}" < /dev/null;
done
Has been said the Fraunhofer AAC library can’t be legally linked to ffmpeg due to license terms violation. In addition, ffmpeg’s default AAC encoder has been improved and is almost as good as Fraunhofer’s, specially for constant bit rate compression. In this case, this is the command:
ls *flac | while read f; do
   ffmpeg -i "$f" -vn -c:a aac -b:a 256k -movflags +faststart "${f[@]/%flac/m4a}" < /dev/null;
done
This is one of my favorites, extremely powerful. Very useful when you get a Hi-Fi, complete but useless WMA-Lossless collection and need to convert it losslesslly to something more portable, ALAC in this case. Change the FMT=flac to FMT=wav or FMT=wma (only when it is WMA-Lossless) to match your source files. Don’t forget to tag the generated files.
FMT=flac
# Create identical directory structure under new "alac" folder
find . -type d | while read d; do
   mkdir -p "alac/$d"
done

find . -name "*$FMT" | sort | while read f; do
   ffmpeg -i "$f" -acodec alac -vn "alac/${f[@]/%$FMT/m4a}" < /dev/null;
   mp4tags -E "Deezer lossless files (https://github.com/Ghostfly/deezDL) + 'ffmpeg -acodec alac'" "alac/${f[@]/%$FMT/m4a}";
done
iPhone and iPod music player can display the file’s embedded lyrics and this is a cool feature. There are several ways to get lyrics into your music files. If you download music from Deezer using SMLoadr, you’ll get files with embedded lyrics. Then, the FLAC to ALAC process above will correctly transport the lyrics to the M4A container. Another method is to use beets music tagger and one of its plugins, though it is very slow for beets to fetch lyrics of entire albums from the Internet.
The third method is manual. Let lyrics.txt be a text file with your lyrics. To tag it into your music.m4a, just do this:
mp4tags -L "$(cat lyrics.txt)" music.m4a
And then check to see the embedded lyrics:
ffprobe music.m4a 2>&1 | less
If some of your friends has the horrible tendency to commit this crime and rip CDs as 1 file for entire CD, there is an automation to fix it. APE is the most difficult and this is what I’ll show. FLAC and WAV are shortcuts of this method.
ffmpeg -i audio-cd.ape audio-cd.wav
iconv -f Latin1 -t UTF-8 audio-cd.cue | shnsplit -t "%n · %p ♫ %t" audio-cd.wav
ls *wav | while read f; do
   ffmpeg -i "$f" -acodec alac -vn "${f[@]/%wav/m4a}" < /dev/null;
done
This will get you lossless ALAC files converted from the intermediary WAV files. You can also convert them into FLAC or MP3 using variations of the above recipes.
Now the files are ready for your tagger.
This is a lossless and fast process, chapters and subtitles are added as tags and streams to the file; audio and video streams are not reencoded.
bash$ file subtitles_file.srt
subtitles_file.srt: ISO-8859 text, with CRLF line terminators
It is not UTF-8 encoded, it is some ISO-8859 variant, which I need to know to correctly convert it. My example uses a Brazilian Portuguese subtitle file, which I know is ISO-8859-15 (latin1) encoded because most latin scripts use this encoding.
bash$ iconv -f latin1 -t utf8 subtitles_file.srt > subtitles_file_utf8.srt
bash$ file subtitles_file_utf8.srt
subtitles_file_utf8.srt: UTF-8 Unicode text, with CRLF line terminators
bash$ cat chapters.txt
CHAPTER01=00:00:00.000
CHAPTER01NAME=Chapter 1
CHAPTER02=00:04:31.605
CHAPTER02NAME=Chapter 2
CHAPTER03=00:12:52.063
CHAPTER03NAME=Chapter 3
…
MP4Box -ipod \
       -itags 'track=The Movie Name:cover=cover.jpg' \
       -add 'subtitles_file_utf8.srt:lang=por' \
       -chap 'chapters.txt:lang=eng' \
       movie.mp4
The MP4Box command is part of GPac.
OpenSubtitles.org has a large collection of subtitles in many languages and you can search its database with the IMDB ID of the movie. And ChapterDB has the same for chapters files.
Since iTunes can tag and beautify your movie files in Windows and Mac, libmp4v2 can do the same on Linux. Here we’ll use it to add the movie cover image we downloaded from IMDB along with some movie metadata for Woody Allen’s 2011 movie Midnight in Paris:
mp4tags -H 1 -i movie -y 2011 -a "Woody Allen" -s "Midnight in Paris" -m "While on a trip to Paris with his..." "Midnight in Paris.m4v"
mp4art -k -z --add cover.jpg "Midnight in Paris.m4v"
This way the movie file will look good and in the correct place when transferred to your iPod/iPad/iPhone.
Of course, make sure the right package is installed first:
dnf install libmp4v2
File extensions MOV, MP4, M4V, M4A are the same format from the ISO MPEG-4 standard. They have different names just to give a hint to the user about what they carry.
dnf -y install libdvdcss vobcopy
mount /dev/sr0 /mnt/dvd;
cd /target/folder;
vobcopy -m /mnt/dvd .
You’ll get a directory tree with decrypted VOB and BUP files. You can generate an ISO file from them or, much more practical, use HandBrake to convert the DVD titles into MP4/M4V (more compatible with wide range of devices) or MKV/WEBM files.
Modern iPhones can record videos at 240 or 120fps so when you’ll watch them at 30fps they’ll look slow-motion. But regular players will play them at 240 or 120fps, hiding the slo-mo effect.
We’ll need to handle audio and video in different ways. The video FPS fix from 240 to 30 is loss less, the audio stretching is lossy.
# make sure you have the right packages installed
dnf install mkvtoolnix sox gpac faac
#!/bin/bash

# Script by Avi Alkalay
# Freely distributable

f="$1"
ofps=30
noext=${f%.*}
ext=${f##*.}

# Get original video frame rate
ifps=`ffprobe -v error -select_streams v:0 -show_entries stream=r_frame_rate -of default=noprint_wrappers=1:nokey=1 "$f" < /dev/null  | sed -e 's|/1||'`
echo

# exit if not high frame rate
[[ "$ifps" -ne 120 ]] && [[ "$ifps" -ne 240 ]] && exit

fpsRate=$((ifps/ofps))
fpsRateInv=`awk "BEGIN {print $ofps/$ifps}"`

# loss less video conversion into 30fps through repackaging into MKV
mkvmerge -d 0 -A -S -T \
	--default-duration 0:${ofps}fps \
	"$f" -o "v$noext.mkv"

# loss less repack from MKV to MP4
ffmpeg -loglevel quiet -i "v$noext.mkv" -vcodec copy "v$noext.mp4"
echo

# extract subtitles, if original movie has it
ffmpeg -loglevel quiet -i "$f" "s$noext.srt"
echo

# resync subtitles using similar method with mkvmerge
mkvmerge --sync "0:0,${fpsRate}" "s$noext.srt" -o "s$noext.mkv"

# get simple synced SRT file
rm "s$noext.srt"
ffmpeg -i "s$noext.mkv" "s$noext.srt"

# remove undesired formating from subtitles
sed -i -e 's|<font size="8"><font face="Helvetica">\(.*\)</font></font>|\1|' "s$noext.srt"

# extract audio to WAV format
ffmpeg -loglevel quiet -i "$f" "$noext.wav"

# make audio longer based on ratio of input and output framerates
sox "$noext.wav" "a$noext.wav" speed $fpsRateInv

# lossy stretched audio conversion back into AAC (M4A) 64kbps (because we know the original audio was mono 64kbps)
faac -q 200 -w -s --artist a "a$noext.wav"

# repack stretched audio and video into original file while removing the original audio and video tracks
cp "$f" "${noext}-slow.${ext}"
MP4Box -ipod -rem 1 -rem 2 -rem 3 -add "v$noext.mp4" -add "a$noext.m4a" -add "s$noext.srt" "${noext}-slow.${ext}"

# remove temporary files
rm -f "$noext.wav" "a$noext.wav" "v$noext.mkv" "v$noext.mp4" "a$noext.m4a" "s$noext.srt" "s$noext.mkv"
If the audio is already AAC-encoded (may also be ALAC-encoded), create an MP4/M4V file:
ffmpeg -loop 1 -framerate 0.2 -i photo.jpg -i song.m4a -shortest -c:v libx264 -tune stillimage -vf scale=960:-1 -c:a copy movie.m4v
The above method will create a very efficient 0.2 frames per second (-framerate 0.2) H.264 video from the photo while simply adding the audio losslessly. Such very-low-frames-per-second video may present sync problems with subtitles on some players. In this case simply remove the -framerate 0.2 parameter to get a regular 25fps video with the cost of a bigger file size.
The -vf scale=960:-1 parameter tells FFMPEG to resize the image to 960px width and calculate the proportional height. Remove it in case you want a video with the same resolution of the photo. A 12 megapixels photo file (around 4032×3024) will get you a near 4K video.
If the audio is MP3, create an MKV file:
ffmpeg -loop 1 -framerate 0.2 -i photo.jpg -i song.mp3 -shortest -c:v libx264 -tune stillimage -vf scale=960:-1 -c:a copy movie.mkv
If audio is not AAC/M4A but you still want an M4V file, convert audio to AAC 192kbps:
ffmpeg -loop 1 -framerate 0.2 -i photo.jpg -i song.mp3 -shortest -c:v libx264 -tune stillimage -vf scale=960:-1 -c:a aac -strict experimental -b:a 192k movie.m4v
See more about FFMPEG photo resizing.
There is also a more efficient and completely lossless way to turn a photo into a video with audio, using extended podcast techniques. But thats much more complicated and requires advanced use of GPAC’s MP4Box and NHML. In case you are curious, see the Podcast::chapterize() and Podcast::imagify() methods in my music-podcaster script. The trick is to create an NHML (XML) file referencing the image(s) and add it as a track to the M4A audio file.
mkdir noexif;
exiftool -filename -T -if '(not $datetimeoriginal or ($datetimeoriginal eq "0000:00:00 00:00:00"))' *HEIC *JPG *jpg | while read f; do mv "$f" noexif/; done
Warning: use this only if image files have correct creation time on filesystem and if they don’t have an EXIF header.
exiftool -overwrite_original '-DateTimeOriginal< ${FileModifyDate}' *CR2 *JPG *jpg
jhead -autorot -cmd "jpegtran -progressive '&i' > '&o'" -ft *jpg
This process will rename silly, sequential, confusing and meaningless photo file names as they come from your camera into a readable, sorteable and useful format. Example:
IMG_1234.JPG ➡ 2015.07.24-17.21.33 • Max playing with water【iPhone 6s✚】.jpg
Note that new file name has the date and time it was taken, whats in the photo and the camera model that was used.
exiftool -overwrite_original '-OriginalFileName<${filename}' *CR2 *JPG *jpg
exiftool '-filename<${DateTimeOriginal} 【${Model}】%.c.%e' -d %Y.%m.%d-%H.%M.%S *CR2 *HEIC *JPG *jpg
\ls *HEIC *JPG *jpg *heic | while read f; do
    nf=`echo "$f" | sed -e 's/0.JPG/.jpg/i; s/0.HEIC/.heic/i'`;
    t=`echo "$f" | sed -e 's/0.JPG/1.jpg/i; s/0.HEIC/1.heic/i'`;
    [[ ! -f "$t" ]] && mv "$f" "$nf";
done
Alternative for macOS without SED:
\ls *HEIC *JPG *jpg *heic | perl -e '
	while (<>) {
		chop; $nf=$_; $t=$_;
		$nf=~s/0.JPG/.jpg/i; $nf=~s/0.HEIC/.heic/i;
		$t=~s/0.JPG/1.jpg/i; $t=~s/0.HEIC/1.heic/i;
		rename($_,$nf) if (! -e $t);
	}'
\ls *HEIC *JPG | while read f; do
    nf=`echo "$f" | sed -e 's/JPG/jpg/; s/HEIC/heic/'`;
    mv "$f" "$nf";
done
\ls *HEIC *JPG *jpg *heic | while read f; do
    nf=`echo "$f" | sed -e 's/Canon PowerShot G1 X/Canon G1X/;
      s/iPhone 6s Plus/iPhone 6s✚/;
      s/iPhone 7 Plus/iPhone 7✚/;
      s/Canon PowerShot SD990 IS/Canon SD990 IS/;
      s/HEIC/heic/;
      s/JPG/jpg/;'`;
    mv "$f" "$nf";
done
You’ll get file names as 2015.07.24-17.21.33 【Canon 5D Mark II】.jpg. If you took more then 1 photo in the same second, exiftool will automatically add an index before the extension.
Subject tag\ls *【*】* | while read f; do s=`exiftool -T -Subject "$f"`; if [[ " $s" != " -" ]]; then nf=`echo "$f" | sed -e "s/ 【/ • $s 【/; s/\:/∶/g;"`; mv "$f" "$nf"; fi; done
exiftool '-filename<${DateTimeOriginal} • ${Subject} 【${Model}】%.c.%e' -d %Y.%m.%d-%H.%M.%S *CR2 *JPG *HEIC *jpg *heic
exiftool -T -Model *jpg | sort -u
Output is the list of camera models on this photos:
Canon EOS REBEL T5i
DSC-H100
iPhone 4
iPhone 4S
iPhone 5
iPhone 6
iPhone 6s Plus
CRE="John Doe";    exiftool -overwrite_original -creator="$CRE" -by-line="$CRE" -Artist="$CRE" -if '$Model=~/DSC-H100/'            *.jpg
CRE="Jane Black";  exiftool -overwrite_original -creator="$CRE" -by-line="$CRE" -Artist="$CRE" -if '$Model=~/Canon EOS REBEL T5i/' *.jpg
CRE="Mary Doe";    exiftool -overwrite_original -creator="$CRE" -by-line="$CRE" -Artist="$CRE" -if '$Model=~/iPhone 5/'            *.jpg
CRE="Peter Black"; exiftool -overwrite_original -creator="$CRE" -by-line="$CRE" -Artist="$CRE" -if '$Model=~/iPhone 4S/'           *.jpg
CRE="Avi Alkalay"; exiftool -overwrite_original -creator="$CRE" -by-line="$CRE" -Artist="$CRE" -if '$Model=~/iPhone 6s Plus/'      *.jpg
If you geometrically mark people faces and their names in your photos using tools as Picasa, you can easily search for the photos which contain “Suzan” or “Marcelo” this way:
exiftool -fast -r -T -Directory -FileName -RegionName -if '$RegionName=~/Suzan|Marcelo/' .
-Directory, -FileName and -RegionName specify the things you want to see in the output. You can remove -RegionName for a cleaner output.
The -r is to search recursively. This is pretty powerful.
Your camera will tag your photos only with local time on CreateDate or DateTimeOriginal tags. There is another set of tags called GPSDateStamp and GPSTimeStamp that must contain the UTC time the photos were taken, but your camera won’t help you here. Hopefully you can derive these values if you know the timezone the photos were taken. Here are two examples, one for photos taken in timezone -02:00 (Brazil daylight savings time) and on timezone +09:00 (Japan):
exiftool -overwrite_original '-gpsdatestamp<${CreateDate}-02:00' '-gpstimestamp<${CreateDate}-02:00' '-TimeZone<-02:00' '-TimeZoneCity<São Paulo' *.jpg
exiftool -overwrite_original '-gpsdatestamp<${CreateDate}+09:00' '-gpstimestamp<${CreateDate}+09:00' '-TimeZone<+09:00' '-TimeZoneCity<Tokio' Japan_Photos_folder
Use exiftool to check results on a modified photo:
exiftool -s -G -time:all -gps:all 2013.10.12-23.45.36-139.jpg
[EXIF]          CreateDate                      : 2013:10:12 23:45:36
[Composite]     GPSDateTime                     : 2013:10:13 01:45:36Z
[EXIF]          GPSDateStamp                    : 2013:10:13
[EXIF]          GPSTimeStamp                    : 01:45:36
This shows that the local time when the photo was taken was 2013:10:12 23:45:36. To use exiftool to set timezone to -02:00 actually means to find the correct UTC time, which can be seen on GPSDateTime as 2013:10:13 01:45:36Z. The difference between these two tags gives us the timezone. So we can read photo time as 2013:10:12 23:45:36-02:00.
Moves is an amazing app for your smartphone that simply records for yourself (not social and not shared) everywhere you go and all places visited, 24h a day.
exiftool -overwrite_original -api GeoMaxExtSecs=86400 -geotag ../moves_export/gpx/yearly/storyline/storyline_2015.gpx '-geotime<${CreateDate}-08:00' Folder_with_photos_from_trip_to_Las_Vegas
Some important notes:
montage -mode concatenate -tile 1x8 *jpg COMPOSED.JPG
montage -mode concatenate -tile 8x1 *jpg COMPOSED.JPG
montage -mode concatenate -tile 4x2 *jpg COMPOSED.JPG
The montage command is part of the ImageMagick package.

This document explains working examples on how to use Bluemix platform advanced features such as:
cf command line interface, including DockerFor this, I’ll use the following source code structure:
github.com/avibrazil/bluemix-docker-kickstart
The source code currently brings to life (as an example), integrated with some Bluemix services and Docker infrastructure, a PHP application (the WordPress popular blogging platform), but it could be any Python, Java, Ruby etc app.
I feel it is important to position what Bluemix really is and which of its parts we are going to use. Bluemix is composed of 3 different things:
cf command from your laptop. IBM has extended this part of Bluemix with functions not currently available on CloudFoundry, notably the capability of executing regular VMs and Docker containers.This tutorial will dive into #1 and some parts of #3, while using some services from #2.
When fully provisioned, the entire architecture will look like this. Several Bluemix services (MySQL, Object store) packaged into a CloudFoundry App (bridge app) that serves some Docker containers that in turns do the real work. Credentials to access those services will be automatically provided to the containers as environment variables (VCAP_SERVICES).
The example source code repo contains boilerplate code that is intentionally generic and clean so you can easily fork, add and modify it to fit your needs. Here is what it contains:
bridge-app folder and manifest.yml filemanifest.yml that defines app name, dependencies and other characteristics to deploy the app contents under bridge-app.containersphpinfo and wordpress directories, but there are some other useful examples you can use..bluemix folderadmin folderThe easiest way to deploy the app is through DevOps Services:

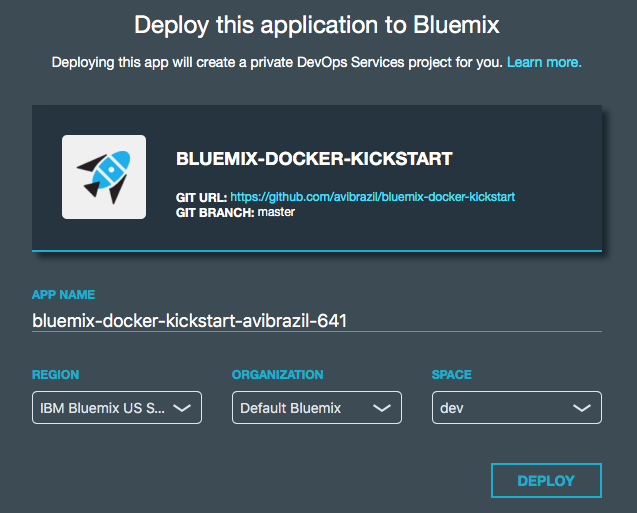
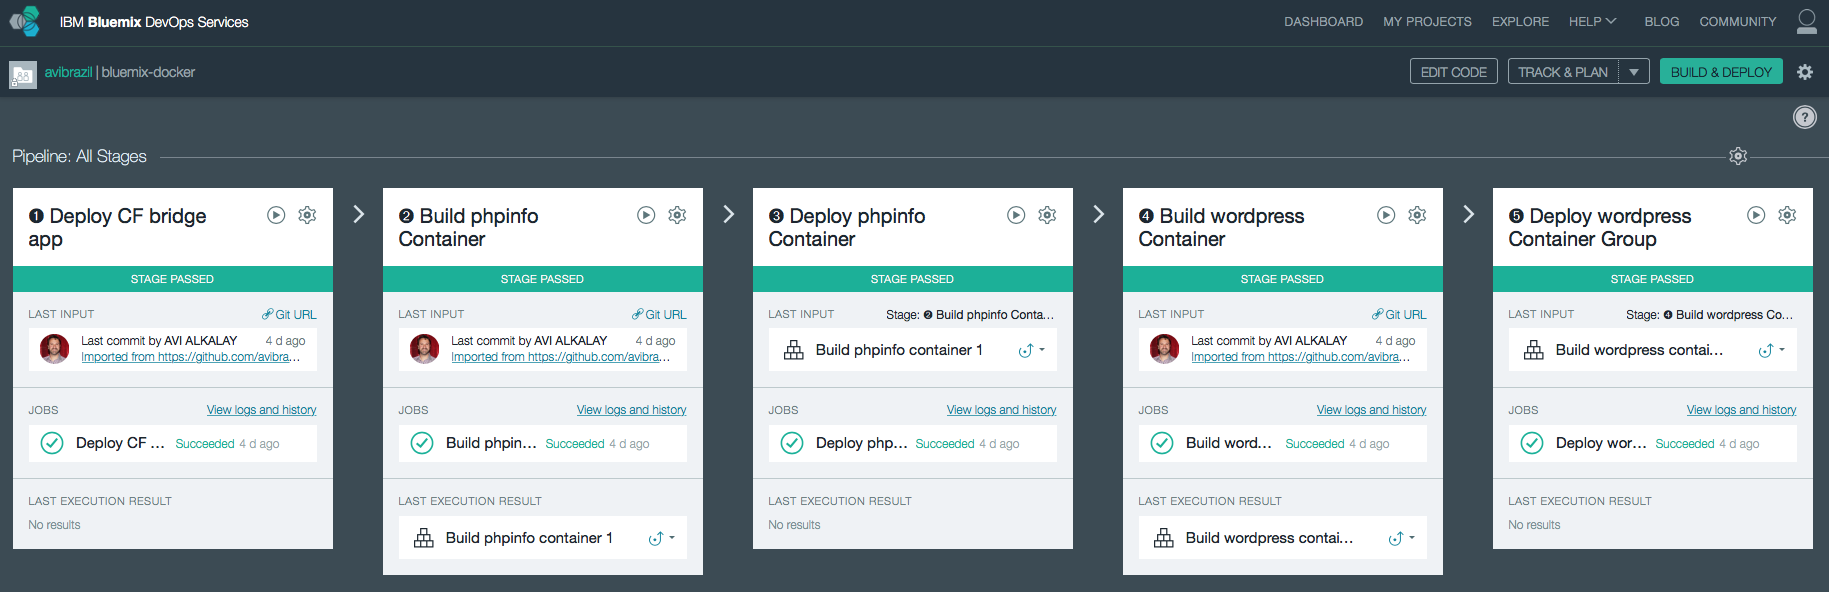
Conceptually, these are the things you need to do to fully deploy an app with Docker on Bluemix:
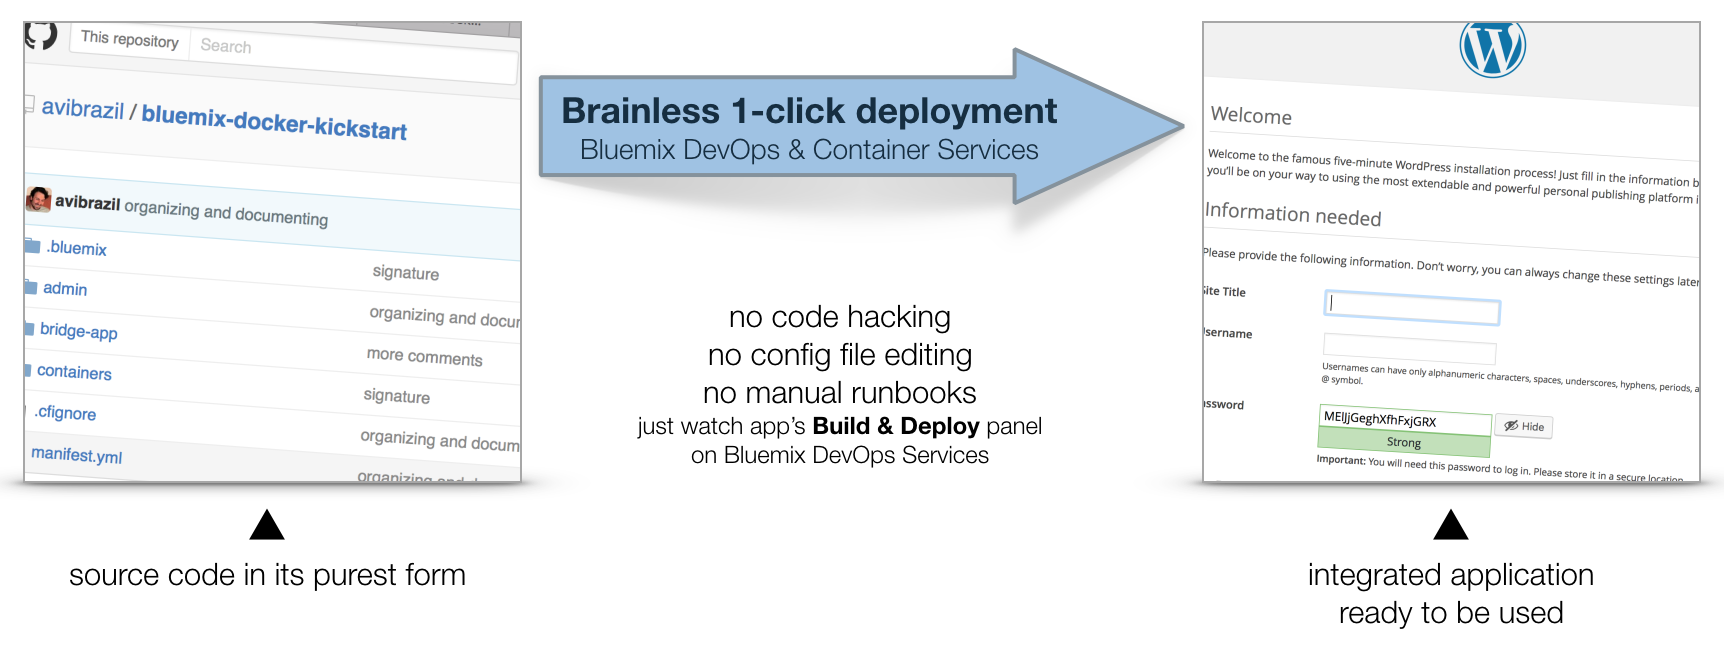
The idea is to encapsulate all these steps in code so deployments can be done entirely unattended. Its what I call brainless 1-click deployment. There are 2 ways to do that:
admin/deploy script in our code..bluemix/pipeline.yml file.From here, we will detail each of these steps both as commands (on the script) and as stages of the pipeline.
I used the cf marketplace command to find the service names and plans available. ClearDB provides MySQL as a service. And just as an example, I’ll provision an additional Object Storage service. Note the similarities between both methods.
cf create-service \
  cleardb \
  spark \
  bridge-app-database;

cf create-service \
  Object-Storage \
  Free \
  bridge-app-object-store;
When you deploy your app to Bluemix, DevOps Services will read your manifest.yml and automatically provision whatever is under the declared-services block. In our case:
declared-services:
  bridge-app-database:
    label: cleardb
    plan: spark
  bridge-app-object-store:
    label: Object-Storage
    plan: Free
The manifest.yml file has all the details about our CF app. Name, size, CF build pack to use, dependencies (as the ones instantiated in previous stage). So a plain cf push will use it and do the job. Since this app is just a bridge between our containers and the services, we’ll use minimum resources and the minimum noop-buildpack. After this stage you’ll be able to see the app running on your Bluemix console.
The heavy lifting here is done by the Dockerfiles. We’ll use base CentOS images with official packages only in an attempt to use best practices. See phpinfo and wordpress Dockerfiles to understand how I improved a basic OS to become what I need.
The cf ic command is basically a clone of the well known docker command, but pre-configured to use Bluemix Docker infrastructure. There is simple documentation to install the IBM Containers plugin to cf.
cf ic build \
   -t phpinfo_image \
   containers/phpinfo/;

cf ic build \
   -t wordpress_image \
   containers/wordpress/;
Stages handling this are “➋ Build phpinfo Container” and “➍ Build wordpress Container”.
Open these stages and note how image names are set.
After this stage, you can query your Bluemix private Docker Registry and see the images there. Like this:
$ cf ic images
REPOSITORY                                          TAG     IMAGE ID      CREATED     SIZE
registry.ng.bluemix.net/avibrazil/phpinfo_image     latest  69d78b3ce0df  3 days ago  104.2 MB
registry.ng.bluemix.net/avibrazil/wordpress_image   latest  a801735fae08  3 days ago  117.2 MB
A Docker image is not yet a container. A Docker container is an image that is being executed.
To make our tutorial richer, we’ll run 2 sets of containers:
cf ic run \
   -P \
   --env 'CCS_BIND_APP=bridge-app-name' \
   --name phpinfo_instance \
   registry.ng.bluemix.net/avibrazil/phpinfo_image;


IP=`cf ic ip request |
    grep "IP address" |
    sed -e "s/.* \"\(.*\)\" .*/\1/"`;


cf ic ip bind $IP phpinfo_instance;
Equivalent stage is “➌ Deploy phpinfo Container”.
Open this stage and note how some environment variables are defined, specially the BIND_TO.
Bluemix DevOps Services default scripts use these environment variables to correctly deploy the containers.
The CCS_BIND_APP on the script and BIND_TO on the pipeline are key here. Their mission is to make the bridge-app’s VCAP_SERVICES available to this container as environment variables.
In CloudFoundry, VCAP_SERVICES is an environment variable containing a JSON document with all credentials needed to actually access the app’s provisioned APIs, middleware and services, such as host names, users and passwords. See an example below.
cf ic group create \
   -P \
   --env 'CCS_BIND_APP=bridge-app-name' \
   --auto \
   --desired 2 \
   --name wordpress_group_instance \
   registry.ng.bluemix.net/avibrazil/wordpress_image


cf ic route map \
   --hostname some-name-wordpress \
   --domain $DOMAIN \
   wordpress_group_instance
The cf ic group create creates a container group and runs them at once.
The cf ic route map command configures Bluemix load balancer to capture traffic to http://some-name-wordpress.mybluemix.net and route it to the wordpress_group_instance container group.
Equivalent stage is “➎ Deploy wordpress Container Group”.
Look in this stage’s Environment Properties how I’m configuring container group.
I had to manually modify the standard deployment script, disabling deploycontainer and enabling deploygroup.
At this point, WordPress (the app that we deployed) is up and running inside a Docker container, and already using the ClearDB MySQL database provided by Bluemix. Access the URL of your wordpress container group and you will see this:
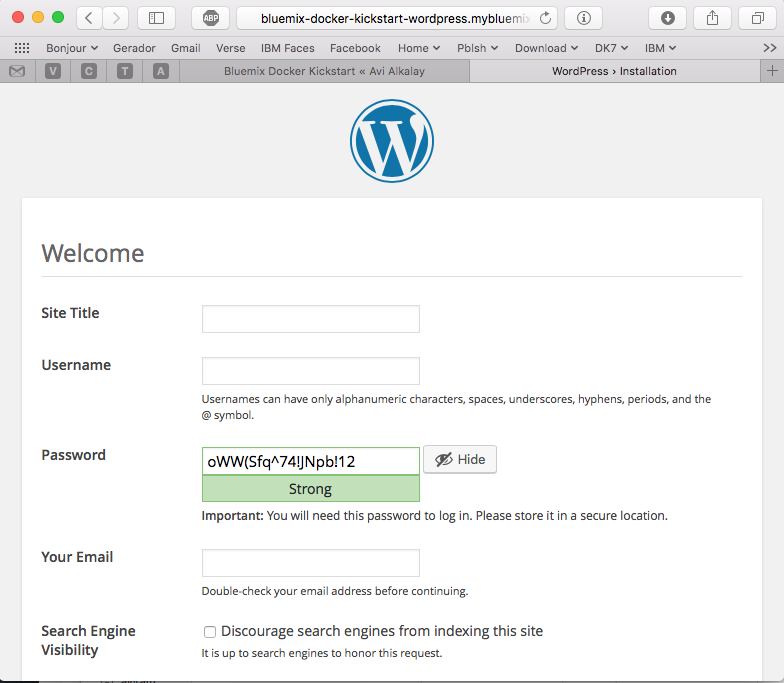
Bluemix dashboard also shows the components running:
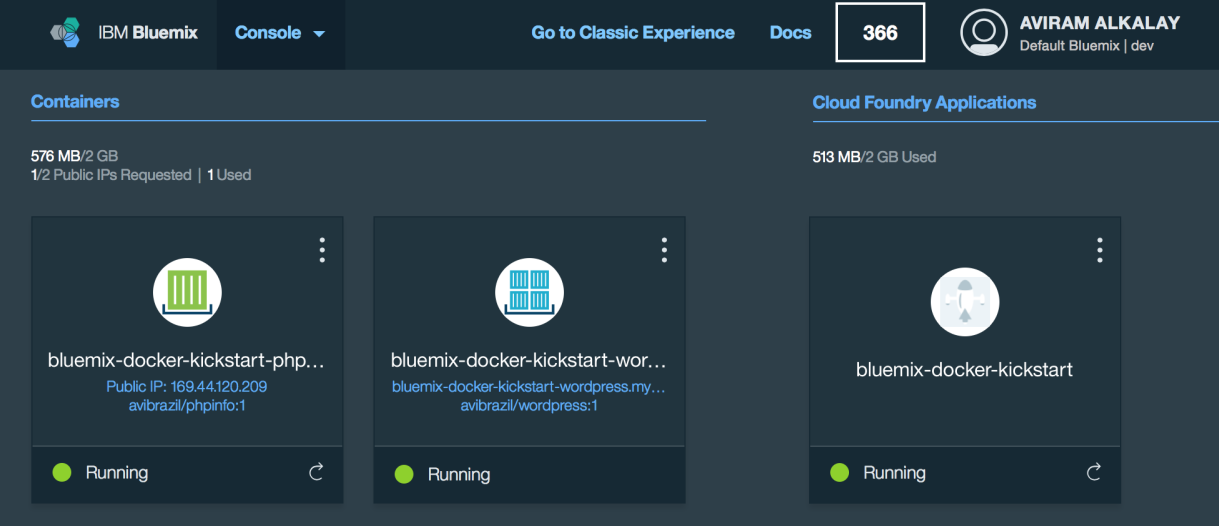
But the most interesting evidence you can see accessing the phpinfo container URL or IP. Scroll to the environment variables section to see all services credentials available as environment variables from VCAP_SERVICES:
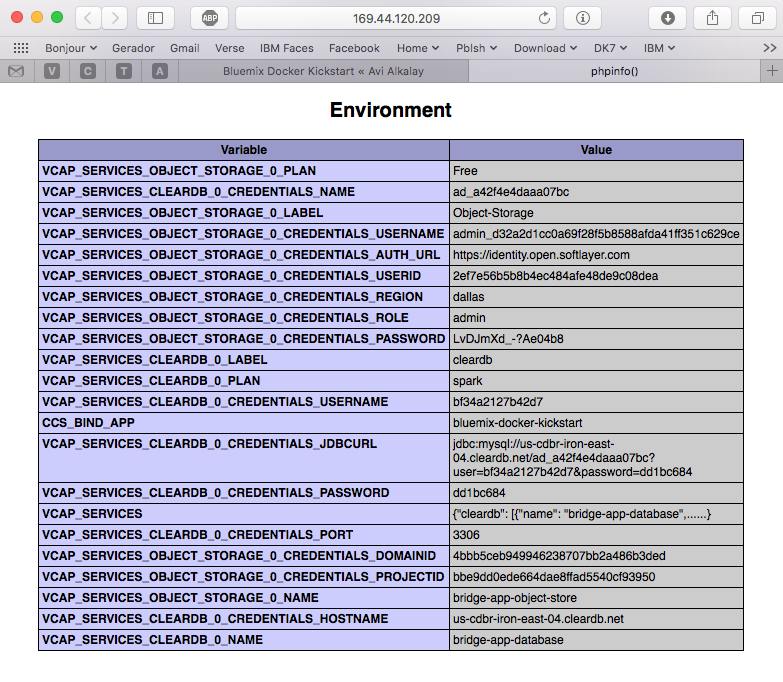
I use these credentials to configure WordPress while building the Dockerfile, so it can find its database when executing:
.
.
.
RUN yum -y install epel-release;\
	yum -y install wordpress patch;\
	yum clean all;\
	sed -i '\
		         s/.localhost./getenv("VCAP_SERVICES_CLEARDB_0_CREDENTIALS_HOSTNAME")/ ; \
		s/.database_name_here./getenv("VCAP_SERVICES_CLEARDB_0_CREDENTIALS_NAME")/     ; \
		     s/.username_here./getenv("VCAP_SERVICES_CLEARDB_0_CREDENTIALS_USERNAME")/ ; \
		     s/.password_here./getenv("VCAP_SERVICES_CLEARDB_0_CREDENTIALS_PASSWORD")/ ; \
	' /etc/wordpress/wp-config.php;\
	cd /etc/httpd/conf.d; patch < /tmp/wordpress.conf.patch;\
	rm /tmp/wordpress.conf.patch
.
.
.
So I’m using sed, the text-editor-as-a-command, to edit WordPress configuration file (/etc/wordpress/wp-config.php) and change some patterns there into appropriate getenv() calls to grab credentials provided by VCAP_SERVICES.
The containers folder in the source code presents one folder per image, each is an example of different Dockerfiles. We use only the wordpress and phpinfo ones here. But I’d like to highlight some best practices.
A Dockerfile is a script that defines how a container image should be built. A container image is very similar to a VM image, the difference is more related to the file formats that they are stored. VMs uses QCOW, VMDK etc while Docker uses layered filesystem images. From the application installation perspective, all the rest is almost the same. But only only Docker and its Dockerfile provides a super easy way to describe how to prepare an image focusing mostly only on your application. The only way to automate this process on the old Virtual Machine universe is through techniques such as Red Hat’s kickstart. This automated OS installation aspect of Dockerfiles might seem obscure or unimportant but is actually the core of what makes viable a modern DevOps culture.
patch command in your Dockerfile, as I did on wordpress Dockerfile.diff -Naur configfile.txt.org configfile.txt > configfile.patch
Then see the wordpress Dockerfile to understand how to apply it.
.zip or .tar.gz) from the Internet. In the wordpress Dockerfile I enabled the official EPEL repository so I can install WordPress with YUM. Same happens on the Django and NGINX Dockerfiles. Also note how I don’t have to worry about installing PHP and MySQL client libraries – they get installed automatically when YUM installs wordpress package, because PHP and MySQL are dependencies.CloudFoundry (the execution environment behind Bluemix) has its own Open Source container technology called Warden. And CloudFoundry’s Dockerfile-equivalent is called Buildpack. Just to illustrate, here is a WordPress buildpack for CloudFoundry and Bluemix.
To chose to go with Docker in some parts of your application means to give up some native integrations and facilities naturally and automatically provided by Bluemix. With Docker you’ll have to control and manage some more things for yourself. So go with Docker, instead of a buildpack, if:
The best balance is to use Bluemix services/APIs/middleware and native buildpacks/runtimes whenever possible, and go with Docker on specific situations. Leveraging the integration that Docker on Bluemix provides.
WordPress is packaged for Fedora and can be installed as a regular RPM (with DNF/YUM). The benefits of this method are that you don’t need to mess around with configuration files, filesystem permissions and since everything is pre-packaged to work together, additional configurations are minimal. At the end of this 3 minutes tutorial, you’ll get a running WordPress under an SSL-enabled Apache using MariaDB as its backend.
All commands need to be executed as root. Read More
 On December 3 Apple has open sourced the Swift programming language on Swift.org. The language was first released (not Open Source yet) about the same time as iOS 8 and was created by Apple to make Mac and iOS app development an easier task. Swift is welcome as one more Open Source language and project but is too early to make a lot of noise about it. Here are my arguments: Read More

Click image for 9000×8250 full resolution. Read More
Com o lançamento de KVM para Power se aproximando no horizonte, tem se falado muito sobre rodar o Microsoft Windows em Power.
Só uma rápida retrospectiva, KVM é a tecnologia do Kernel do Linux que permite rodar máquinas virtuais de forma muito eficiente. E o QEMU é o software que emula diversos aspectos de um computador (portas serias, rede, BIOS/firmware, disco etc). O QEMU existia antes do projeto KVM e possibilita rodar, de forma razoavelmente lenta devido a emulação de todos os aspectos do hardware, outro sistema operacional completo dentro dele.
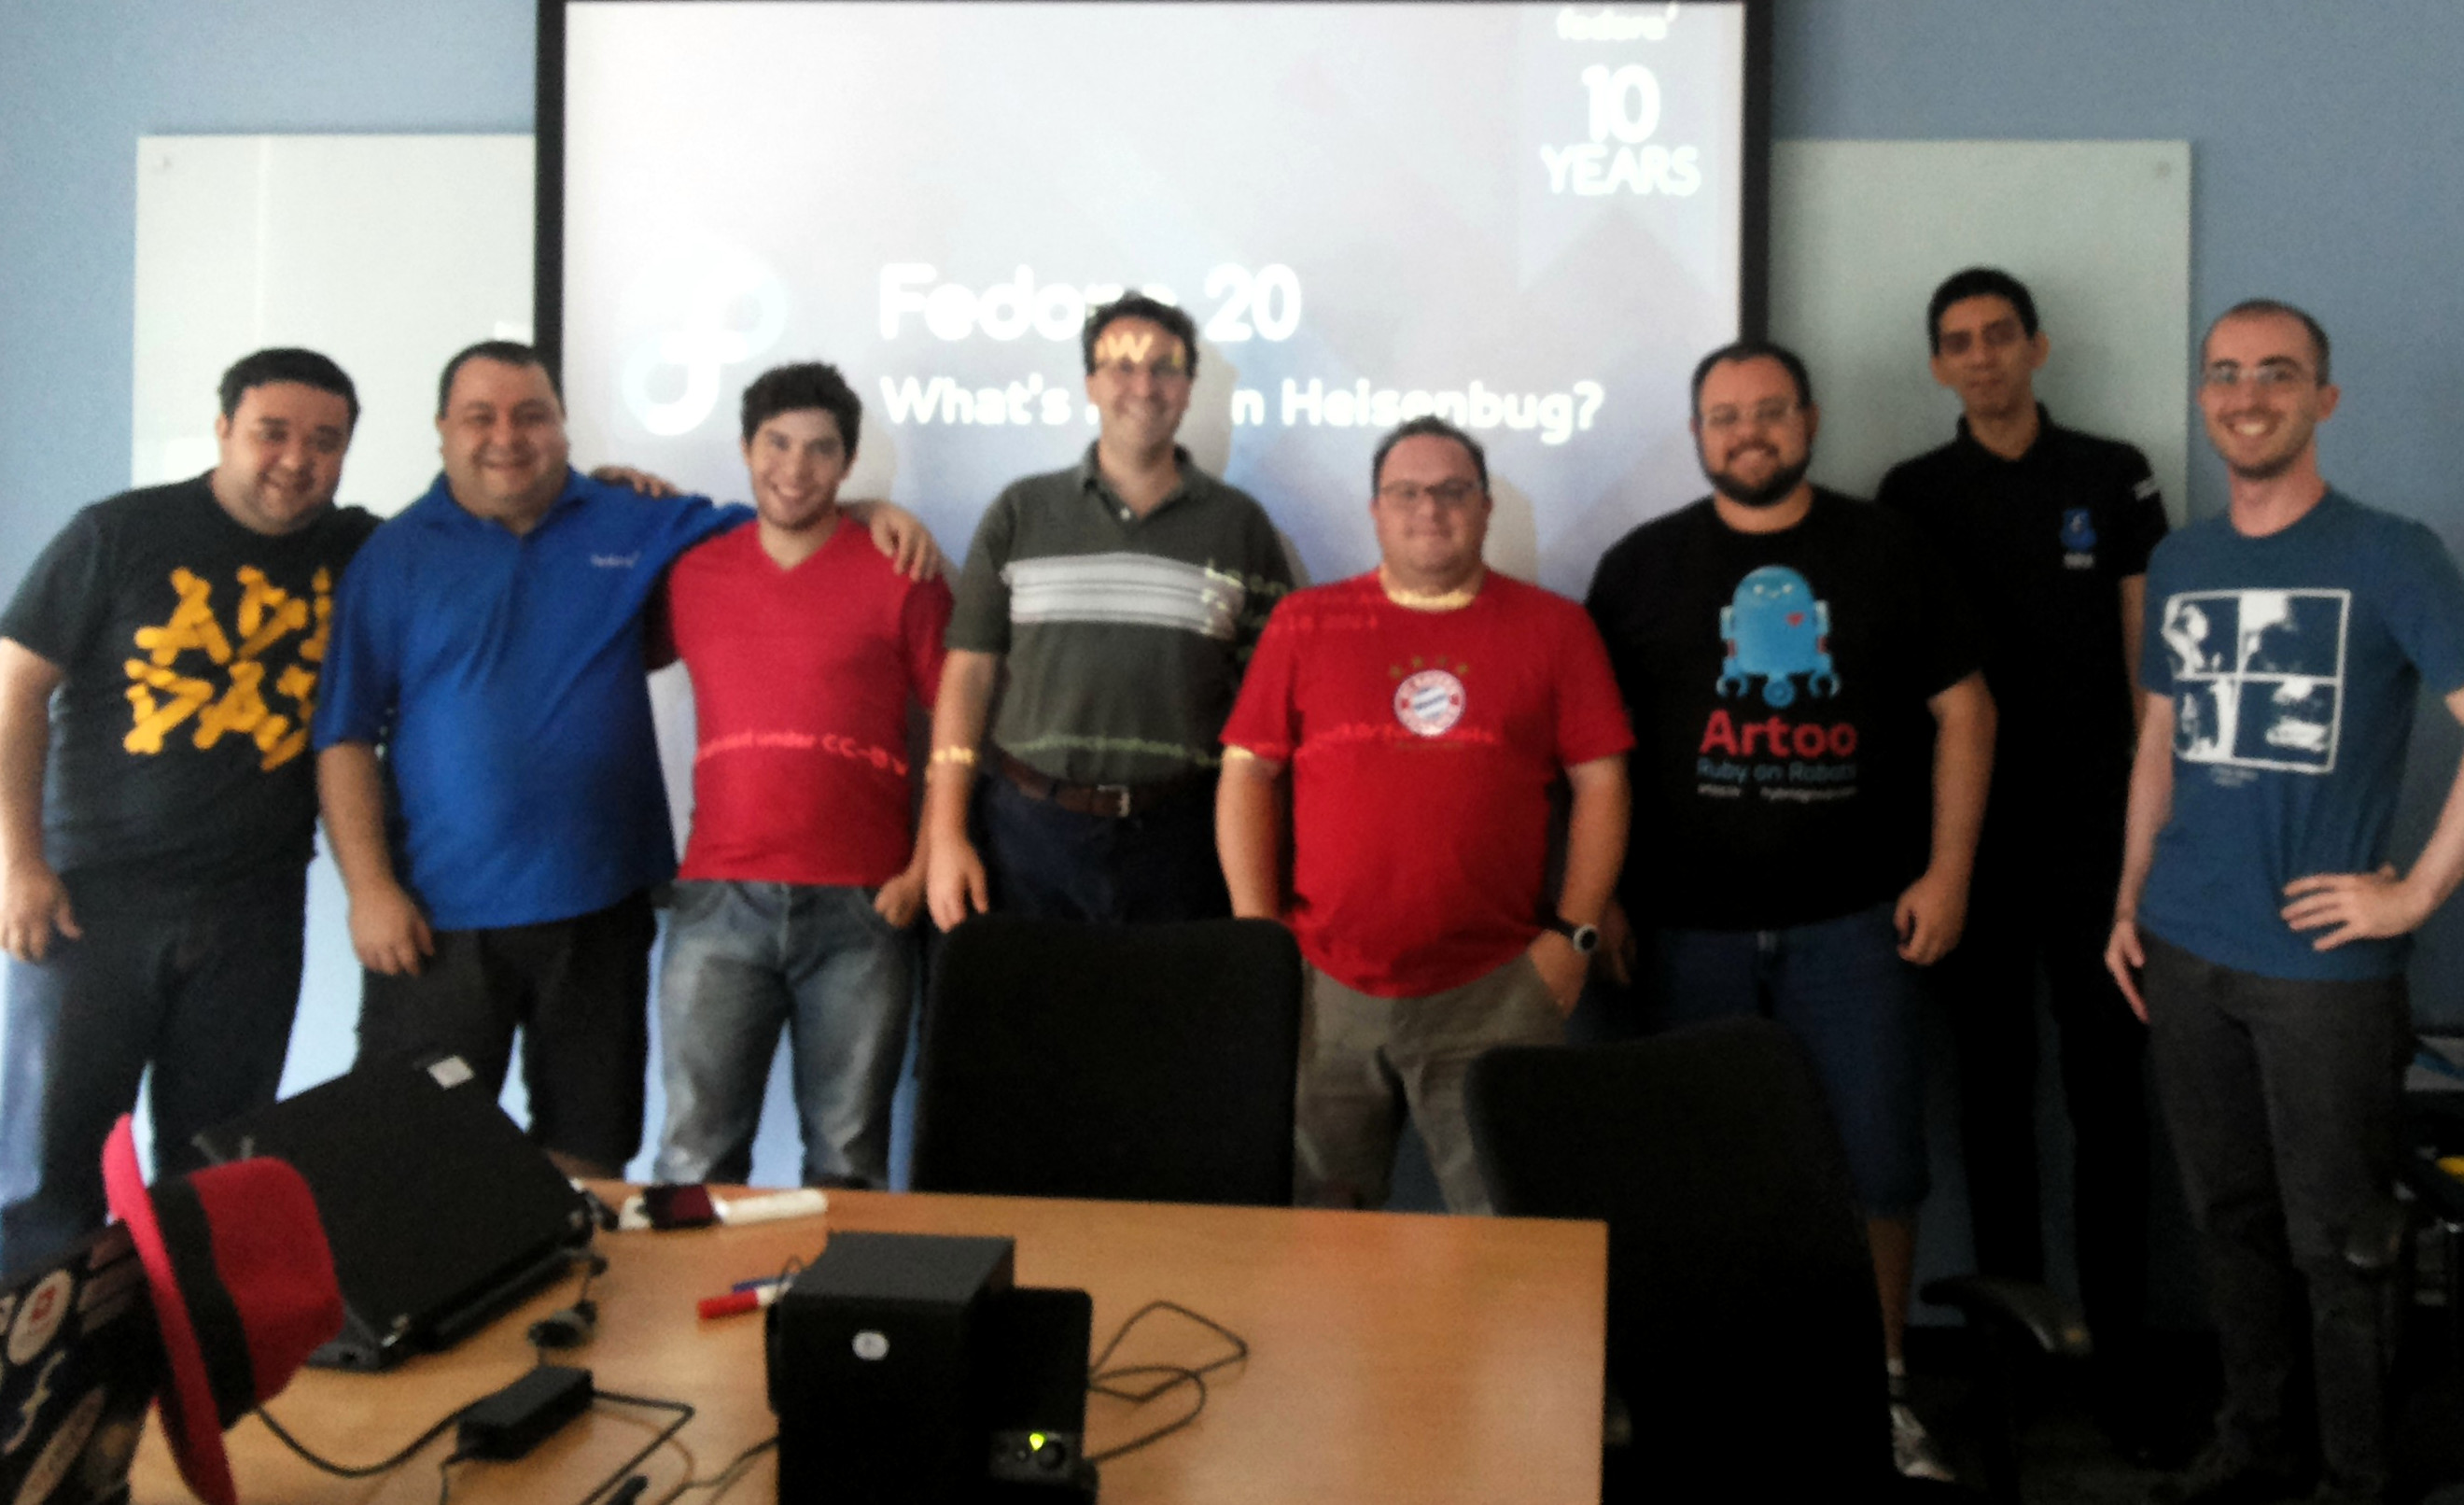
![]() At the Fedora 20 release party another guy stepped up and presented+demonstrated OpenShift, which was the most interesting new feature from Red Hat for me. First of all I had to switch my mindset about cloud from IaaS (infrastructure as a service, where the granularity are virtual machines) to PaaS. I heard the PaaS buzzword before but never took the time to understand what it really means and its implications. Well, I had to do that at that meeting so I can follow the presentation, of course hammering the presenter with questions all the time.
At the Fedora 20 release party another guy stepped up and presented+demonstrated OpenShift, which was the most interesting new feature from Red Hat for me. First of all I had to switch my mindset about cloud from IaaS (infrastructure as a service, where the granularity are virtual machines) to PaaS. I heard the PaaS buzzword before but never took the time to understand what it really means and its implications. Well, I had to do that at that meeting so I can follow the presentation, of course hammering the presenter with questions all the time.
Read More
Few weeks ago I attended the Fedora 20 release party at São Paulo Red Hat offices. It was nice to hang together with other Fedora enthusiasts, get a refresh about newest Fedora features and also share my experiences as (I considere myself) a power user.
 |
 |
Since my Fedora Post-installation Configurations article, some things have changed in Fedora 20. For example, for security and economy reasons, Sendmail does not get installed anymore by default. Here are the steps to make your Linux home computer be able to send system e-mails as alerts or from things that run on cron. All commands should be run as user root. This is certified to work on Fedora 21.
Fedora 20 is the first distribution to bundle NetworkManager with bridging support. It means that the old hacks to make a virtual machine plug into current network are not required anymore. Read More
MySQL é ainda o gerenciador de banco de dados mais popular do mundo em número de instalações. Muito mais usado que Oracle, DB2 ou qualquer outro SGBD comercial. Mas ele está morrendo, está sendo matado pela Oracle numa morte lenta mas não dolorosa.
Espere, isso não é uma má notícia. Read More
Either if you are doing forensics or just want better reports about your call patterns, the iPhone Call History database can be very handfull.
If you have a jailbroken iPhone, you can access the database file directly. If you are not, you can still access it offline simply copying the file from an unencrypted iTunes backup to some other folder on you computer to manipulate it. Here are the real files path inside the iPhone and their counterparts on an iTunes backup folder:
Read More


O site oficial de Linux da IBM Brasil ficava em http://ibm.com/br/linux/ e lá era nosso QG virtual quando o Linux Impact Team existia e eu fazia parte dele. Nosso time foi formado na época para estabelecer a idéia de que Linux, Software Livre, Padrões Abertos etc são coisas boas, desmitificar algumas crenças confusas, ajudar clientes IBM a usar Linux com nossos produtos etc.
Read MoreI spent a few days to figure out how to make a simple conversion of a DBF file into a plain text file as comma separated values (CSV) or tab separated values (TSV) in a batch/command line way. I was almost setting up an OpenOffice.org server because it seamed to be the only packaged solution to read and convert DBFs.
Well, it easier than that. Read More
Folks at the Fedora Project devel list asked us to enable and use SELinux. So I sent this reply:
Read More Finaly Expired: Get Ready to Dramatically Improve Font Readability on Your Linux Desktop")
The TrueType bytecode interpreter patents have expired !!! It means you’ll get much better and nice looking font rendering on your Linux desktop, by default, without the need of hacking or exchanging packages.
Read MoreForget expensive and proprietary MS Access. Forget about applications built on top of complex muiltitab spreadsheets. Drupal with Content Construction Kit, Views and Faceted Search are the right and way better solution for you.
Forget about building Flash-only web sites. Drupal and its modules is a better and semantically correct way for your Web 2.0 site.
Forget about PHP, ASP, JSP development from scratch. Drupal and its modules will put your site running faster with near zero programming.
This is a just a note for people building websites and general applications.
 Dediquei-me nos últimos meses a estudar o Drupal. Fiz isso nas horas vagas (tipo da meia noite às 6 da manhã) e foi uma longa curva de aprendizado.
Para quem não sabe, Drupal é um Sistema de Gerenciamento de Conteúdo (CMS) para a Web. Um fazedor de sites, em outras palavras. Quaisquer sites.
Umas semanas atrás ultrapassei o ponto da arrebentação. Agora é só um mar de calmaria, ou seja, a luta contra o maremoto da falta de conhecimento foi ultrapassado. Minha saga com CMSs começou com o WordPress, quando montei este blog que vos fala. A partir daí aprendi o que é um conteúdo atômico, como gerenciá-lo corretamente, taxonomias, tags, feeds, mashups, blogosfera, e as maravilhas da web semântica.
O WordPress é um CMS otimizado para blogs e por isso ele se dá ao luxo de ser fácil de usar. OK, você pode fazer outros tipos de sites com ele, mas isso exige uma violenta intervenção em seu mecanismo de temas, e ao longo do tempo esse site não-blog se tornará ingerenciável — uma aberração.
Se o WordPress foi feito para fazer blogs, Drupal foi feito para fazer qualquer tipo de site. O custo disso é que os elementos que o constituem são mais abstratos e por consequência mais difíceis de se entender. Além do mais, o Drupal Core por sí só é meio feio, pouco prático e não faz muita coisa.
No processo de aprendizado, é necessário dedicar uma boa lapa de tempo para conhecer seu ecossistema de plugin e extensões. Ultrapassar a arrebentação então constitui em vencer os seguintes passos:
Construi dois sites relativamente complexos, semânticos, com múltiplos tipos de categorias, buscas facetadas, layouts diferenciados, look profissional etc, sem escrever sequer uma linha de código. OK, para não enganar vocês escrevi umas 30 linhas de CSS para embelezar alguns elementos da página. Só. Posso dizer que há algumas dezenas de pessoas encantadas com um deles, rodando na Intranet da minha empresa — IBM— e que ele é tão funcional, simples e interessante que até meu chefe comprou a idéia e está vendendo-o empresa a dentro.
Drupal tem o mérito de juntar duas características importantíssimas que cada uma por sí só já é ultravaliosa:
Há outros CMSs por aí — Plone, Joomla etc —, não os conheço na prática. Mas acho que dificilmente alcançaram a maturidade e a solidez do Drupal. O retorno disso é que Drupal está conquistando algumas referências incríveis como o site da Casa Branca, Sony, MTV, etc.
Anotem esta previsão: Dentro de 2 ou 3 anos, Drupal estará para o mundo dos sites assim como Linux está hoje para o mundo do Sistemas Operacionais — não fará nenhum sentido criar um site sem ele.
Drupal é um dos melhores gerenciadores de conteúdo que existem e é Open Source.
Há quem diga que é porque o governo Obama incentiva Open Source blablabla etc. Mas a verdade é que provavelmente a escolha foi pelo melhor: Drupal. No blog do Tim O’reilly, há também mais detalhes sobre a infraestrutura: Red Hat Linux como SO e MySQL como DB.
Eu uso-o diariamente e posso dizer que é extremamente bem arquitetado e tem uma comunidade vibrante. Posso dizer também que não faz nenhum sentido hoje em dia criar um site do zero sem usar uma ferramenta poderosa e flexivel de gestão de conteúdo como o Drupal.
Bem, a prova que o site da Casa Branca roda sobre Drupal está em seu HTML enviado ao browser.
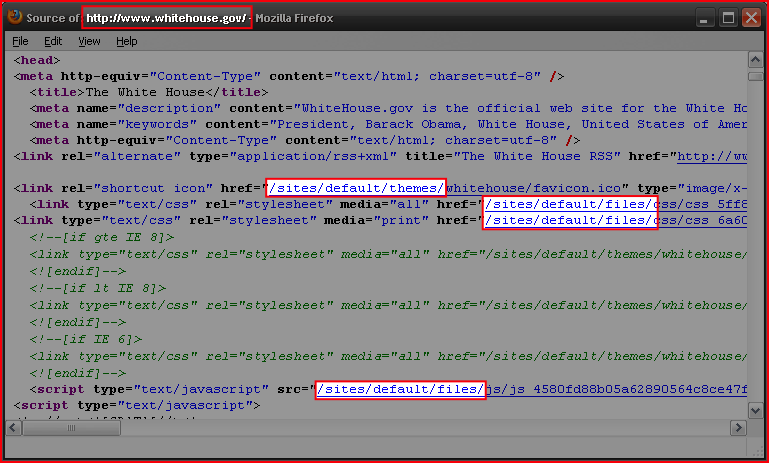
As partes em destaque são típicas URIs do Drupal.
Se Linux reina hoje no universo dos sistemas operacionais de servidor, Drupal reinará também no universo dos sites em 2 ou 3 anos.
This is a set of personal notes and a tutorial for everyone about how to correctly organize and tag MP3 files using the id3 command line tool.
General way to tag MP3 files:
id3 -M -2 [-v] [-t title] [-a artist] [-l album] [-n tracknr] [-y year] [-g genre] [-c comment] file.mp3
Recursively tag with ID3v2 a tree with many directories containing MP3 files, setting artist and genre:
id3 -v -2 -R -a "João Gilberto" -g "Bossa Nova" *mp3
Rewrite the Title tag of each file capitalizing the first letter of each word:
id3 -v -2 -t %+t *mp3
Rename files based on track number and song name (as “02 – Song Name.mp3”) padding a zero to track numbers smaller than 10:
id3 -v -2 -f "%#n - %t.mp3" *mp3
Add a suffix to the current Author tag:
id3 -2 -a "%a e Spokfrevo Orquestra" *mp3
Copy current Author tag to the Composer tag:
id3 -v -2 -wTCOM %a *mp3
Use the “Artist” (TPE1) and “Album Artist” (TPE2) tags in a different way to correctly group songs by album on your MP3 player:
id3 -2 -wTPE2 "Various Artists" Café_Del_Mar_*/*mp3
or, alternatively with the id3v2 program:
id3v2 --TPE2 "Various Artists" Café_Del_Mar_*/*mp3
Scan track number (%n) and song name (%t) from each file name and set them as ID3 respectivelly along with additional artist name and album name:
id3 -2 -a "The Artist Name" -l "The Album Name" -g "The Genre Name" -m "%n - %t.mp3"
The id3 program is available for multiplatforms, including Linux and Windows. You can find RPM packages for Fedora Linux on my site.
É ainda uma pergunta muito recorrente qual a diferença entre SUSE e OpenSUSE, Fedora e Red Hat. Por mais óbvio que seja para várias pessoas.
Quando comparamos distribuições Linux como SUSE com OpenSUSE e Red Hat com Fedora, são estruturalmente idênticas mas tem alguns componentes internos que diferem na versão. Por exemplo, o OpenSUSE tem kernel versão 2.6.y e o SUSE tem 2.6.x, ou seja, tem linhas do tempo um pouco desincronizadas porque o OpenSUSE busca inovações e o SUSE estabilidade e suporte. Mesma coisa para Fedora e Red Hat respectivamente.
O OpenSUSE não tem suporte formal (só pela comunidade) e o SUSE tem via Novell. O Fedora não tem suporte formal (só pela comunidade) e o Red Hat Linux tem via Red Hat.
Para um fabricante de hardware e software, quando houver algum problema com um de seus produtos rodando junto com esses sistemas operacionais, se ao depurar a causa descobre-se que é um problema no SO, só há compromisso da Novell ou Red Hat de corrigir o problema se o cliente estiver usando um SUSE ou Red Hat cujo suporte foi comprado.
Outra vantagem é que o laboratório de tal fabricante de HW ou SW terá mais facilidade em tentar reproduzir o problema com o SUSE ou Red Hat do que com OpenSUSE ou Fedora porque os primeiros são os suportados e o que têm rodando em seus testes.
Para a Novell, usar o SUSE sem comprar seu suporte anual é a mesma coisa que usar o OpenSUSE. Do ponto de vista de correção de falhas o suporte é inexistente. Mesma coisa para a dupla Fedora↔Red Hat, este último menos confuso por terem nomes completamente diferentes.
Para entender melhor a diferença entre as famílias de Linux SUSE e Red Hat e escolher a melhor, veja este artigo.
Since we got a 52″ Samsung LCD TV almost a year ago as a gift from relatives, I knew it was time to attach to it a dedicated computer and have a full digital media experience in the living room. I’ll tell you here my experiences building and running this thing that makes all my guests very impressed and desiring one.
Its easy and cheap to build a Media Center. In fact, the most expensive component is the TV, not the computer. You can do it with whatever operating system you like: Linux, Windows Vista or Mac. I wanted to do it with Linux because I am more fluent with this platform, but I had to use Vista because Linux audio drivers for my computer were not ready at that time. I’ll put bellow all the conceptual components in an modular way so you can understand what is important on each. But usually you will find them together in a single board very well integrated. In fact, unless you know what you are doing, I recommend using integrated components as motherboards that have a good GPU plus audio integrated in a single HDMI output connector.
The physical ingredients to build a Media Center are:

These are the aproximate brazilian prices I pay for the hardware parts
| Description | Part Number | Price US$ |
| Motherboard XFX 8200 GeForce | MI-A78S-8209 | $172.22 |
| AMD Phenom Quadcore 9750 | HD9750WCGHBOXSN | $338.89 |
| Seagate Barracuda 750GB | 9BX156-303 | $205.56 |
| 4GB RAM | $133.33 | |
| HUNTKEY Power supply 14CM EPS12V | LW-6450SG 450W | $94.44 |
| HDMI cable | $16.67 | |
| Nice PC case | $138.89 | |
| Gotec Remote Control 3801 for Media Center | $26.61 | |
| Total | $1,126.61 | |
You may want to have Media Center(s) in several spots of your home playing media from a central network file server located somewhere else.
You should pay attention to not overload your home wireless network. I had bad experiences streaming HD media from one computer to another over WiFi. A single wall in between can dramatically decrease the kilobits per second the wireless signal can carry, to a level that is lower than your movie’s kilobits per second. The result are unwatchable movies while streaming. Big photos will also take longer to load to a point that will affect negatively your ambient slideshow.
To avoid that:

Your Media Center will have several simultaneous purposes. The most visible one is to feed your TV with content, but I also use it as a host to run several virtual machines, a web server, file server and to download things. I use mine 40% as a visible Media Center, 30% as a Media Server (to serve media to other computers) and 30% as a host for other purposes.
Forget about using your Media Center as a regular PC with keyboard and mouse. It is simply not practical and will prevent your wife and kids to use it because you are locking its TV. You can connect to and work with it remotely though, with SSH, VNC, Desktop Sharing, Remote Desktop or whatever technology your platform supports. And this can happen while your folks are watching a movie. I found this way of managing my Media Center very practical and productive.
Linux would be my preferred platform for running a Media Center. It is highly configurable and gives its owner a lot of power. To feed your TV, use MythTV or XBMC. Just make sure that devices as remote control, audio and HDMI interface have drivers and will work on Linux. I had problems with that.
If you are an Apple person, a Mac mini will do the job. It is compact, silent, has a strong enough processor and comes with a nice remote control. If Mac OS is your platform of choice, use FrontRow or XBMC. You will also need a codecs to play all types of media, so download the free Perian codec pack. I don’t know much people that use Mac OS as a Media Center, let me know if you do. You can also use an Apple machine to run Windows.
Windows Vista has a lot of improvements for managing media when compared to Windows XP. The native File Explorer support for MP3 and photo tagging is excelent, uses open standards as ID3v2 (MP3) and EXIF and IPTC (JPEG photo) and Vista Media Center has partial support for browsing you media collection through these tags (album, artist, genre, date picture was taken, IPTC tags etc). Strangelly, Vista Media Center does not support browsing by multiple genres and multiple artists so an album simultaneously tagged with genres “Samba” and “MPB” will appear only when you list by “Samba”, not by “MPB”.
Microsoft locks their desktop operating systems in a way that multiple users can’t use it simultaneously, even if there are multiple users created on the OS. This can be fixed installing a small terminal services-related patch. There is also a post-SP1 version of the hack.
So the modus operandi is to create one user called Media that will automatically login and run the Media Center program at boot, and another one for me to login remotely with Remote Desktop and run stuff simultaneously. The Media user has to be administrator and codec packs and plugin must be installed by him.
To play advanced and HD audio and video, H.264, MKV, MP4, DivX/Xvid, FLAC etc, you will also need a codec pack for Windows. I recommend the K-Lite Codec Pack and I use its Mega edition. Having that, Vista Media Center will play any type of media.
I must tell that Windows alone can’t satisfy all my media management needs. Thats why I run a Linux as a virtual machine on the Media Center to make massive manipulations of MP3, photos, video compression, etc.
Still on Vista Media Center, I use several useful plugins:
Happy entertainment !
Gostaria de saber o termômetro de uso do Debian e do Ubuntu em vossas empresas, escolas e comunidades.
Ubuntu está mais no desktop? Já migrou para os servidores ?
Ubuntu domina o desktop e Debian o servidor ?
Windows no desktop e Linux no servidor? Qual Linux ?
Nem um nem outro ?
Abra seu coração e emita sua opinião !!
It took some time to have my honeypot invaded again in a useful way. They were attacking constantly but were using it only to connect to IRC rooms. Useless for me.
But yesterday a sweet cracker invaded it again and left behind about 240000 non-unique combinations of user+password he was using to invade others.
They were all merged into the Compromised Passwords file, now with 142002 unique combinations of user+password that you must never use.
Enjoy.
 I love to see crackers attacking my computers. I even wrote a Linux Magazine article about a successful invasion (portuguese).
Since recently, I leave a virtual machine with an easy password ready to be attacked, just to see these crackers’ leftovers, their rootkits and what they’ll do once they brake into my system.
Guess what. Once inside, they use my system to attack more or to create DDoS-capable networks ready to put some website down. They are not looking for my files, nor my other passwords. They are actually looking for my compute power and want to preserve their anonymity through the use of my Internet address. Pretty useless lifestyle.
Those crackers will rarely explore some Apache or Samba vulnerability to get inside. Few of them have brains for this difficult task. They manage to get inside a system simply because some user password is very simple. They use port scanners to find your SSH TCP port open and then try thousands of combinations of user+password until they login. Once inside, they install this same scanning tools and user+password databases to attack other computers on the Internet.
I started to collect this user+password databases in an alphabetically sorted file and realease it here so people may check if some password they are choosing is well known by crackers or not.
Some classical combinations you’ll find in the file are:
root changeme
root default
root l1nuxb0x
root passw0rd
root password
oracle oracle123
sapdb sapdb
Remember, you will greatelly avoid having your Linux/Unix/BSD/Mac computer being attacked simply following this rules:
PermitRootLogin no
Pretty obvious, but I keep finding Internt-connected systems with very weak and well known passwords.
Para quem quer ter um exemplo de uma abordagem madura para a adoção de Open Source em uma empresa, é só ver como a Petrobras faz, num artigo no Convergência Digital.
Alguns trechos empolgantes de Jorge Sued, gerente de TIC da Petrobras:
Quando faço palestras sobre Open Source versus Closed Source, enfatizo os seguintes pontos:
A única diferença entre os dois modelos é a ordem em que as coisas acontecem.
Isso também me lembra algo que um colega costuma dizer: “Open Source só é de graça se o seu tempo não vale nada”.
Escrevi extensamente sobre este assunto em vários artigos: Open Source na Prática, Open Source geeks should read this, Quando abrir o código fonte.
Notícias como as do Banco do Brasil migrando seus 40.000 ATMs para Linux será cada vez mais freqüente.
Explico. Uma empresa que precisa manter uma infraestrutura de computadores largamente espalhados, deve ter uma equipe preocupada com os seguintes pontos:
Com excessão do primeiro ítem, todos devem acontecer obrigatoriamente dentro da empresa — ou terceirizado para uma equipe que trabalha de forma tão integrada com a empresa que pode também ser considerada interna.
Para uma equipe que precisa mergulhar tão profundamente na tecnologia de um projeto como esses, adicionar o primeiro ítem em seu conjunto de responsabilidades pode até ser benéfico porque traz mais controle.
Então, em casos como esse, ao invés de sair no mercado em busca de suporte pago ao SO, criar inteligência interna para prover esse suporte é um passo pequeno e fácil de ser absorvido, além de reduzir custos de licenças e suporte anual.
Empresas deste tipo são os grandes varejistas como Casas Bahia, Pão de Açucar, Droga Raia, Lojas Marabraz, etc — todos eles casos de sucesso no uso de Linux em seus Pontos de Venda.
Da perspectiva de TI, grandes bancos não são muito diferentes de varejistas. São idênticos na verdade, em termos de arquiteturas e fluxo da informação.
Banrisul e Bando do Brasil são os pioneiros no Brasil a entrar neste caminho, e anunciam o ingresso dos outros monumentais Itaús e Bradescos e Unibancos neste domínio de ATMs e caixas rodando Linux. Simplesmente porque não faz o menor sentido técnico e financeiro usar qualquer outro sistema operacional.
Juro para vocês, a seguinte notícia apareceu no jornal sensacionalista Hora H hoje. Como não tem permalink, segue o screenshot mesmo.

Só faltou isto para ficar definitivamente provado que usuários de Slackware são assassinos e bebem o sangue de suas vítimas !
Bem, a notícia é verdadeira mas minha afirmação foi brincadeira… Eu, como a maioria dos usuários antigos de Linux, começamos com Slackware e é uma grande distribuição.
Fonte: Rodrigo Missiaggia