Advanced Multimedia on the Linux Command Line

There was a time that Apple macOS was the best platform to handle multimedia (audio, image, video). This might be still true in the GUI space. But Linux presents a much wider range of possibilities when you go to the command line, specially if you want to:

  • Process hundreds or thousands of files at once
  • Same as above, organized in many folders while keeping the folder structure
  • Same as above but with much fine grained options, including lossless processing, pixel perfectness that most GUI tools won’t give you

The Open Source community has produced state of the art command line tools as ffmpeg, exiftool and others, which I use every day to do non-trivial things, along with Shell advanced scripting. Sure, you can get these tools installed on Mac or Windows, and you can even use almost all these recipes on these platforms, but Linux is the native platform for these tools, and easier to get the environment ready.

These are my personal notes and I encourage you to understand each step of the recipes and adapt to your workflows. It is organized in Audio, Video and Image+Photo sections.

I use Fedora Linux and I mention Fedora package names to be installed. You can easily find same packages on your Ubuntu, Debian, Gentoo etc, and use these same recipes.

Audio

Show information (tags, bitrate etc) about a multimedia file

ffprobe file.mp3
ffprobe file.m4v
ffprobe file.mkv

Lossless conversion of all FLAC files into more compatible, but still Open Source, ALAC

ls *flac | while read f; do
	ffmpeg -i "$f" -acodec alac -vn "${f[@]/%flac/m4a}" < /dev/null;
done

Convert all FLAC files into 192kbps MP3

ls *flac | while read f; do
   ffmpeg -i "$f" -qscale:a 2 -vn "${f[@]/%flac/mp3}" < /dev/null;
done

Convert all FLAC files into ~256kbps VBR AAC with Fraunhofer AAC encoder

First, make sure you have Negativo17 build of FFMPEG, so run this as root:

dnf config-manager --add-repo=http://negativo17.org/repos/fedora-multimedia.repo
dnf update ffmpeg

Now encode:

ls *flac | while read f; do
   ffmpeg -i "$f" -vn -c:a libfdk_aac -vbr 5 -movflags +faststart "${f[@]/%flac/m4a}" < /dev/null;
done

Has been said the Fraunhofer AAC library can’t be legally linked to ffmpeg due to license terms violation. In addition, ffmpeg’s default AAC encoder has been improved and is almost as good as Fraunhofer’s, specially for constant bit rate compression. In this case, this is the command:

ls *flac | while read f; do
   ffmpeg -i "$f" -vn -c:a aac -b:a 256k -movflags +faststart "${f[@]/%flac/m4a}" < /dev/null;
done

Same as above but under a complex directory structure

This is one of my favorites, extremely powerful. Very useful when you get a Hi-Fi, complete but useless WMA-Lossless collection and need to convert it losslesslly to something more portable, ALAC in this case. Change the FMT=flac to FMT=wav or FMT=wma (only when it is WMA-Lossless) to match your source files. Don’t forget to tag the generated files.

FMT=flac
# Create identical directory structure under new "alac" folder
find . -type d | while read d; do
   mkdir -p "alac/$d"
done

find . -name "*$FMT" | sort | while read f; do
   ffmpeg -i "$f" -acodec alac -vn "alac/${f[@]/%$FMT/m4a}" < /dev/null;
   mp4tags -E "Deezer lossless files (https://github.com/Ghostfly/deezDL) + 'ffmpeg -acodec alac'" "alac/${f[@]/%$FMT/m4a}";
done

Embed lyrics into M4A files

iPhone and iPod music player can display the file’s embedded lyrics and this is a cool feature. There are several ways to get lyrics into your music files. If you download music from Deezer using SMLoadr, you’ll get files with embedded lyrics. Then, the FLAC to ALAC process above will correctly transport the lyrics to the M4A container. Another method is to use beets music tagger and one of its plugins, though it is very slow for beets to fetch lyrics of entire albums from the Internet.

The third method is manual. Let lyrics.txt be a text file with your lyrics. To tag it into your music.m4a, just do this:

mp4tags -L "$(cat lyrics.txt)" music.m4a

And then check to see the embedded lyrics:

ffprobe music.m4a 2>&1 | less

Convert APE+CUE, FLAC+CUE, WAV+CUE album-on-a-file into a one file per track ALAC or MP3

If some of your friends has the horrible tendency to commit this crime and rip CDs as 1 file for entire CD, there is an automation to fix it. APE is the most difficult and this is what I’ll show. FLAC and WAV are shortcuts of this method.

  1. Make a lossless conversion of the APE file into something more manageable, as WAV:
    ffmpeg -i audio-cd.ape audio-cd.wav
  2. Now the magic: use the metadata on the CUE file to split the single file into separate tracks, renaming them accordingly. You’ll need the shnplit command, available in the shntool package on Fedora (to install: yum install shntool). Additionally, CUE files usually use ISO-8859-1 (Latin1) charset and a conversion to Unicode (UTF-8) is required:
    iconv -f Latin1 -t UTF-8 audio-cd.cue | shnsplit -t "%n · %p ♫ %t" audio-cd.wav
  3. Now you have a series of nicely named WAV files, one per CD track. Lets convert them into lossless ALAC using one of the above recipes:
    ls *wav | while read f; do
       ffmpeg -i "$f" -acodec alac -vn "${f[@]/%wav/m4a}" < /dev/null;
    done

    This will get you lossless ALAC files converted from the intermediary WAV files. You can also convert them into FLAC or MP3 using variations of the above recipes.

Now the files are ready for your tagger.

Video

Add chapters and soft subtitles from SRT file to M4V/MP4 movie

This is a lossless and fast process, chapters and subtitles are added as tags and streams to the file; audio and video streams are not reencoded.

  1. Make sure your SRT file is UTF-8 encoded:
    bash$ file subtitles_file.srt
    subtitles_file.srt: ISO-8859 text, with CRLF line terminators
    

    It is not UTF-8 encoded, it is some ISO-8859 variant, which I need to know to correctly convert it. My example uses a Brazilian Portuguese subtitle file, which I know is ISO-8859-15 (latin1) encoded because most latin scripts use this encoding.

  2. Lets convert it to UTF-8:
    bash$ iconv -f latin1 -t utf8 subtitles_file.srt > subtitles_file_utf8.srt
    bash$ file subtitles_file_utf8.srt
    subtitles_file_utf8.srt: UTF-8 Unicode text, with CRLF line terminators
    
  3. Check chapters file:
    bash$ cat chapters.txt
    CHAPTER01=00:00:00.000
    CHAPTER01NAME=Chapter 1
    CHAPTER02=00:04:31.605
    CHAPTER02NAME=Chapter 2
    CHAPTER03=00:12:52.063
    CHAPTER03NAME=Chapter 3
    …
    
  4. Now we are ready to add them all to the movie along with setting the movie name and embedding a cover image to ensure the movie looks nice on your media player list of content. Note that this process will write the movie file in place, will not create another file, so make a backup of your movie while you are learning:
    MP4Box -ipod \
           -itags 'track=The Movie Name:cover=cover.jpg' \
           -add 'subtitles_file_utf8.srt:lang=por' \
           -chap 'chapters.txt:lang=eng' \
           movie.mp4
    

The MP4Box command is part of GPac.

OpenSubtitles.org has a large collection of subtitles in many languages and you can search its database with the IMDB ID of the movie. And ChapterDB has the same for chapters files.

Add cover image and other metadata to a movie file

Since iTunes can tag and beautify your movie files in Windows and Mac, libmp4v2 can do the same on Linux. Here we’ll use it to add the movie cover image we downloaded from IMDB along with some movie metadata for Woody Allen’s 2011 movie Midnight in Paris:

mp4tags -H 1 -i movie -y 2011 -a "Woody Allen" -s "Midnight in Paris" -m "While on a trip to Paris with his..." "Midnight in Paris.m4v"
mp4art -k -z --add cover.jpg "Midnight in Paris.m4v"

This way the movie file will look good and in the correct place when transferred to your iPod/iPad/iPhone.

Of course, make sure the right package is installed first:

dnf install libmp4v2

File extensions MOV, MP4, M4V, M4A are the same format from the ISO MPEG-4 standard. They have different names just to give a hint to the user about what they carry.

Decrypt and rip a DVD the loss less way

  1. Make sure you have the RPMFusion and the Negativo17 repos configured
  2. Install libdvdcss and vobcopy
    dnf -y install libdvdcss vobcopy
  3. Mount the DVD and rip it, has to be done as root
    mount /dev/sr0 /mnt/dvd;
    cd /target/folder;
    vobcopy -m /mnt/dvd .

You’ll get a directory tree with decrypted VOB and BUP files. You can generate an ISO file from them or, much more practical, use HandBrake to convert the DVD titles into MP4/M4V (more compatible with wide range of devices) or MKV/WEBM files.

Convert 240fps video into 30fps slow motion, the loss-less way

Modern iPhones can record videos at 240 or 120fps so when you’ll watch them at 30fps they’ll look slow-motion. But regular players will play them at 240 or 120fps, hiding the slo-mo effect.

We’ll need to handle audio and video in different ways. The video FPS fix from 240 to 30 is loss less, the audio stretching is lossy.

# make sure you have the right packages installed
dnf install mkvtoolnix sox gpac faac
#!/bin/bash

# Script by Avi Alkalay
# Freely distributable

f="$1"
ofps=30
noext=${f%.*}
ext=${f##*.}

# Get original video frame rate
ifps=`ffprobe -v error -select_streams v:0 -show_entries stream=r_frame_rate -of default=noprint_wrappers=1:nokey=1 "$f" < /dev/null  | sed -e 's|/1||'`
echo

# exit if not high frame rate
[[ "$ifps" -ne 120 ]] && [[ "$ifps" -ne 240 ]] && exit

fpsRate=$((ifps/ofps))
fpsRateInv=`awk "BEGIN {print $ofps/$ifps}"`

# loss less video conversion into 30fps through repackaging into MKV
mkvmerge -d 0 -A -S -T \
	--default-duration 0:${ofps}fps \
	"$f" -o "v$noext.mkv"

# loss less repack from MKV to MP4
ffmpeg -loglevel quiet -i "v$noext.mkv" -vcodec copy "v$noext.mp4"
echo

# extract subtitles, if original movie has it
ffmpeg -loglevel quiet -i "$f" "s$noext.srt"
echo

# resync subtitles using similar method with mkvmerge
mkvmerge --sync "0:0,${fpsRate}" "s$noext.srt" -o "s$noext.mkv"

# get simple synced SRT file
rm "s$noext.srt"
ffmpeg -i "s$noext.mkv" "s$noext.srt"

# remove undesired formating from subtitles
sed -i -e 's|<font size="8"><font face="Helvetica">\(.*\)</font></font>|\1|' "s$noext.srt"

# extract audio to WAV format
ffmpeg -loglevel quiet -i "$f" "$noext.wav"

# make audio longer based on ratio of input and output framerates
sox "$noext.wav" "a$noext.wav" speed $fpsRateInv

# lossy stretched audio conversion back into AAC (M4A) 64kbps (because we know the original audio was mono 64kbps)
faac -q 200 -w -s --artist a "a$noext.wav"

# repack stretched audio and video into original file while removing the original audio and video tracks
cp "$f" "${noext}-slow.${ext}"
MP4Box -ipod -rem 1 -rem 2 -rem 3 -add "v$noext.mp4" -add "a$noext.m4a" -add "s$noext.srt" "${noext}-slow.${ext}"

# remove temporary files 
rm -f "$noext.wav" "a$noext.wav" "v$noext.mkv" "v$noext.mp4" "a$noext.m4a" "s$noext.srt" "s$noext.mkv"

1 Photo + 1 Song = 1 Movie

If the audio is already AAC-encoded (may also be ALAC-encoded), create an MP4/M4V file:

ffmpeg -loop 1 -framerate 0.2 -i photo.jpg -i song.m4a -shortest -c:v libx264 -tune stillimage -vf scale=960:-1 -c:a copy movie.m4v

The above method will create a very efficient 0.2 frames per second (-framerate 0.2) H.264 video from the photo while simply adding the audio losslessly. Such very-low-frames-per-second video may present sync problems with subtitles on some players. In this case simply remove the -framerate 0.2 parameter to get a regular 25fps video with the cost of a bigger file size.

The -vf scale=960:-1 parameter tells FFMPEG to resize the image to 960px width and calculate the proportional height. Remove it in case you want a video with the same resolution of the photo. A 12 megapixels photo file (around 4032×3024) will get you a near 4K video.

If the audio is MP3, create an MKV file:

ffmpeg -loop 1 -framerate 0.2 -i photo.jpg -i song.mp3 -shortest -c:v libx264 -tune stillimage -vf scale=960:-1 -c:a copy movie.mkv

If audio is not AAC/M4A but you still want an M4V file, convert audio to AAC 192kbps:

ffmpeg -loop 1 -framerate 0.2 -i photo.jpg -i song.mp3 -shortest -c:v libx264 -tune stillimage -vf scale=960:-1 -c:a aac -strict experimental -b:a 192k movie.m4v

See more about FFMPEG photo resizing.

There is also a more efficient and completely lossless way to turn a photo into a video with audio, using extended podcast techniques. But thats much more complicated and requires advanced use of GPAC’s MP4Box and NHML. In case you are curious, see the Podcast::chapterize() and Podcast::imagify() methods in my  music-podcaster script. The trick is to create an NHML (XML) file referencing the image(s) and add it as a track to the M4A audio file.

Image and Photo

Move images with no EXIF header to another folder

mkdir noexif;
exiftool -filename -T -if '(not $datetimeoriginal or ($datetimeoriginal eq "0000:00:00 00:00:00"))' *HEIC *JPG *jpg | while read f; do mv "$f" noexif/; done

Set EXIF photo create time based on file create time

Warning: use this only if image files have correct creation time on filesystem and if they don’t have an EXIF header.

exiftool -overwrite_original '-DateTimeOriginal< ${FileModifyDate}' *CR2 *JPG *jpg

Rotate photos based on EXIF’s Orientation flag, plus make them progressive. Lossless

jhead -autorot -cmd "jpegtran -progressive '&i' > '&o'" -ft *jpg

Rename photos to a more meaningful filename

This process will rename silly, sequential, confusing and meaningless photo file names as they come from your camera into a readable, sorteable and useful format. Example:

IMG_1234.JPG2015.07.24-17.21.33 • Max playing with water【iPhone 6s✚】.jpg

Note that new file name has the date and time it was taken, whats in the photo and the camera model that was used.

  1. First keep the original filename, as it came from the camera, in the OriginalFileName tag:
    exiftool -overwrite_original '-OriginalFileName<${filename}' *CR2 *JPG *jpg
  2. Now rename:
    exiftool '-filename<${DateTimeOriginal} 【${Model}】%.c.%e' -d %Y.%m.%d-%H.%M.%S *CR2 *HEIC *JPG *jpg
  3. Remove the ‘0’ index if not necessary:
    \ls *HEIC *JPG *jpg *heic | while read f; do
        nf=`echo "$f" | sed -e 's/0.JPG/.jpg/i; s/0.HEIC/.heic/i'`;
        t=`echo "$f" | sed -e 's/0.JPG/1.jpg/i; s/0.HEIC/1.heic/i'`;
        [[ ! -f "$t" ]] && mv "$f" "$nf";
    done

    Alternative for macOS without SED:

    \ls *HEIC *JPG *jpg *heic | perl -e '
    	while (<>) {
    		chop; $nf=$_; $t=$_;
    		$nf=~s/0.JPG/.jpg/i; $nf=~s/0.HEIC/.heic/i;
    		$t=~s/0.JPG/1.jpg/i; $t=~s/0.HEIC/1.heic/i;
    		rename($_,$nf) if (! -e $t);
    	}'
  4. Optional: make lower case extensions:
    \ls *HEIC *JPG | while read f; do
        nf=`echo "$f" | sed -e 's/JPG/jpg/; s/HEIC/heic/'`;
        mv "$f" "$nf";
    done
  5. Optional: simplify camera name, for example turn “Canon PowerShot G1 X” into “Canon G1X” and make lower case extension at the same time:
    \ls *HEIC *JPG *jpg *heic | while read f; do
        nf=`echo "$f" | sed -e 's/Canon PowerShot G1 X/Canon G1X/;
          s/iPhone 6s Plus/iPhone 6s✚/;
          s/iPhone 7 Plus/iPhone 7✚/;
          s/Canon PowerShot SD990 IS/Canon SD990 IS/;
          s/HEIC/heic/;
          s/JPG/jpg/;'`;
        mv "$f" "$nf";
    done

You’ll get file names as 2015.07.24-17.21.33 【Canon 5D Mark II】.jpg. If you took more then 1 photo in the same second, exiftool will automatically add an index before the extension.

Even more semantic photo file names based on Subject tag

\ls *【*】* | while read f; do
	s=`exiftool -T -Subject "$f"`;
	if [[ " $s" != " -" ]]; then         
		nf=`echo "$f" | sed -e "s/ 【/ • $s 【/; s/\:/∶/g;"`;
		mv "$f" "$nf";
	fi;
done

Copy Subject tag to Title-related tags

exiftool -overwrite_original '-ImageDescription< ${Subject}' '-XPTitle<${Subject}' '-Title<${Subject}' '-Description<${Subject}' '-Caption-Abstract<${Subject}' *jpg

Full rename: a consolidation of some of the previous commands

exiftool '-filename<${DateTimeOriginal} • ${Subject} 【${Model}】%.c.%e' -d %Y.%m.%d-%H.%M.%S *CR2 *JPG *HEIC *jpg *heic

Set photo “Creator” tag based on camera model

  1. First list all cameras that contributed photos to current directory:
    exiftool -T -Model *jpg | sort -u

    Output is the list of camera models on this photos:

    Canon EOS REBEL T5i
    DSC-H100
    iPhone 4
    iPhone 4S
    iPhone 5
    iPhone 6
    iPhone 6s Plus
  2. Now set creator on photo files based on what you know about camera owners:
    CRE="John Doe";    exiftool -overwrite_original -creator="$CRE" -by-line="$CRE" -Artist="$CRE" -if '$Model=~/DSC-H100/'            *.jpg
    CRE="Jane Black";  exiftool -overwrite_original -creator="$CRE" -by-line="$CRE" -Artist="$CRE" -if '$Model=~/Canon EOS REBEL T5i/' *.jpg
    CRE="Mary Doe";    exiftool -overwrite_original -creator="$CRE" -by-line="$CRE" -Artist="$CRE" -if '$Model=~/iPhone 5/'            *.jpg
    CRE="Peter Black"; exiftool -overwrite_original -creator="$CRE" -by-line="$CRE" -Artist="$CRE" -if '$Model=~/iPhone 4S/'           *.jpg
    CRE="Avi Alkalay"; exiftool -overwrite_original -creator="$CRE" -by-line="$CRE" -Artist="$CRE" -if '$Model=~/iPhone 6s Plus/'      *.jpg

Recursively search people in photos

If you geometrically mark people faces and their names in your photos using tools as Picasa, you can easily search for the photos which contain “Suzan” or “Marcelo” this way:

exiftool -fast -r -T -Directory -FileName -RegionName -if '$RegionName=~/Suzan|Marcelo/' .

-Directory, -FileName and -RegionName specify the things you want to see in the output. You can remove -RegionName for a cleaner output.
The -r is to search recursively. This is pretty powerful.

Make photos timezone-aware

Your camera will tag your photos only with local time on CreateDate or DateTimeOriginal tags. There is another set of tags called GPSDateStamp and GPSTimeStamp that must contain the UTC time the photos were taken, but your camera won’t help you here. Hopefully you can derive these values if you know the timezone the photos were taken. Here are two examples, one for photos taken in timezone -02:00 (Brazil daylight savings time) and on timezone +09:00 (Japan):

exiftool -overwrite_original '-gpsdatestamp<${CreateDate}-02:00' '-gpstimestamp<${CreateDate}-02:00' '-TimeZone<-02:00' '-TimeZoneCity<São Paulo' *.jpg
exiftool -overwrite_original '-gpsdatestamp<${CreateDate}+09:00' '-gpstimestamp<${CreateDate}+09:00' '-TimeZone<+09:00' '-TimeZoneCity<Tokio' Japan_Photos_folder

Use exiftool to check results on a modified photo:

exiftool -s -G -time:all -gps:all 2013.10.12-23.45.36-139.jpg
[EXIF]          CreateDate                      : 2013:10:12 23:45:36
[Composite]     GPSDateTime                     : 2013:10:13 01:45:36Z
[EXIF]          GPSDateStamp                    : 2013:10:13
[EXIF]          GPSTimeStamp                    : 01:45:36

This shows that the local time when the photo was taken was 2013:10:12 23:45:36. To use exiftool to set timezone to -02:00 actually means to find the correct UTC time, which can be seen on GPSDateTime as 2013:10:13 01:45:36Z. The difference between these two tags gives us the timezone. So we can read photo time as 2013:10:12 23:45:36-02:00.

Geotag photos based on time and Moves mobile app records

Moves is an amazing app for your smartphone that simply records for yourself (not social and not shared) everywhere you go and all places visited, 24h a day.

  1. Make sure all photos’ CreateDate or DateTimeOriginal tags are correct and precise, achieve this simply by setting correctly the camera clock before taking the pictures.
  2. Login and export your Moves history.
  3. Geotag the photos informing ExifTool the timezone they were taken, -08:00 (Las Vegas) in this example:
    exiftool -overwrite_original -api GeoMaxExtSecs=86400 -geotag ../moves_export/gpx/yearly/storyline/storyline_2015.gpx '-geotime<${CreateDate}-08:00' Folder_with_photos_from_trip_to_Las_Vegas

Some important notes:

  • It is important to put the entire ‘-geotime’ parameter inside simple apostrophe or simple quotation mark (), as I did in the example.
  • The ‘-geotime’ parameter is needed even if image files are timezone-aware (as per previous tutorial).
  • The ‘-api GeoMaxExtSecs=86400’ parameter should not be used unless the photo was taken more than 90 minutes of any detected movement by the GPS.

Concatenate all images together in one big image

  • In 1 column and 8 lines:
    montage -mode concatenate -tile 1x8 *jpg COMPOSED.JPG
  • In 8 columns and 1 line:
    montage -mode concatenate -tile 8x1 *jpg COMPOSED.JPG
  • In a 4×2 matrix:
    montage -mode concatenate -tile 4x2 *jpg COMPOSED.JPG

The montage command is part of the ImageMagick package.

Como será sua próxima TV

Antena ou “conversor” digital é bobagem para quem tem TV a cabo. Só serve pra quem precisa captar sinal digital do ar e por enquanto só serve para a cidade de São Paulo.

Sobre OLED vs LED vs LCD vs Plasma, é o tipo da coisa que você só sente a diferença de imagem na loja, quando vê a mesma imagem passando em tecnologias diferentes. O importante é você não entrar numa tecnologia que deixaram pra trás, tipo Plasma, e entrar no que é bom em termos de custo/benefício hoje. Meu pai comprou uma LG LCD uns meses atrás com fatores de contraste e luminosidade superbons e preço bacana. E lembre-se que 3 minutos depois que o filme começar, deitado no sofazão, comendo pipoca, o que importa é a emoção e não mais a tecnologia. Este é o fator mais importante. Read More

How the iPhone 3GS records videos

Here are some technical details an analysis about the formats used by the Apple iPhone 3GS to record video.

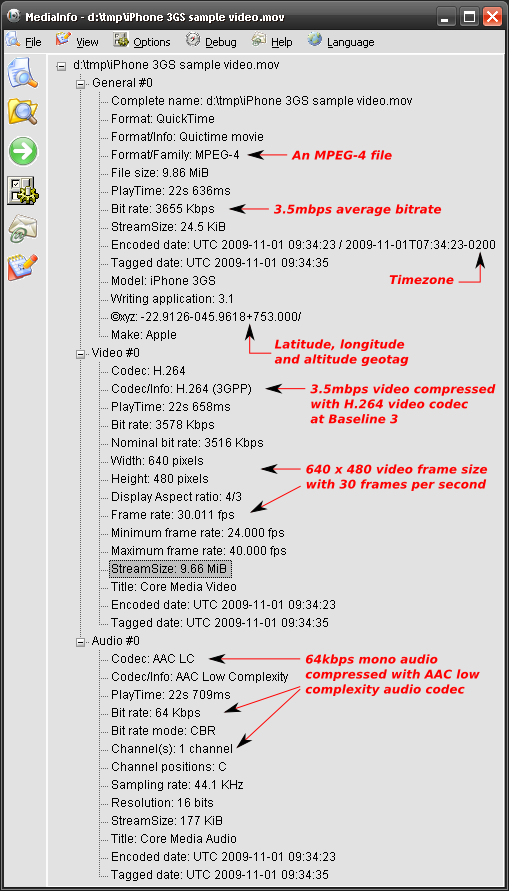
This is an annotated screenshot of the excellent Mediainfo by Jerome Martinez.

Mediainfo screenshot analysing an iPhone recorded video
Some notes:

  1. Apple always uses MOV as the extension for standard MP4 files. The recorded video uses an MP4 container so it is capable of holding modern content and tags. Read on.
  2. Very cool: the iPhone ads geotagging to the video file with latitude, longitude and altitude information.
  3. Video is compressed and encoded with one of the most modern codecs available: H.264. The compression profile used is Baseline at level 3, the one optimized for low power CPUs.
  4. 3.5mbps average bitrate. Quite high but expected for a low power device compressing on demand. Lower bitrates with minimal quality loss can only be achieved by multipass compressions with higher level proviles.
  5. The video is a standard VGA 640×480 pixels per frame, with average of 30 frames per second. This is almost DVD quality.
  6. Audio is compressed and encoded with the MPEG-4’s AAC low complexity codec, the same used by popular M4A audio files. But it is mono, only one channel, no stereo audio.

Having said that, videos generated by the iPhone are ready for streaming over the Internet directly to Flash multimedia players. You may need conversion/recompression/transcoding only if you want to reduce the file size and bit rate. Otherwise, current popular Flash players that you already have installed in your browser are capable of playing these video files.

Here is a more detailed analysis generated by mp4dump utility on Linux, from the mpeg4ip Open Source project.

Organize fast and precisely your MP3 files with ID3v2 tags

This is a set of personal notes and a tutorial for everyone about how to correctly organize and tag MP3 files using the id3 command line tool.

General way to tag MP3 files:

id3 -M -2 [-v] [-t title] [-a artist] [-l album] [-n tracknr] [-y year] [-g genre] [-c comment] file.mp3

Recursively tag with ID3v2 a tree with many directories containing MP3 files, setting artist and genre:

id3 -v -2 -R -a "João Gilberto" -g "Bossa Nova" *mp3

Rewrite the Title tag of each file capitalizing the first letter of each word:

id3 -v -2 -t %+t *mp3

Rename files based on track number and song name (as “02 – Song Name.mp3”) padding a zero to track numbers smaller than 10:

id3 -v -2 -f "%#n - %t.mp3" *mp3

Add a suffix to the current Author tag:

id3 -2 -a "%a e Spokfrevo Orquestra" *mp3

Copy current Author tag to the Composer tag:

id3 -v -2 -wTCOM %a *mp3

Use the “Artist” (TPE1) and “Album Artist” (TPE2) tags in a different way to correctly group songs by album on your MP3 player:

id3 -2 -wTPE2 "Various Artists"  Café_Del_Mar_*/*mp3

or, alternatively with the id3v2 program:

id3v2 --TPE2 "Various Artists" Café_Del_Mar_*/*mp3

Scan track number (%n) and song name (%t) from each file name and set them as ID3 respectivelly along with additional artist name and album name:

id3 -2 -a "The Artist Name" -l "The Album Name" -g "The Genre Name" -m "%n - %t.mp3"

The id3 program is available for multiplatforms, including Linux and Windows. You can find RPM packages for Fedora Linux on my site.

A Media Center at Home

Since we got a 52″ Samsung LCD TV almost a year ago as a gift from relatives, I knew it was time to attach to it a dedicated computer and have a full digital media experience in the living room. I’ll tell you here my experiences building and running this thing that makes all my guests very impressed and desiring one.

Things you can do with a Media Center

  1. Play all your digital music (MP3, M4A, FLAC etc) as albums, custom play lists or randomly.
  2. Browse all your digital music semantically, by Genre or Artist or Song Name or Album. This is very practical and much faster than searching for a CD on your shelf.
  3. Tune hundreds of Internet radios that play all kinds of specific music as New Age, 80’s, 70’s, Classical, Flamenco, etc.
  4. Watch movies downloaded from the Internet in Full HD quality (1080p) or almost (720p) with or without subtitles. Who needs Blu-ray ?
  5. Play last trip photos as a slideshow in a 52″ TV. Who needs to develop photos in paper anymore? You can also play in the background music from your MP3 collection while watching the slideshow.
  6. Browse photos by trip, year and people that appear on them (if you tag them).
  7. Watch in a 52″ TV the clips from your last trip.
  8. Download a collection of 80’s music clips, invite your friends and make a very funny multimedia 80’s party.
  9. Watch YouTube videos in a 52″ TV.
  10. Browse Google Maps in 52″ TV.
  11. Control all the above using a nice handy $20 remote control.
  12. Let your iPhone/iPod browse, access and play all your music as it is loaded on your iPhone, through UPnP and PlugPlayer.

How to build a Media Center

Its easy and cheap to build a Media Center. In fact, the most expensive component is the TV, not the computer. You can do it with whatever operating system you like: Linux, Windows Vista or Mac. I wanted to do it with Linux because I am more fluent with this platform, but I had to use Vista because Linux audio drivers for my computer were not ready at that time. I’ll put bellow all the conceptual components in an modular way so you can understand what is important on each. But usually you will find them together in a single board very well integrated. In fact, unless you know what you are doing, I recommend using integrated components as motherboards that have a good GPU plus audio integrated in a single HDMI output connector.

The physical ingredients to build a Media Center are:

  1. An LCD TV. Looks like Plasma is an obsolete technology but I’m not the right person to ask about that. An LCD or Plasma TV is a plain big computer monitor, there is no big differences when compared to the computer monitor you are using right now to read this. Make sure the TV you buy has HDMI input connector, is Full HD (that is, its physical resolution goes up 1920×1080 (a.k.a. 1080p) or more) or at least is Full HD Ready (its maximum physical resolutions is less than 1920×1080 but can handle 1920×1080 signals with distortion), has a VGA input connector and a stereo audio input connector.
  2. A regular dedicated computer with at least a dual core CPU and 2GB RAM. This will be connected to the TV and forget about using it as a regular desktop. Intel or AMD will do here. If you will play only those low-quality, old, 700MB DivX/Xvid files, a generation before dual core (as AMD Turion) will do, but if you are going to enter the HD world with H.264 (a.k.a x264), MP4, MKV, you’ll need at least 2 cores. About the 2GB RAM, this is a guess and you may play well with a bit less too, but never tested. My system is a Quadcore AMD Phenom, 4GB RAM (because I use it for other purposes too) into a XFX 8200 HDMI-enabled motherborad (this board has unsolved issues with audio over HDMI and high power CPUs, thus I would recommend you look for another brand or model).
  3. A video card/chip that can go up to 1920×1080 resolution with DVI or HDMI output connector. People keep saying that you need NVidia and this is a lie, let me explain. NVidia or ATI GPUs (graphical processing units) have capabilities and hardware accelerators used by advanced 3D games, not by video players. So unless you are going to use this PC also as an advanced playing station, any GPU (a.k.a. graphic card/chip) will do the job, including those very popular Intel GPUs found on board in laptops. Just make sure to configure your BIOS and set video RAM to the maximum, otherwise you will have video delay problems playing Full HD (1080p) videos. If the video card only has VGA output, thats fine too but be aware that you’ll need extra cables for audio. Read next item to understand.
  4. An audio card that outputs 7, 8 or 13 channels of sound. Stereo (2 channels) is old school. Today’s any regular DVD has 5.1 (6 channels) surround audio (2 front, 2 rear, 1 center and 1 sub-woofer) and you want to take advantage of that. This is today very common and easy to find in stores, just make sure this component is integrated with the video component above and both use one single HDMI output connector.
  5. Remote Control. Your folks will call you a complete geek if they’ll see you browsing photos and music with a keyboard and mouse. Out of fashion. I bought a simple but effective infrared remote control that has a receiver that plugs into the USB for about $20. It has specific buttons for Pictures, Video, Music and works well with Vista Media Center.
  6. Lots of storage. If you are going to collect HD movies, rip DVDs, store photos and rip all your CDs, start with at least 1TB hard drive. Also make sure you have internal space in your computer to receive additional hard drives because you will run out of space sooner or latter. Another option is to have a motherboard with external SATA connectors (similar to USB connectors) and connect external SATA hard drives for increased speed and flexibility. An example of such an external SATA storage is Sagate’s FreeAgent XTreame.
  7. A silent power supply. Nobody thinks about that but I believe this is very important. Since this PC will stay in your living room or some place for multimedia contemplation, you don’t want to be disturbed by the computer’s fan noise while listening to your collection of zen Ambient music. Spend a few dollars more and make sure your power supply is quiet. I am a happy and zen user of a 450W Huntkey power supply.
  8. HDMI cable. This is the single cable you should use to connect the Media Center PC to your TV. This single cable should carry Full HD video and 13 channels audio, it should costs $20 and is a clean and modern solution.


Good network layout for a home Media Center

These are the aproximate brazilian prices I pay for the hardware parts

Description Part Number Price US$
Motherboard XFX 8200 GeForce MI-A78S-8209 $172.22
AMD Phenom Quadcore 9750 HD9750WCGHBOXSN $338.89
Seagate Barracuda 750GB 9BX156-303 $205.56
4GB RAM $133.33
HUNTKEY Power supply 14CM EPS12V LW-6450SG 450W $94.44
HDMI cable $16.67
Nice PC case $138.89
Gotec Remote Control 3801 for Media Center $26.61
Total $1,126.61

Home Networking

You may want to have Media Center(s) in several spots of your home playing media from a central network file server located somewhere else.

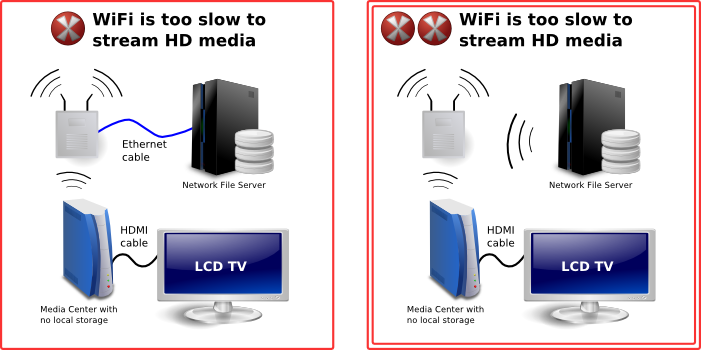
You should pay attention to not overload your home wireless network. I had bad experiences streaming HD media from one computer to another over WiFi. A single wall in between can dramatically decrease the kilobits per second the wireless signal can carry, to a level that is lower than your movie’s kilobits per second. The result are unwatchable movies while streaming. Big photos will also take longer to load to a point that will affect negatively your ambient slideshow.

To avoid that:

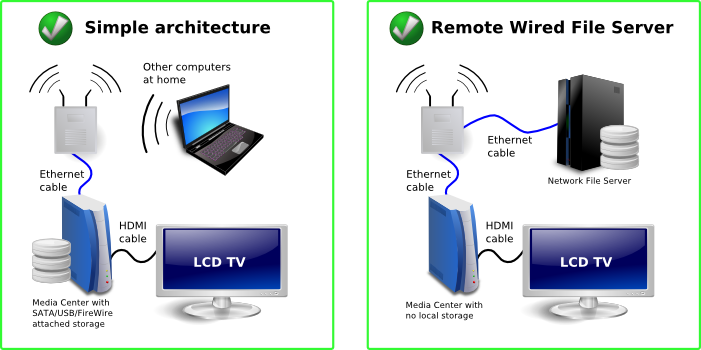
  1. Have your files physically connected to your Media Center. This can be a plain internal disk (this is my choice) or an external SATA or FireWire or USB attached disk. Remember that USB is much slower (even than FireWire) and file transfers (as copying lots of movies to/from a frined) will take longer time.
  2. Have a separate file server but connect it to your Media Center over a wired network.

Bad network layout for a home Media Center

Software Requirements

Your Media Center will have several simultaneous purposes. The most visible one is to feed your TV with content, but I also use it as a host to run several virtual machines, a web server, file server and to download things. I use mine 40% as a visible Media Center, 30% as a Media Server (to serve media to other computers) and 30% as a host for other purposes.

Forget about using your Media Center as a regular PC with keyboard and mouse. It is simply not practical and will prevent your wife and kids to use it because you are locking its TV. You can connect to and work with it remotely though, with SSH, VNC, Desktop Sharing, Remote Desktop or whatever technology your platform supports. And this can happen while your folks are watching a movie. I found this way of managing my Media Center very practical and productive.

  • Linux-based Media Center

    Linux would be my preferred platform for running a Media Center. It is highly configurable and gives its owner a lot of power. To feed your TV, use MythTV or XBMC. Just make sure that devices as remote control, audio and HDMI interface have drivers and will work on Linux. I had problems with that.

  • Mac OS-based Media Center

    If you are an Apple person, a Mac mini will do the job. It is compact, silent, has a strong enough processor and comes with a nice remote control. If Mac OS is your platform of choice, use FrontRow or XBMC. You will also need a codecs to play all types of media, so download the free Perian codec pack. I don’t know much people that use Mac OS as a Media Center, let me know if you do. You can also use an Apple machine to run Windows.

  • Windows Vista-based Media Center

    Windows Vista has a lot of improvements for managing media when compared to Windows XP. The native File Explorer support for MP3 and photo tagging is excelent, uses open standards as ID3v2 (MP3) and EXIF and IPTC (JPEG photo) and Vista Media Center has partial support for browsing you media collection through these tags (album, artist, genre, date picture was taken, IPTC tags etc). Strangelly, Vista Media Center does not support browsing by multiple genres and multiple artists so an album simultaneously tagged with genres “Samba” and “MPB” will appear only when you list by “Samba”, not by “MPB”.

    Microsoft locks their desktop operating systems in a way that multiple users can’t use it simultaneously, even if there are multiple users created on the OS. This can be fixed installing a small terminal services-related patch. There is also a post-SP1 version of the hack.

    So the modus operandi is to create one user called Media that will automatically login and run the Media Center program at boot, and another one for me to login remotely with Remote Desktop and run stuff simultaneously. The Media user has to be administrator and codec packs and plugin must be installed by him.

    To play advanced and HD audio and video, H.264, MKV, MP4, DivX/Xvid, FLAC etc, you will also need a codec pack for Windows. I recommend the K-Lite Codec Pack and I use its Mega edition. Having that, Vista Media Center will play any type of media.

    I must tell that Windows alone can’t satisfy all my media management needs. Thats why I run a Linux as a virtual machine on the Media Center to make massive manipulations of MP3, photos, video compression, etc.

Still on Vista Media Center, I use several useful plugins:

  • Media Control. Improves usability of the remote control and lets you set subtitle and audio languages, enables fast forwarding etc while playing video.
  • Google Maps for Windows Media Center. Turns my 52″ TV into an interactive map that I can control with my remote control. I don’t know how life was before this.
  • Yougle. Lets you access Internet media from Vista Media Center. In other words, lets you browse and watch YouTube videos, Flickr photos, Internet radios etc.

Happy entertainment !

First Views of Our Baby

This is the 12 weeks plus 4 days ultrasound result of our baby.

We don’t know yet if its a boy or a girl. Stay tuned, it will be revealed in the next one.

He is growing fast and we are looking forward for his arrival in february.

[flashvideo filename=http://avi.alkalay.net/articlefiles/2008/08/2008-08-15-Ultrasound_Parts-H264_672x464_650kbps-AAC_64kbps.mp4 overstretch=none width=672 height=487 showstop=true autostart=true volume=100 /]

If you can’t see the video above, please update your Flash Player here. It is a DVD-quality MP4 video compressed by x264.

Como Receber Conteúdo de Agências de Publicidade

Agências de Publicidade ou de Marketing são 100% digitais hoje em dia. Geram conteúdo digital em forma de videos, animações, documentos, imagens etc. Às vezes preciso interagir com essas agências e é importante que todo seu potencial criativo esteja materializado em formatos abertos para que seus clientes (nós) tenham máxima flexibilidade ao usar seus serviços.

Este é um guia que envio para Agências de Publicidade, a fim de entregarem produtos em bons formatos. Cor verde indica os bons formatos, e vermelho os banidos.

Fomatos para Audio, Video e Filmes

  • Arquivos no formato MKV (Matroska) ou MP4 (MOV, M4V) com faixa de vídeo em formato H.264 ou MPEG-4 AVC. A faixa de áudio do arquivo deve estar no formato AAC ou MP3. O video deve ter a resolução original da câmera que foi usada na gravação e não deve ser reduzido para resolução de DVD.
  • No caso de legendas, que estejam em trilhas independentes nos arquivos MKV ou MP4. Ou como arquivos SRT separados. Nunca sobrescritos no video.
  • No caso de filmes a serem embutidos em Flash Players, favor usar arquivos MP4 otimizados para streaming, contendo video comprimido em H.264 e AAC para audio. O formato FLV é proprietário, ineficiente e considerado obsoleto hoje em dia.
  • Formatos proprietarios como WMA, WMV, ASF, AVI não serão aceitos por permitirem pouca flexibilidade.
  • Formatos como MPEG (.mpg) são considerados obsoletos em favor do conjunto MPEG-4.
  • Não é necessário nem desejável transformar o video em DVD, por ser um formato pouco prático, menos bom e obsoleto. Mas o DVD pode ser usado para gravar o arquivo MP4 ou MKV (sem conversão) para entregá-lo ao cliente.

Imagens e Arte Gráfica Estática

  • PNG para arte gráfica e imagens geradas por computador. Por favor observem e respeitem transparências e alpha channels das imagens.
  • JPEG somente para fotografias, nunca para arte gráfica e gerada por computador.
  • XML-SVG para graficos vetoriais. Pode ser editado em ferramentas como Adobe Illustrator e Inkscape, e visualizado no próprio Firefox.
  • Ainda para arte vetorial, formatos como OpenDocument (do OpenOffice.org) e PowerPoint também são aceitos.
  • TIF e GIF são considerados ineficientes e obsoletos após a invenção do PNG.
  • AI e CDR são formatos proprietários e não podemos visualizá-los. Exporte para SVG.
  • PSD e EPS são pouco práticos no dia a dia mas gostariamos de recebê-los como referência.

Animações Flash

  • Páginas web em geral não devem conter Flash. Use DHTML com JavaScript.
  • Arquivos Flash para sinalização digital (digital signage) devem estar no formato SWF, nunca EXE.
  • Antes de enviar o arquivo SWF, por favor teste no Firefox, não somente no Internet Explorer.
  • Se o contrato permitir, a Agência deve entregar também o arquivo fonte do SWF.
  • No caso de filmes a serem embutidos em Flash Players, favor usar arquivos MP4 otimizados para streaming, contendo video comprimido em H.264 e AAC para audio. O formato FLV é proprietário, ineficiente e considerado obsoleto hoje em dia.
  • Animações Silverlight não são suportadas nem aceitas.

Páginas e Aplicações Web

  • HTML e JavaScript devem ser testados e rodar bem no Firefox, Safari e Internet Explorer.
  • Páginas web não devem ter conteúdo Flash, somente em casos especiais.
  • Aplicações web de servidor devem ser feitas em Java, PHP ou Python. Nunca ASP, .NET ou ColdFusion.

A Test with High Definition Video Conferencing

I just participated in very successful proof of technology with Siemens OpenScape video conferencing products.

We made a point-to-point SIP high definition video conference over a local area network. Another test used H.323 protocol. We also included my SIP-enabled Nokia E61i in the conference over the office WiFi network in a direct multipoint call simply calling my phone’s IP address. Crystal clear sound.

The equipment statistics showed the following:
Video

  • 1280×720 resolution (720p HD) at 30 frames per second
  • H.264 compression
  • aprox. 1780 kilobits per second for the compressed video stream

Audio

  • AAC-LC compression
  • aprox. 70 kilobits per second for the compressed audio stream

Total of aprox. 1850 kbps for excellent and smooth audio and video quality.

How to Make High Quality DVD Rips

Some friends asked so the following is how I encode (rip) DVDs.

Choosing the file format: .AVI, .OGG, .MP4 or .MKV ?

The ripped video file format is a decision you must make. Currently my format of choice is .MKV or Matroska. I’ll explain why.

It is quite silly to say that an .MP4 movie has better quality than a .AVI or vice-verse (or any other combination of comparisons). OGG, MP4 (MPEG-4 Part 14), MKV (Matroska), AVI, WMV (or ASF) are just containers, envelopes. Video quality depends on what goes inside it.

“Multimedia” has this name because you have multiple types of media: video in multiple angles, multiple audio options including different languages and channels (stereo, 5.1, 6 channels etc), subtitles in several languages, chapter information, menu etc. Think about a DVD. So this is a graphical view of how things are organized inside a 900MB movie file in a modern format as MKV or MP4:

Header with tags, track names, chapters info, seek positions Main Video track (MPEG-4 AVC/H.264) Attachments as JPG images, documents, scripts or text files
Video segment showing another angle (MPEG-4 ASP/Xvid/DivX)
Audio track: English Dolby Surround 5.1 (AC3)
Audio track: Director’s comments stereo (MP3)
Audio track: Portuguese Dolby Surround 5.1 (DTS)
Subtitle track: Portuguese (Unicode text)
Subtitle track: Chinese (Unicode text)
Subtitle track: English (VobSub)
byte 100K byte 100M byte 200M byte 310M byte 420M byte 530M byte 650M byte 780M byte 895M byte 900M

A digital multimedia file format must be capable to contain all this different medias and multiplex them in parallel so you won’t have the video in the first 500MB of the file and the audio on the following 500MB (this can’t work for streaming). And this is exactly what modern file formats as MP4 and MKV do: they carry all your movie-related data together.

This is a comparison of all these file formats based on my personal experience with them (a more formal comparison can be found in Wikipedia):

.MKV .MP4 .AVI
Industry support Almost none Good and increasing, specially on Apple platforms, the mobile scene and Nero Digital ecosystem Treated as legacy popular format
Usage on the web Very popular on HD or high quality DVD rips Very popular on HD or high quality DVD rips, supported by Flash Player, YouTube, Google Video Popular amongst low-quality DVD rips
Support for advanced video formats and multiple video angles Yes. MPEG-4 ASP (DivX, Xvid), MPEG-4 AVC (a.k.a. H.264) etc Yes. Only MPEG-4 systems and a few others Problematic and No
Support for multiple audio tracks (channels, formats, languages and “director’s comments”) Yes Yes. Formats are only MP3, AAC and a few others not very popular Yes
Support for tags (artist, title, composer, etc as MP3’s ID3) Yes Can be supported by MP4 extensibility but this is not very well standardized across authoring tools (iTunes, GPAC etc) and players (Amarok, Media Player Classic, iPod, Windows Media Player etc) No
Support for attachments with mime-types (used to attach movie posters images or other files) Yes No
Support for chapter marks Yes No
Support for multiple language embedded soft-subtitles Yes. VobSub (as extracted from DVDs), plain timed UTF-8 text (SRT, SUB) etc No
Support for naming tracks with human names as “Director’s comments” or “Portuguese subtitles” etc Yes Yes No
Support for carrying menus information (as in DVDs) and interaction Yes through an XML idiom, but unsupported by most players Yes through SVG, but unsupported by most players No
The container overhead in bytes in the final file Very small Very small Very big
Supported by free and Open Source multiplatform authoring tools Perfect on Linux, Unix, Windows and Mac Yes (see GPAC), with some intellectual property issues. Tools need to mature. Yes
Ready for popular web streaming as in Flash player No Yes. The popular Flash Player that is installed on everybody’s browser supports playing MP4 files as long as they contain H.264 video and AAC audio tracks. I recommend the LongTail FLV/MP4 Player since it also plays subtitles embedded in MP4 files. No

Personally I believe MP4 is the multimedia file format for the future because since it is getting popular, all these non–standardized features will get stabilized. MP4 is an ISO standard and the increasing industry support can be felt on iPods and portable devices, and most notable on home DVD players capable of playing the 700MB MP4 video file burned in a CD.

By the way, remember this:

  • MP4 is not an evolution of MP3. AAC (MPEG-4 Part 3) is.
  • MP5 and MP6 (used to classify portable media players) are things that simply doesn’t exist in the multimedia scene.
  • .M4A, .M4V, .MOV and .3GP files can safely be renamed to .MP4. They just use to be different extensions to help user’s eyes easily identify whats inside.

Meanwhile, MKV wins everything but on the Industry Support category. But this doesn’t really matter, and I’ll explain why. Since MKV is just a container, the large video, audio etc streams can be extracted and repackaged into MP4 and vice-versa in seconds. No transcoding (decoding followed by a lossy encoding into another format) is needed.

So today I store my videos in the most feature rich and well supported by players format: MKV.

OGG or OGM (the container file format) is practically dead in my opinion. They were created as part of the Xiph initiative for a complete open source patent-free multimedia framework, but seems nobody uses it anymore for video. From the same family, Vorbis (the audio codec compared to MP3, a.k.a. .OGG) is very good but also very not popular. Theora (the video codec) is frequently comparable to old MPEG-1 in terms of quality and compression ratio so currently, if you want quality and are not concerned about patents, MPEG-4 AVC is the best choice. FLAC, Xiph’s lossless audio codec, is the winner of the family: very popular, massively used, and recommended.

Encoding the DVD

I use HandBrake, the most practical Open Source (and overall) movie encoder. It runs on Linux, Mac and Windows and uses the same Open Source libraries as ffmpeg, mplayer/mencoder, xine, etc. While these programs are generic video handlers (with thousands of confusing configuration parameters to sustain this generalistic status) HandBrake is optimized only for ripping so it is very easy to use, yet extremely powerful.


#!/bin/bash

##
## This is the script I use to make hifi DVD rips including chapter markers and
## subtitles. It uses Handbrake.
## Contains what I found to be the best quality ripping parameters and
## also let me set simple parameters I need.
##
## Avi Alkalay <avi at unix dot sh>
## http://avi.alkalay.net/2008/03/mpeg4-dvd-rip.html
##
## $Id$
##

#set -vx

HANDBRAKE=${HANDBRAKE:=~/bin/HandBrakeCLI}
#HANDBRAKE=${HANDBRAKE:="/cygdrive/c/Program Files/Handbrake/HandBrakeCLI.exe"}
## Where is the Handrake encoder executable.
## Handbrake is the most practical free, OSS, DVD riper available.
## Download HandBrake for Linux, Mac or Windows at http://HandBrake.fr


INPUT=${INPUT:=/dev/dvd}
## What to process. Can also be a mounted DVD image or simply '/dev/dvd'


TITLE=${TITLE:=L}
## The title number to rip, or empty or "L" to get the longest title


#CHAPTERS=${CHAPTERS:=7}
## Example: 0 or undefined (all chapters), 7 (only chapter 7), 3-6 (chapters 3 to 6)


#VERBOSE=${VERBOSE:="yes"}
## Wether to be verbose while processing.


SIZE=${SIZE:=1200}
## Target file size in MB. The biggest the file size, the best the quality.
## I use to use from 1000MB to 1400MB for astonishing high quality H.264 rips.


OUTPUT=${OUTPUT:="/tmp/output.mkv"}
## Output file. This will also define the file format.
## MKV (Matroska) is currently the best but MP4 is also good.


AUDIO=${AUDIO:="-E ac3 -6 dpl2 -D 1"} # For AC3 passthru (copy).
#AUDIO=${AUDIO:="-E lame -B 160"} # For MP3 reencoding. Good when input is DTS.
## Audio parameters. If input is AC3, use it without transcoding.
## If is DTS, reencode to MP3.


MATRIX=${MATRIX:=`dirname $0`/eqm_avc_hr.cfg}
## x264 matrix to use. The matrix file may increase encoding speed and quality.
## This one is Sharktooth's as found
## at http://forum.doom9.org/showthread.php?t=96298

######### Do not change anything below this line ##############


## Make some calculations regarding title and chapters based on parameters.
SEGMENT=""
if [[ "$TITLE" == "L" || -z "$TITLE" ]]; then
	SEGMENT="-L"
else
	SEGMENT="-t $TITLE"
fi

[[ -n "$CHAPTERS" && "$CHAPTERS" -ne 0 ]] && SEGMENT+=" -c $CHAPTERS"

[[ "$VERBOSE" != "no" ]] && VERB="-v"


# Define args for the x264 encoder. These are some values I found on the net
# which give excelent results.
X264ARGS="ref=3:mixed-refs:bframes=6:b-pyramid=1:bime=1:b-rdo=1:weightb=1"
X264ARGS+=":analyse=all:8x8dct=1:subme=6:me=umh:merange=24:filter=-2,-2"
X264ARGS+=":ref=6:mixed-refs=1:trellis=1:no-fast-pskip=1"
X264ARGS+=":no-dct-decimate=1:direct=auto"
[[ -n "$MATRIX" ]] && X264ARGS+=":cqm=$MATRIX"


# Encode...
"$HANDBRAKE" $VERB -i "$INPUT" -o "$OUTPUT" \
	-S $SIZE \
	-m $SEGMENT \
	$AUDIO \
	-e x264 -2 -T -p \
	-x $X264ARGS


# Repackage to optimize file size, to include seek and to include this
# this script as a way to document the rip...
echo $OUTPUT | grep -qi ".mkv"
if [[ $? && -x `which mkvmerge` && -f $OUTPUT ]]; then
	mv $OUTPUT $OUTPUT.mkv
	mkvmerge -o $OUTPUT $OUTPUT.mkv \
		--attachment-name "The ripping script" \
		--attachment-description "How this movie was created from original DVD" \
		--attachment-mime-type application/x-sh \
		--attach-file $0

	[[ -f $OUTPUT ]] && rm $OUTPUT.mkv
fi

The script seems long because it is fully documented but it actually only collects some parameters and simply runs the HandBrake encoder like this (passed parameters are in red):


~/bin/HandBrakeCLI -v -i /dev/dvd -o /tmp/output.mkv \
    -S 1200 \
    -m -L \
    -E lame -B 160 \
    -e x264 -2 -T -p \
    -x ref=3:mixed-refs:bframes=6:b-pyramid=1:bime=1:b-rdo=1:weightb=1:analyse=all:8x8dct=1:subme=6:me=umh:merange=24:filter=-2,-2:ref=6:mixed-refs=1:trellis=1:no-fast-pskip=1:no-dct-decimate=1:direct=auto:cqm=~/src/randomscripts/videotools/eqm_avc_hr.cfg

All the rest is what I found to be the best encoding parameters.

The resulting video file (/tmp/output.mkv in this case) will contain correctly cropped video and audio quality as good as the DVD (it is almost lossless), and chapter breaks at the same positions read from the DVD.

In a Core Duo machine as my laptop running Fedora 8 or Windows XP, a 2 pass H.264 encoding (2 pass improves quality and H.264 is newer standard MPEG-4 technology better than DivX/Xvid) takes about 4 to 5 hours for a regular 2 hours movie, so leave it encoding while you go to sleep. A Pentium 4 machine running Ubuntu takes about 17 hours for the same rip.

I use to rip one chapter from the movie first (use your preferred video player or lsdvd command to find the shortest chapter), check quality, compare to DVD, fine tune, try again and then shoot full DVD ripping.

After encoding I use to repackage the audio/video stream with Matroska‘s mkvmerge (or mmg, its GUI version available on any Linux distribution as “mkvtoolnix” package, and installable for Windows or Mac OS from Matroska’s website) to optimize seeks and to include soft subtitles (that can be turned on and off as on regular DVDs), but I’ll explain that in another HOWTO.

Give Your Ripped Movie a Descriptive File Name

I use to organize my media library in a standard way I invented for myself and which I suggest you to use too.

My movie file names shows everything that the file includes. Some examples:

  • Indiana_Jones_and_The_Raiders_of_the_Lost_Ark_IMDB{tt0082971}-Xvid{720x304_23.98fps}+MP3{ENG,POB_VBR}+Sub{ENG,SPA,POB}+Covers.mkv
    This is the Indiana Jone’s Raiders of the Lost Ark movie, whose IMDB index is tt0082971 (IMDB{tt0082971}). It was ripped with the old Xvid codec and contains 720×304 pixels frame size at a rate of 23.98 frames per second (Xvid{720x304_23.98fps}). It also contains selectable audio tracks in English and Brazilian Portuguese encoded in variable bit rate MP3 (MP3{ENG,POB_VBR}). In addition, there is also selectable subtitles in English, Spanish and Brazilian Portuguese (Sub{ENG,SPA,POB}). The file also contains the cover images as attachments.
  • Harold_and_Maude_IMDB{tt0067185}-H264{672x368_3Pass_25fps}+HEAAC{EN}+Sub{POR,EN,FRE}+Chapters+Covers.mkv
    The old Harold and Maude movie whose IMDB index is tt0067185 (IMDB{tt0067185}). It is encoded with H.264 in 3 passes and has 672×368 pixels frame size at a rate of 25 frames per second (H264{672x368_3Pass_25fps}). There is only one English audio track encoded in modern HE-AAC (HEAAC{EN}). Subtitles in Portuguese, English and French (Sub{POR,EN,FRE}), chapter information and attached cover images. This is very complete high quality DVD backup.
  • I_Am_Legend_IMDB{tt0480249}-H264{704x304_23.98fps}+AC3{ENG_5.1}+Sub{POR}.mkv
    The I Am Legend movie whose IMDB index is tt0480249 (IMDB{tt0480249}), video encoded in H.264 with 704×304 pixels frame size (H264{704x304_23.98fps}), original 5.1 channels AC3 audio in English (AC3{ENG_5.1}) and subtitles in Portuguese (Sub{POR}).

The advantages of this scheme are:

  • It is web safe with no spaces in filenames. All underlines. It is also DOS safe.
  • To have the IMDB index let me know exactly which movie this file contains. This is particularly good to avoid ambiguity for movies that have remakes as Ben Hur, or movies that have an official name but are well known by other names or have international titles.
  • To know the encoding method, subtitles included and chapters info give me the overall quality of the movie right away.
  • Special attention to audio and subtitle languages. Having them on the filename let me know I will understand its content without having to play. Sometimes I can’t play the file because I logged in my home computer remotely.

Playing the Ripped File

To play this advanced Matroska media file that contains such a rich set of metainformation and highly compressed digital content you will need an advanced player too. And happens that the best players are the Open Source ones. So use these players:

These are Media Player Classic screenshots demonstrating how to activate the advanced content inside a Matroska file. Players on other platforms have similar capabilities and menus.

Activating embedded subtitles and languages
The player lets you choose the audio language and subtitles. On MPC for example, this is how you turn on and off and choose the language for subtitles.
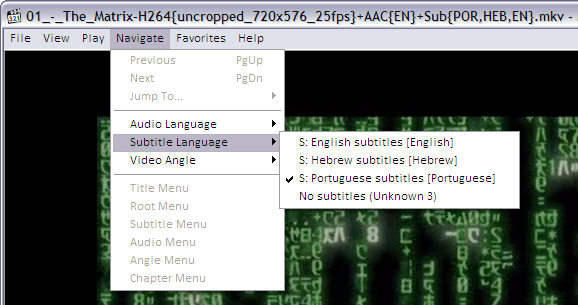
Choosing subtitles language

As you can see, the player found subtitles embedded in the MKV file in English, Hebrew and Portuguese.

If the MKV file contains many audio tracks (as different languages, director’s comments etc) this is how to select it:
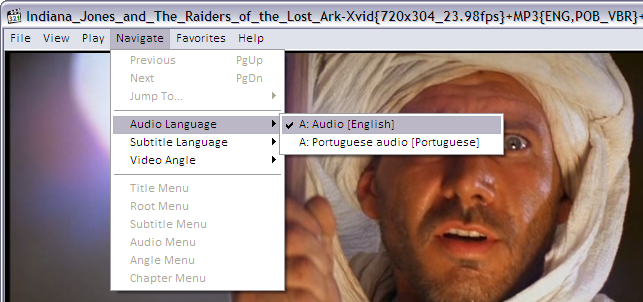
Selecting audio track to play in Media Player Classic

And to jump directly to a specific chapter on the movie, if the MKV file contains this kind of information:
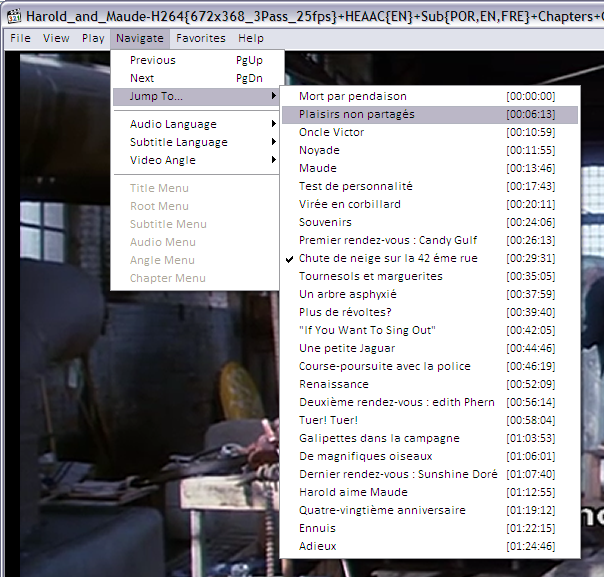
Using Media Player Classic to browse chapter in a movie file

Improving audio volume
If you ripped the movie without reencoding the audio, the final file will contain DVD’s original AC3 audio tracks in 6 channels (5+1). This may sound with a lower volume when played in a 2-speaker system as your laptop, iPod, etc because 4 channels are simply not being played. To remediate this the player will have to downsample the audio. In other words, it will remix the 6 channels into 2 stereo channels while playing. The Media Player Classic options should look like this:
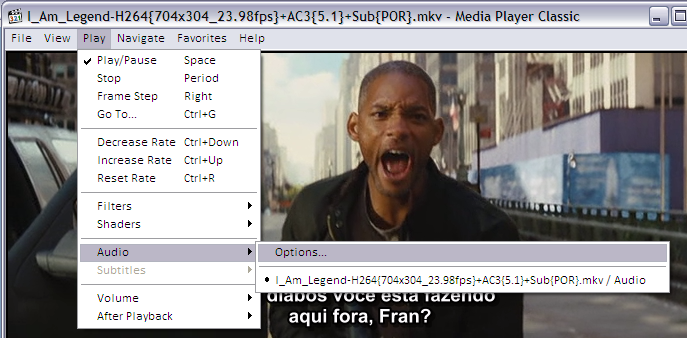
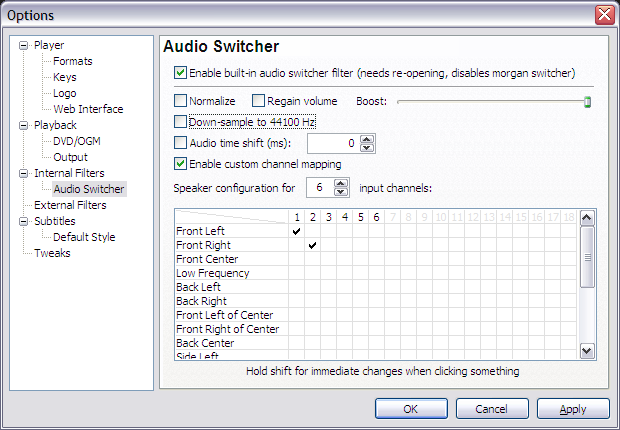
Selecting Media Player Classic\'s Audio Options

Configuring audio downsample on Media Player Classic

Flash Player now supports advanced MPEG-4 content

Adobe’s press release says it all: lab version of o Flash Player 9.0 supports latest and best multimedia technologies.

Thanks to YouTube and other online video services, the Adobe Flash Player browser plug in is probably the most popular video player in the world. But before this version, only the proprietary and now inefficient FLV format was supported.

Tinic Uro, a multimedia software engineer at Adobe explains that the Player now supports:

  • H.264/MPEG-4 AVC
    The best, most sofisticated and advanced video codec, capable of high quality, low bitrate video performances. H.264 is the standard for HD-TV, HD-DVD and BluRay. H.264 is better than MPEG-4 ASP/Xvid/DivX.
  • AAC and HE-AAC (a.k.a AAC SBR)
    The ISO successor of MP3, for audio. MP3 is already very good, extremely popular, and still supported by the MPEG-4 ISO standard and Flash Player. There is no practical advantage on AAC over MP3 for the music you load in your portable player, but HE-AAC achieves much better quality on very low bit rates (desired for streaming) than MP3.
  • MP4 file format
    The MP4 container was designed for many types of usages, including streaming over the Internet. An MP4 file can carry many video, audio, subtitle, scripting, VRML, XML and other metadata multiplexed and in parallel.

All this formats are parts of the ISO MPEG-4 standard.

This is a much expected update for the Flash Player and its users. Every new video on YouTube is being compressed with this technologies since June and the old ones will be converted over time.

We will see quality and speed improvements in multimedia content happening in the right way. Also, the formats of the video files people exchange will converge into a single one based on MPEG-4 standards: MP4 files containing higher-quality-for-megabyte H.264, AAC and subtitle streams.

This is also good news for the Linux and open community. A number of good MPEG-4 related authoring tools already exist and are maturing fast: x264 for video compression, FAAD/FAAC for audio, and GPAC and others for MP4.

My New Cellphone

Its a Nokia E61i.

The Nokia E Series smartphones are currently the most advanced in the market. Some may say iPhone but there is no more than great usability and fancy-ness on it.

These are a few characteristics I like in E61i:

  1. QWERTY keyboard. I’m tired of loosing stylus pens and even use them to point things.
  2. WiFi with power save features. This is unique and as far as I know only Nokia and now the iPhone have it. E61i can also connect to Cisco WiFi networks with LEAP authentication, as used by my company. At work, at home and everywhere it finds a WiFi network I stay connected all the time with a sort of smart roaming, without running out of batteries.
  3. A wide screen and great web features as integrated feed reader and full XHTML browser based on KDE’s Konqueror that perfectly render very well all pages I need.
  4. Integrated Java support so I can install a practical mobile Google Maps application amongst others.
  5. Media features as MP3, MPEG-4’s AAC, MPEG-4 video (low profile DivX/Xvid) and MP4 container support.
  6. 2 megapixel camera for pictures and video.
  7. Can syncronize PIM data with anything that supports the SyncML Open Standard, for example the ScheduleWorld.com service.
  8. Has Text To Speech capabilities, so everytime somebody calls me, the phone actually speaks his or her name as it is written in the contacts database. There are options to install and use different voices and language accents.
  9. Has voice recognition capabilities, so I can press a button in the wireless bluetooth phones to make the phone as for a name, I speak it and it recognizes by how it is written in the contacts database. I did not have to record each contact’s name as previous phone models. Nokia E61i actually recognizes what I speak.
  10. And, to keep me hacking, the most important: integrated VoIP support through the SIP standard.

This last point deserves an explanation. To use VoIP you usually have to install a softphone in your computer and be close to it to make calls. Well, this phone kind of has a standards compliant softphone already installed in the OS. Together with great WiFi support, I can carry my work extension and other SIP accounts with me all the time, to make cheap international calls and also receive free calls.

This is all very geeky and I love it.

In further articles I’ll explain how to configure advanced features I’ve been using in my new Nokia E61i, a very portable computer.

Fedora Post-installation Configurations

Inspired by an old post by Rui Moura, I’ll maintain here the plain commands needed to setup a freshly installed Fedora or Red Hat system, to include essential softwares they don’t ship by default due to legal issues.

These instructions are currently optimized for Fedora 14, 15 and 16, but most of it should work on any other Fedora and modern Red Hat Enterprise Linux too. Good suggestions provided as comments bellow will be added to this guide.

Index

  1. Permissions Setup
  2. Keeping System Updated
  3. Repositories Setup
  4. Activate Hardware Acceleration on NVidia and Intel GPUs
  5. Install Adobe Flash Player Globally
  6. Install Google Chrome or Chromium Browser
  7. Access LAN Hosts by Name Without a DNS Server (Bonjour, Zeroconf)
  8. Dramatically Improve Fonts
  9. Install Web Standard Fonts
  10. MP3 Support
  11. Amarok: The best audio player for Linux
  12. Enable Any DVD Player Software to Play DVDs from All Regions
  13. General DVD and DivX/Xvid/MP4/H.264 Movie Player
  14. General Digital Video Authoring and Editing tools
  15. Command Line DVD Copy & Decrypting Tool
  16. Enabling GMail as System’s Default Mail Relay (so you get sysadmin e-mails from your machine)
  17. Access Windows NTFS Partitions From Linux
  18. Configure text console in high resolution and smaller fonts

Terms highlighted in red should be changed to match your system.

Permissions Setup

This step will allow you to issue some administrative commands without having to be all the time logged in as root — the system administrator.

bash# echo 'your_plain_loginname_here ALL=(ALL) ALL' >> /etc/sudoers

Note that this is the only command throughout this guide that shows a root prompt (bash#). All other commands are indicated to be run as a regular non-root user (indicated by bash$).

After configuring sudo, every time you execute an administrative command with its help, a password is requested. This is your password (the regular user’s password), not the root password.

Keeping System Updated

Install the following packages so updates will come faster:

bash$ sudo yum -y install yum-presto yum-plugin-fastestmirror

You can also get e-mail notifications about system updates:

bash$ sudo yum -y install yum-cron
bash$ sudo chkconfig yum-cron on

Then make sure your /etc/sysconfig/yum-cron file has the following lines:

CHECK_ONLY=yes
MAILTO=YOUR-EMAIL@address-com

You will get one e-mail every day with a list of updates available. E-mail delivery will only work if you configure your system for that.
After all the steps below and from time to time, update all software installed on your system with the following command:

bash$ sudo yum update

Repositories Setup

RPM Fusion is a repository of many essential multimedia and general purpose software for Fedora and Red Hat systems. It is a good idea to have it configured so you can easily install players for DVDs, MP3s amongst other useful things.

bash$ sudo rpm -Uvh http://download1.rpmfusion.org/free/fedora/rpmfusion-free-release-stable.noarch.rpm http://download1.rpmfusion.org/nonfree/fedora/rpmfusion-nonfree-release-stable.noarch.rpm

Activate Hardware Acceleration on NVidia and Intel GPUs

bash$ sudo yum -y install vdpau-video-freeworld libva-freeworld libva-utils vdpauinfo libva libvdpau kmod-nvidia xorg-x11-drv-nvidia

Install Adobe Flash Player Globally

bash$ sudo rpm -Uvh http://linuxdownload.adobe.com/adobe-release/adobe-release-i386-1.0-1.noarch.rpm
bash$ sudo yum -y install flash-plugin --exclude=AdobeReader\*

On 64bit systems (x86_64) use this:

bash$ sudo rpm -Uvh http://linuxdownload.adobe.com/adobe-release/adobe-release-i386-1.0-1.noarch.rpm
bash$ sudo yum -y install flash-plugin nspluginwrapper.x86_64 nspluginwrapper.i686 alsa-plugins-pulseaudio.i686 libcurl.i686 --exclude=AdobeReader\*
bash$ mkdir -p ~/.mozila/plugins; ln -s /usr/lib/flash-plugin/libflashplayer.so ~/.mozila/plugins

Restart your browser to activate the plugin. For reference: Flash Player for Linux home page.

Install Google Chrome or Chromium Browser

There are 2 ways to install Chrome or Chromium:

  • Chrome is packaged by Google, has less frequent update cycles, includes Flash and H.264 support.
    bash$ sudo wget -O /etc/yum.repos.d/google.repo http://avi.alkalay.net/articlefiles/2011/01/google.repo
    bash$ yum -y install google-chrome-beta

    You can also find Picasa on the same repo but is 32 bit only and not on the latest versions.

  • Chromium is the open-source-only part of Chrome, it is more well packaged by the Fedora community, is more well integrated into the desktop, has more frequent update cycles but doesn’t include Flash (that can be added separately). All the rest is the same and I prefer Chromium.
    bash$ sudo wget -O /etc/yum.repos.d/fedora-chromium-stable.repo http://repos.fedorapeople.org/repos/spot/chromium-stable/fedora-chromium-stable.repo
    bash$ sudo yum -y install chromium

Access LAN Hosts by Name Without a DNS Server

You can access servers and machines on you LAN by name, instead of using their long IP address using the Zeroconf standard (implemented as Avahi in Linux). This is so useful and works out of the box in Ubuntu. The setup in Fedora is easy too, but not automatic.

bash$ sudo yum -y install avahi-tools nss-mdns

Now, instead of accessing local hosts by their IP, you can use the .local domain appended to their names. Just like this:

bash$ ssh 10.0.0.5 # stop using the IP address of dbserver
bash$ ssh dbserver.local # start using its hostname

Evnetually this will only work if you correctly configure or disable packet filtering (firewalling). To disable:

bash$ sudo service iptables stop
bash$ sudo service ip6tables stop
bash$ sudo chkconfig --del iptables  # disable even for next reboots
bash$ sudo chkconfig --del ip6tables # disable even for next reboots

Tip grabbed from Fedora Project wiki.

Dramatically Improve Fonts

bash$ sudo yum install freetype-freeworld

Logoff and login again your graphical environment to this update take effect.

To understand why you need this update read this section on the Linux Font HOWTO.

The freetype-freeworld package uses a technique described in this bug report.

Install Web Standard Fonts

These packages include popular fonts as Arial, Times New Roman, Tahoma, Verdana, as well as new Windows Vista and MS Office 2007 fonts. Learn more.

bash$ sudo rpm -Uvh \
http://avi.alkalay.net/software/webcore-fonts/webcore-fonts-3.0-1.noarch.rpm \
http://avi.alkalay.net/software/webcore-fonts/webcore-fonts-vista-3.0-1.noarch.rpm

Then, configure your desktop as described in the Linux Font HOWTO, for KDE or Gnome.

MP3 Support

For Gnome and GStreamer:

bash$ sudo yum -y install gstreamer-plugins-ugly libmad libid3tag id3v2


For KDE:

bash$ sudo yum -y install kdemultimedia-extras-nonfree id3v2

Amarok: The best audio player for Linux

bash$ sudo yum -y install amarok-extras-nonfree

Enable Any DVD Player Software to Play DVDs from All Regions

bash$ sudo wget -O /etc/yum.repos.d/atrpms.repo http://avi.alkalay.net/articlefiles/2011/01/atrpms.repo
bash$ sudo rpm --import http://packages.atrpms.net/RPM-GPG-KEY.atrpms
bash$ sudo yum --enablerepo=atrpms -y install libdvdcss

General DVD and DivX/Xvid/MP4/H.264 Movie Player

bash$ sudo yum -y install gnome-mplayer

General Digital Video Authoring and Editing tools

bash$ sudo yum -y install mencoder mkvtoolnix mkvtoolnix-gui ffmpeg avidemux subtitleripper

Command Line DVD Copy & Decrypting Tool

bash$ sudo yum -y install vobcopy

Now, thanks to libdvdcss installed above, you can use vobcopy to clone DVD while removing their protections like this:

bash$ sudo mount /dev/dvd /mnt
bash$ cd /some/directory
bash$ vobcopy -m /mnt

Enabling GMail as System’s Default Mail Relay (so you get sysadmin e-mails from your machine)

See an updated post about it, ready for Fedora 20.

Access Windows NTFS Partitions From Linux

bash$ sudo yum -y install ntfs-config

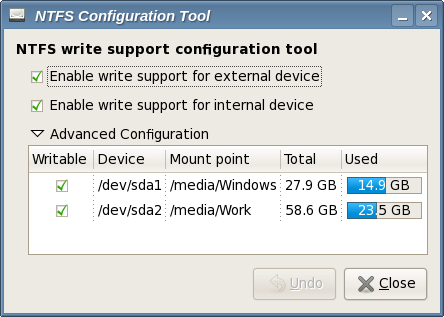
Then run the ntfs-config-root graphical tool and configure your partitions to be writable and mountable.

bash$ sudo /usr/sbin/ntfs-config-root

An example of my system:
NTFS config tool screenshot
After you configure the tool and quit, your NTFS partitions will be mounted in the specified place. In my case /media/Windows and /media/Work.

Configure text console in high resolution and smaller fonts

This tip is for the text console.

bash$ sudo echo 'SYSFONT="lat0-08"' >> /etc/sysconfig/i18n  # set a ISO-8859-15 font
bash$ sudo echo 'fbset 1024x768-60' >> /etc/rc.d/rc.local    # set console resolution to 1024x768 @ 60Hz

These settings will take effect after a reboot, but you can test them before rebooting executing the following commands:

bash$ sudo setfont lat0-08
bash$ sudo fbset 1024x768-60

Note that you can set different resolutions than 1024×768 if you have a video card and monitor that will accept it. A full list of modes can be listed with the command:

bash$ grep "mode " /etc/fb.modes

Propagandas do iPhone para Linux

A Apple finalmente deu a data de lançamento do iPhone: 29 de junho.

Em seu site há 3 lindos videos mostrando a operação fácil do aparelho. Mas exige Quicktime e sem isso não funciona. Para um leigo.

Mas como já sabia que a Apple usa padrões ISO em seus videos, tipo MP4, H.264 e AAC, foi só ver o fonte e descobrir a URL dos videos. Então é só clicar com o botão direito, salvar o arquivo MOV (MP4) e depois assistir com MPlayer ou outro player de Linux que você preferir.

Never been an iPod
Never been an iPod

How to
How to

Calamari
Calamari

Ou então, se tiver um link rápido, pode assistir enquanto baixa, assim:

bash$ mplayer http://movies.apple.com/movies/us/apple/iphone/never_been/apple-iphone-never_been_848x496.mov
bash$ mplayer http://movies.apple.com/movies/us/apple/iphone/how_to/apple-iphone-how_to_848x496.mov
bash$ mplayer http://movies.apple.com/movies/us/apple/iphone/calamari/apple-iphone-calamari_848x496.mov

Os links que escolhi são os de alta definição. Há versões com qualidade mais baixa no site original.

Suas Multas e Linux

Sabe aquela multa de radar que você recebeu? Foi enviada pelo Tux.

Mas não o culpe por isso. Linux só foi a base tecnológica para todo o sistema.
Ontem conversei bastante com o pessoal da Engebras, empresa que cria e administra a maioria dos radares de São Paulo e outros estados. Já tinha ouvido falar que todos os sistemas para suportar essa monitoração era baseada em Linux, e eles contaram mais detalhes. Continue lendo…


Os radares são na verdade câmeras analógicas com sensibilidade melhorada conectadas a computadores próximos que rodam Linux que por sua vez digitalizam a imagem instantaneamente com a ajuda de placas de captura de vídeo. As placas dos carros são imediatamente reconhecidas por OCR por uma biblioteca de uma empresa israelense, a multa é impressa, enviada pelo correio, recolhida no banco e repassada para o governo estadual, federal ou município, dependendo da jurisdição.

Todos os carros que passam por um radar — infrator ou não — são filmados. Não é uma câmera fotográfica, e sim uma filmadora.

Tazo (gerente de informática da Engebras) e seu pessoal afirmaram que todos os sevidores da empresa rodam Linux. Coisa de 50 a 60 servidores. Mas são servidores paravirtuais. Porque servidores físicos mesmo a empresa tem menos de 10.

Fiquei feliz em ver um exemplo vivo de um datacenter inteiramente virtual, e imaginei a flexibilidade operacional que eles tem em fazer movimentações de serviços sem indisponibilidades.

Mostraram sua extranet onde pode-se ver as fotos de infrações do momento, mais estatísticas de variação de velocidade média por hora, número de veículos, e até seu tamanho. Mostraram também como motoqueiros cometem infrações, mas escondem sua placa com a mão.


Além disso, imediatamente consultam uma base de dados de veículos não licenciados (em MySQL), mas aqui não se pode multar por radar. Por outro lado uma aviso é enviado para a polícia da região, avisando a placa e o ponto onde o veículo foi detectado.

40% da frota nacional não é licenciada, inclusive viaturas da polícia.

Há também os radares de farol, onde não basta uma imagem estática. É necessário registrar o movimento do veículo ultrapassando o sinal vermelho como evidência. Neste caso são usados softwares livres como ffmpeg para gerar este clip em MPEG.

A comunicação entre os radares e o datacenter central é geralmente provida por GPRS, pelas operadoras de celular da localidade.

Se tiver sorte, o pessoal da Engebras vai passar no meu blog para dar mais detalhes de sua operação.

Supra-sumo em Compressão de Video

Andei estudando tecnologias de compressão de vídeo e é um mundo fascinante. Tudo sobre Linux.

DivX e Xvid são compressores ainda bons mas de gerações anteriores. O mais moderno e avançado é o H.264 também conhecido por MPEG-4 AVC, padrão ISO. Uma das melhores implementações desse compressor é livre: o projeto x264.

E sobre containers, um dos mais completos hoje em dia é o MP4. Um mesmo arquivo MP4 pode conter uma trilha de vídeo, outra de vídeo em outros ângulos, outra de audio em inglês, outra de audio em português, e outras de legendas em várias linguas, em Unicode, menu como o de um DVD, informação sobre capítulos etc. Isso é um significativo avanço em relação ao container AVI da Microsoft que não suportava nada disso. Pode-se fazer um backup de um DVD para um arquivo MP4, incluindo toda a sua interatividade, menus e capítulos.

Apesar do nome sugestivo, MP4 não é a evolução do MP3. Afirmar isso é como dizer que .gif evoluiu para .tar, coisa que não faz sentido. A evolução do MP3 é AAC e HE-AAC. MP4 (um formato de container) pode conter streams MP3 (um formato de audio), como fiz abaixo, mas o mais natural e moderno é um MP4 conter streams AAC.

Converti um vídeo de 53 segundos que fiz com minha câmera. Veja a comparação:

  Original.avi Comprimido.mp4
Geral 53s, 15.077 kb/s, 640×480, 30 quadros por segundo 53s, 2.495 kb/s, 640×480, 30 quadros por segundo
Tamanho 100.326.316 Bytes 16.639.145 Bytes
Trilha de vídeo 99.697.780 Bytes, compressão Motion JPEG 15.952.188 Bytes, compressão H.264
Trilha de audio 586.888 Bytes, formato PCM mono 11,024 Hz 657.699 Bytes, compressão MP3 mono 22,05 Hz 64kbps
Overhead do container 41.648 Bytes ou 0.04% do tamanho do arquivo 29.258 Bytes ou 0.18% do tamanho do arquivo

Há duas discrepâncias aqui:

  1. O tamanho relativo do container deveria ter diminuido.
    O overhead do container MP4 é bem menor que AVI, mas como o tamanho do vídeo diminuiu muitíssimo, isso distorceu a relação do tamanho do container com o do arquivo. Se transferíssemos sem recomprimir os streams de audio e vídeo do AVI p/ MP4, veríamos uma significativa queda de overhead do container.
  2. O tamanho da trilha de audio aumentou.
    O fato é que tive sérios problemas para compactar o audio. Minha câmera grava som em formatos tão baixos que tive que aumentar a freqüência do sinal para o arquivo ser aceito pelo LAME. E ai usei bitrates talvez altos de mais para a compressão. Mas ganhei tanto com o H.264 que nem vou esquentar a cabeça.

O vídeo final é de alta qualidade (comparado com o original), e não consegui perceber diferença entre eles. Olhei várias vezes, com muita atenção.

Eu ainda fiz questão de alta qualidade, e mantive o bitrate em 2495 kbps. Poderia ter diminuido mais ainda o tamanho se fizesse compressão em 2 passos. Filmes em formato Xvid (MPEG-4 ASP) que se baixa da Internet, em boa qualidade, tem aproximadamente 850 kbps. É esperado que se dermos só 850 kbits para o H.264 trabalhar 1 segundo de vídeo, obteremos resultados melhores comparados ao Xvid.

Sobre Podcast

Uma vez perguntei a um amigo o que é um podcast, e ele disse que é um MP3. Bem, isso é tão minimalista quanto dizer que um Gaudí é um amontoado de tijolos, ou que a Internet é uma porção de bits dançantes.

Um podcast é um blog não-textual. Seu conteúdo pode ser audio e/ou vídeo, rodeado por metainformações do tipo “autor”, “entrevistado”, “banda”, “estilo”, “sumário” etc.

Como todo blog, ele tem regularidade: “episódios” no lugar de posts e assim por diante.

Você “assina” um podcast como assina uma revista, da mesma forma como assina um blog (via RSS ou ATOM). Mas como um browser é um leitor essencialmente textual, é mais comum e prático assinar podcasts usando softwares de mídia: iTunes, Yahoo! Music Engine, Amarok, etc.

Na convergência das coisas, um podcast pode ser comparado a um programa de rádio onde o próprio ouvinte decide quando e como vai ouvi-lo.

Num mundo onde tivermos banda larga no ar tão abundante e livre quanto ondas de rádio, além da memória para freqüências de estações, os rádios de nossos carros terão também a assinatura de nossos podcasts preferidos. Com ainda não chegamos a isso, temos que usar MP3 players modernos como o iPod – que tratam podcasts de forma especial – para termos essa funcionalidade.

E nesse mundo, os podcasters seremos você e eu, pessoas comuns falando diretamente para o mundo. Publicar um podcast é tão simples quanto publicar posts num blog. É inclusive algo que se pode integrar com plataformas de blogs comuns, com plugins para WordPress, etc.

Se você tem um fluxo de coisas para dizer, crie um podcast. Se você tem um fluxo de coisas para serem assistidas, crie um podcast. Se você tem um fluxo de coisas que quer que as pessoas ouçam, crie um podcast. Este último é o meu caso, sobre Jazz Brasileiro, e por isso estou juntando os pedaços e os módulos para criar um.

Andei estudando isso ultimamente, e achei importante compartilhar…

Converting YouTube to MPEG or iPod

In the end of this proccess you’ll have an .mpg file on your local disk, generated from an Internet-only YouTube URL.

First make sure you have ffmpeg (video encoding and decoding tools) and lame (MP3 audio encoding and decoding tools) softwares and dependencies installed on your system. You will also require the youtube-dl scripts that downloads the actual YouTube video.

In a Red Hat or Fedora system you can install it from Dag or Livna RPM repositories, with a simple yum command:

bash# yum install ffmpeg lame youtube-dl

Then you get to the YouTube video page you want to download. In this example we’ll use the Heist video, the first Linux ad from IBM, that has http://www.youtube.com/watch?v=DO9ZWDaLLxA as its URL.

I’ll use youtube-dl this way:

bash$ youtube-dl -t http://www.youtube.com/watch?v=DO9ZWDaLLxA

And I saw it connecting to YouTube several times and downloading the video. In the end, I found a big file named the_heist-RRZyz1vXkPE.flv in the current firectory, which is the video file.

Now lets convert it into MPEG with ffmpeg:

bash$ ffmpeg -i the_heist-RRZyz1vXkPE.flv -acodec copy -sameq heist.mpg

-acodec copy will cause ffmpeg to copy the audio from input to output file, while -sameq causes the output video quality to be the same as the source, but output file will be very big. For YouTube videos, you can use -b 320000 instead of -sameq to get smaller file sizes.

I saw ffmpeg taking some time to convert, and in the end I got the heist.mpg file which I was able to confortablly play in any MPEG aware video player, as mplayer.

If you want to convert the video file into MP4, which is the format supported by iPod Video players, you just change the extension:

bash$ ffmpeg -i the_heist-RRZyz1vXkPE.flv -acodec copy -b 320000 heist.mp4

Ffmpeg will take care to use the maximum screen size available from the source (the .flv file) so the converted file will be as hi-fi as YouTube let be (not too high really).

Enjoy your video.