Fedora 20 is the first distribution to bundle NetworkManager with bridging support. It means that the old hacks to make a virtual machine plug into current network are not required anymore.
A network bridge lets VMs use same network addresses as other machines, use same DHCP server, listen to network broadcasts, which also enables IP services as Zeroconf (Avahi) and other. It feels as the VMs are plugged on same network as the host machine.
But we are in initial support stage for these features. Documentation is still poor (this is why I’m writing this) and configuration GUIs are still buggy (specially libvirt’s console, virt-manager). So I’ll tell you here how to workaround these bugs. Do the following on machine’s local console and not remotely because you will experience network outages in the process.
Settings for NetworkManager
- Run NetoworkManager Connection Editor (nm-connection-editor command) as root.
- Delete the Ethernet connection that is connected to the network you want to bridge. This is were you get disconnected from the network.
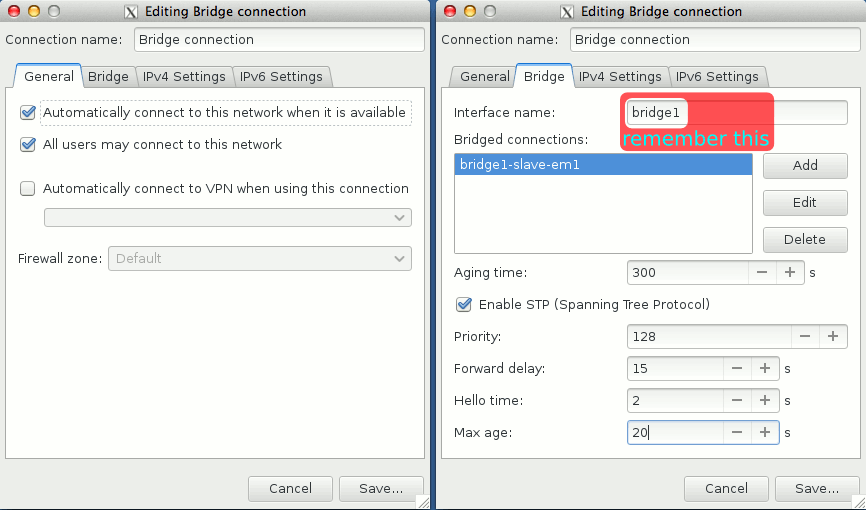
- Add a Bridge connection as these screenshots. Please remember what you put on Interface name, it will be used later on virt-manager configuration. In my case is “bridge1”:
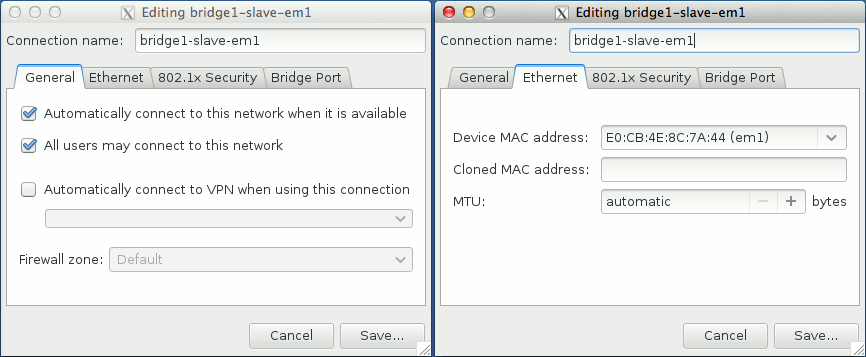
- On the Bridged connections pane, add a connection as these screenshots. Note how I select the MAC address of the physical interface I just deleted on step 2.
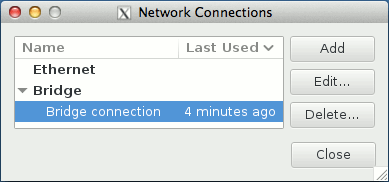
- Save and close. The main NetworkManager Connection Editor window should look like the following, with the bridge connection and with no ethernet connection
This is how my interfaces looked like before this configuration:
em1: flags=4163<UP,BROADCAST,RUNNING,MULTICAST>  mtu 1500
        inet 172.16.174.4  netmask 255.255.255.0  broadcast 172.16.174.255
        inet6 fe80::e2cb:4eff:fe8c:7a44  prefixlen 64  scopeid 0x20<link>
        ether e0:cb:4e:8c:7a:44  txqueuelen 1000  (Ethernet)
        RX packets 5397512  bytes 1376033231 (1.2 GiB)
        RX errors 0  dropped 0  overruns 0  frame 0
        TX packets 6343341  bytes 5990187987 (5.5 GiB)
        TX errors 0  dropped 0 overruns 0  carrier 0  collisions 0
        device interrupt 20  memory 0xfe500000-fe520000

lo: flags=73<UP,LOOPBACK,RUNNING>  mtu 65536
        inet 127.0.0.1  netmask 255.0.0.0
        inet6 ::1  prefixlen 128  scopeid 0x10<host>
        loop  txqueuelen 0  (Local Loopback)
        RX packets 796010  bytes 3692664543 (3.4 GiB)
        RX errors 0  dropped 0  overruns 0  frame 0
        TX packets 796010  bytes 3692664543 (3.4 GiB)
        TX errors 0  dropped 0 overruns 0  carrier 0  collisions 0
And this is how they look after. Note how the IP address moved from the physical “em1” interface to the new “bridge1” interface we’ve just created:
bridge1: flags=4163<UP,BROADCAST,RUNNING,MULTICAST>  mtu 1500
        inet 172.16.174.4  netmask 255.255.255.0  broadcast 172.16.174.255
        inet6 fe80::344c:9fff:fe89:ac91  prefixlen 64  scopeid 0x20<link>
        ether e0:cb:4e:8c:7a:44  txqueuelen 0  (Ethernet)
        RX packets 5565233  bytes 1897586628 (1.7 GiB)
        RX errors 0  dropped 0  overruns 0  frame 0
        TX packets 4794315  bytes 8405056987 (7.8 GiB)
        TX errors 0  dropped 0 overruns 0  carrier 0  collisions 0

em1: flags=4163<UP,BROADCAST,RUNNING,MULTICAST>  mtu 1500
        inet6 fe80::e2cb:4eff:fe8c:7a44  prefixlen 64  scopeid 0x20<link>
        ether e0:cb:4e:8c:7a:44  txqueuelen 1000  (Ethernet)
        RX packets 5397512  bytes 1376033231 (1.2 GiB)
        RX errors 0  dropped 0  overruns 0  frame 0
        TX packets 6343341  bytes 5990187987 (5.5 GiB)
        TX errors 0  dropped 0 overruns 0  carrier 0  collisions 0
        device interrupt 20  memory 0xfe500000-fe520000

lo: flags=73<UP,LOOPBACK,RUNNING>  mtu 65536
        inet 127.0.0.1  netmask 255.0.0.0
        inet6 ::1  prefixlen 128  scopeid 0x10<host>
        loop  txqueuelen 0  (Local Loopback)
        RX packets 796010  bytes 3692664543 (3.4 GiB)
        RX errors 0  dropped 0  overruns 0  frame 0
        TX packets 796010  bytes 3692664543 (3.4 GiB)
        TX errors 0  dropped 0 overruns 0  carrier 0  collisions 0
Settings for Virtualization Management
The previous configuration could be done directly on Virtualization Management console but since this is all new features and code, it has a bug (as of 2014-01-07). The workaround was found by Mateusz Marzantowicz on a discussion list about it.
- Run Virtualization Manager console (virt-manager command) as root and make sure you are connected to the libvirt daemon.
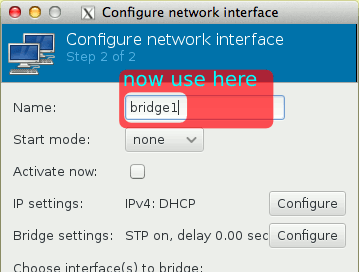
- From the menu, select Edit ➡ Connection Details ➡ Network Interface and add a new one.
- Simply paste the same Interface name you created above, “bridge1” in my case, and save it with no further configurations. This causes virt-manager to adhere to what is defined to this interface on NetworkManager:
- Note that with no further configuration the bridge interface appears here with correct slave interface:

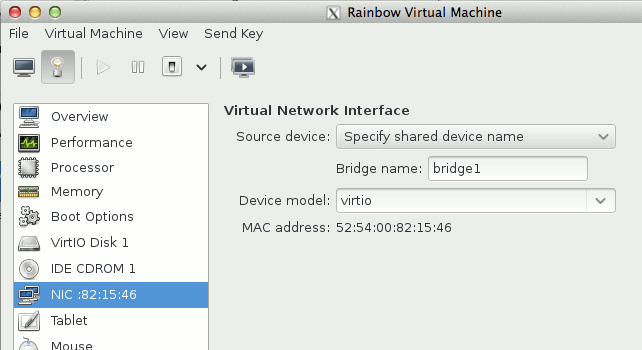
Settings on Virtual Machines
Now each VM on virt-manager should be configured this way:
Now my KVM VMs are members of my network as any other machine or device.
Isn’t MacVTap suppose to take care of bridging? Wouldn’t you need to create a bridge for each VM otherwise?
No, no need for exclusive bridge per VM. You make the bridge on the bare metal and use it to create regular network interfaces on the VMs.
I don’t know much about MacVTap. All I know is that all this implementation is still (Feb 05 2014) buggy, specially on the UI part, so maybe it will be easier in the future.
Your URL has been passed around as a solution for bridged networking in F20, but I and several of my colleagues have had trouble. What does your ifcfg-Bridge_connection look like within /etc/sysconfig/network-scripts?
Thanks!
I ended up having to do static addressing, DHCP didn’t seem to work no matter what I tried. Thanks for most of your tutorial, though! Very helpful!
Jason, this method used to work until latest NetworkManager and libnl3 (NetworkManager-0.9.9.0-28.git20131003.fc20.x86_64) update. This is being discussed in this bug report and apparently there is a solution that works for most people but not for me. Since the method here is purely official UI based, I’m starting to suspect the UI programs are buggy and generate network-scripts files in a wrong way.
I’m waiting for more feedbacks from users of that bug report. I believe a solution will appear in the next days.
Yeah, it works now with a distro-sync as of 5 Jun 2014
worked for me with a minimal of head scratching. Thanks
I can only get it to work with DHCP. If I give a static address to the bridge, the virtual guests can’t connect.On the guest, neither bridge0 nor eth0 show in ipv4 address. What am I doing wrong?
TIA
Lavie
And a new problem – the slaved bridge connections (as defined in the second image in your Settings for NetworkManager fig. 3) disappears from time to time – often after a poweroff (especially after power outages). I keep on needing to manually to redefine it. This is with Heisbug and the latest updates.
Hi,
Very useful. I’ve tried the same method to create a bridge also for my wireless link, and no luck this doesn’t work. No way to connect the network. Any idea how to debug this?
Thanks.
Hi Avi,
In the final step, you use the virt-manager GUI to define the qemu network and tell the guest O/S to use it. I’m sure this can be done with qemu-system-* command line switches, but I can’t find an example. Can you help? Perhaps, “ps -aelf | grep qemu” and paste the relevant line?
Thanks for the help,
Chris.
Chris, I have no idea. I didn’t study how to make it through the command line.
If you find out, please let me know posting a comment here and I’ll update the post !
Thank you
GREAT 🙂 WORKS for me 🙂 thx