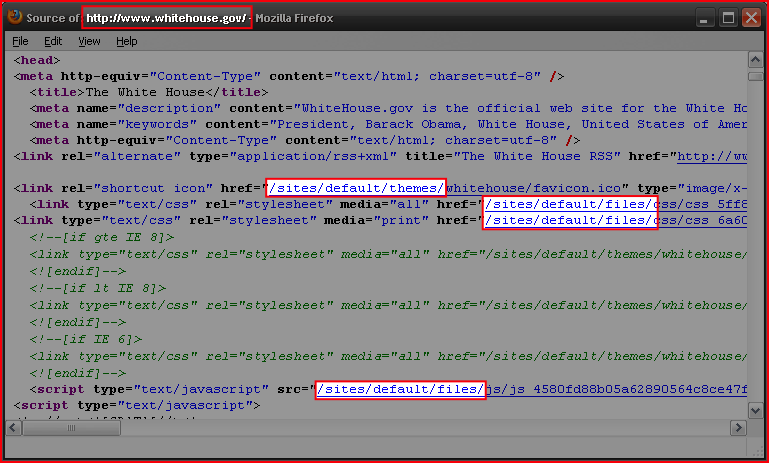
At Uniqlo flagship store in Ginza, Tokyo, there was this T-shirt with an encoded shell script.


Well, I had to decode it and see the result.
Read MorePosts for tech geeks.

At Uniqlo flagship store in Ginza, Tokyo, there was this T-shirt with an encoded shell script.
Well, I had to decode it and see the result.
Read MoreHere is a short shell script to show last logins from SSH, XRDP, SUDO and Cockpit. In addition it show potential disk problems from S.M.A.R.T.
#!/bin/sh

default_since='-1days'
default_priority=info

read -r -d "" data << END_OF_DATA
System login         ^ systemd-logind          ^ info  ^         ^ New session
XRDP                 ^ xrdp-sesman             ^ debug ^ -5days  ^ logged in|Received system login request
Cockpit login        ^ cockpit-session         ^       ^         ^ session opened
SUDO                 ^ sudo                    ^       ^         ^ session opened
Storage problems     ^ smartd                  ^       ^ -1days  ^ uncorrectable|unreadable
END_OF_DATA

trim() {
    local s="$*"

    # remove leading whitespace
    s="${s#"${s%%[![:space:]]*}"}"

    # remove trailing whitespace
    s="${s%"${s##*[![:space:]]}"}"

    printf '%s' "$s"
}

IFS="^"
echo "$data" | while read title slid priority since grep; do
	effective_since=$default_since
	effective_priority=$default_priority

	[[ -n "$(trim $since)" ]] && effective_since="$(trim $since)"
	[[ -n "$(trim $priority)" ]] && effective_priority="$(trim $priority)"

	echo "$(trim $title)"
	journalctl \
		--no-pager \
		--no-tail \
		--since $effective_since \
		--priority $effective_priority \
		--reverse \
		--grep "$(trim $grep)" \
		-- SYSLOG_IDENTIFIER="$(trim $slid)"

	echo; echo
done
I made it with the help of Cockpit Logs feature that shows the actual command being executed based on how you configure it.
The most important part of the script is the journalctl command. Everything else are defaults, the list of desired syslog identifiers and what to extract from them, and output formatting.

Here are simple good practices to ensure health of your HDDs, using SMART.
Read MoreI’m doing Machine Learning Industrialization for more than 2 years and I’m thrilled to see it featured by McKinsey as top 2 in its 2023 tech trends!


Need to mirror an entire website? Use the httrack command, available in all Linux distributions. If site requires authentication, provide to httrack a cookies.txt file exported from your browser.
Colegas programadoræs, arquitetᴔ︎s e companheirᴔ︎s da TI, podemos retornar à Língua Mãe porque uma palavra que usamos muito no nosso dia a dia — FRAMEWORK — já tem popularizada a sua tradução para Português:
ARCABOUÇO
Obrigado, Ministério da Fazenda

First allow the Unix user that will make backups (root, in my case) to access MariaDB without a password (works only if accessing from same host that the server is running):
GRANT ALL PRIVILEGES ON *.* TO `root`@`localhost` IDENTIFIED VIA unix_socket WITH GRANT OPTION;
Command line on Windows (10+) nowadays doesn’t have to be only PuTTY to a remote Linux machine. In fact many Linux concepts were incorporated on Windows.
First, activate WSL. Since I enjoy using Fedora, and not Ubuntu, this guide by Jonathan Bowman has helped me to set WSL exactly as I like. The guide points to some old Fedora images, so pay attention to its links to get a newer one. Then, the guide also explains how to initialize the Fedora image, customize it as default, configure your user etc.
Yes, it has tools from OpenSSH, such as the plain ssh client, ssh-agent and others. No need for PuTTY.
This guide by Chris Hastie explains how to activate SSH Agent with your private key. I’m not sure it is fairly complete, since I didn’t test yet if it adds your key in session startup for a complete password-less experience. I’m still trying.
Basically, you need to activate a Windows service and have your private key in $HOME\.ssh\id_rsa, exactly like under Linux.
The old command prompt is very limited, as we know, and obsolete. Luckily, Microsoft has released a new, much improved, Terminal application that can be installed from the Store. On Windows 11, the Terminal app is already there for you.

It allows defining sessions with custom commands as wsl (to get into the Fedora WSL container installed above), cmd, ssh. I use tmux in all Linux computers that I connect, so my default access command is:
ssh -l USERNAME -A -t HOSTNAME "tmux new-session -s default -n default -P -A -D"
Windows Terminal app is highly customizable, with colors and icons. And this repo by Mark Badolato contains a great number of terminal color schemes. Select a few from the windowsterminal folder and paste their JSON snippet into the file %HOME%\AppData\Local\Packages\Microsoft.WindowsTerminal_8wekyb3d8bbwe\LocalState\settings.json.
We the data people immediately identify a poorly designed system when we see it handling date and time as plain local time, instead of the number of seconds since January 1st 1970 of time zone 0.
Just your daily dose of nerdy facts…

Programming is the art of creating flexible engines that can be easily extended as new features are needed over time.

Experienced programmers use Design Patterns to help make engine’s functions, features and structure (materialized as code) easily and clearly extensible.
Young programmers must learn and use Design Patterns, and Refactoring Guru has a very nice starting point.
macOS Catalina doesn’t ship with Python 3, only 2. But you can still get 3 from Apple, updated regularly through system’s official update methods. You don’t need to get the awful Anaconda on you Mac to play with Python.
Python 3 is shipped by Xcode Command Line Tools. To get it installed (without the heavy Xcode GUI), type this in your terminal:
xcode-select --install
This way, every time Apple releases an update, you’ll get it.
Settings window will pop so wait 5 minutes for the installation to finish.
If you already have complete Xcode installed, this step was unnecessary (you already had Python 3 installed) and you can continue to the next section of the tutorial.
In case you already have Python installed under your user and modules downloaded with pip, remove it:
rm -rf ${HOME}/Caches/com.apple.python/${HOME}/Library/Python \
${HOME}/Library/Python/ \
${HOME}/Library/Caches/pip
Now that you get a useful Python 3 installation, use pip3 to install Python modules that you’ll need. Don’t forget to use –user to get things installed on your home folder so you won’t pollute your overall system. For my personal use, I need the complete machine learning, data wrangling and Jupyter suite:
pip3 install --user sqlalchemy
pip3 install --user matplotlib
pip3 install --user pandas
pip3 install --user jupyterlab
pip3 install --user PyMySQL
pip3 install --user configobj
pip3 install --user requests
pip3 install --user seaborn
pip3 install --user bs4
pip3 install --user xgboost
pip3 install --user scikit_learn
But you might need other things as Django or other sqlalchemy drivers. Set yourself at home and install them with pip3.
For modules that require compilation and special library, say crypto, do it like this:
CFLAGS="-I/Library/Developer/CommandLineTools/Library/Frameworks/Python3.framework/Versions/3.7/include" \
LDFLAGS="-L/Library/Developer/CommandLineTools/Library/Frameworks/Python3.framework/Versions/3.7/lib" \
pip3 install --user pycrypto
For some reason, Apple installs many different Python 3 binaries in different places of the system. The one that gets installed on /usr/bin/python3 has problems loading some libraries and instrumentation with install_name_tool would be required. So lets just use the binary that works better:
export PATH=/Library/Developer/CommandLineTools/usr/bin:$PATH
Commands installed by pip3 will be available in the ~/Library/Python/3.7/bin/ folder, so just add it to your PATH:
export PATH=$PATH:~/Library/Python/3.7/bin/
Now I can simply type jupyter-lab anywhere in the terminal or command line to make it fire my browser and get a Jupyter environment.
Xcode Command Line Tools will get you a full hand of other useful developer tools, such as git, subversion, GCC and LLVM compilers and linkers, make, m4 and a complete Python 3 distribution. You can see most of its installation on /Library/Developer/CommandLineTools folder.
For production and high end processing I’ll still use Python on Linux with my preferred distribution’s default packages (no Anaconda). But this method of getting Python on macOS is fastest and cleanest to get you going on your own data scientist laptop without a VM nor a container.
Se você está numa encruzilhada para escolher uma linguagem de computador para aprender a programar, escolha Python.
Read MoreJupyter Notebooks are the elegant way that Data Scientists work and all software needed to run them are already pre-packaged on Fedora (and any other Linux distribution). It is encouraged to use your distribution’s packaging infrastructure to install Python packages. Avoid at any cost installing Python packages with pip, conda, anaconda and from source code. The reasons for this good practice are security, ease of use, to keep the system clean and to make installation procedures easily reproducible in DevOps scenarios.

Here is a curated list of active, responsive and valid BitTorrent trackers. Add them to the list of trackers of your torrents to increase your chance of finding peers and improve download speed.
Read More
Subject tagCreator tag based on camera modelThere was a time that Apple macOS was the best platform to handle multimedia (audio, image, video). This might be still true in the GUI space. But Linux presents a much wider range of possibilities when you go to the command line, specially if you want to:
The Open Source community has produced state of the art command line tools as ffmpeg, exiftool and others, which I use every day to do non-trivial things, along with Shell advanced scripting. Sure, you can get these tools installed on Mac or Windows, and you can even use almost all these recipes on these platforms, but Linux is the native platform for these tools, and easier to get the environment ready.
These are my personal notes and I encourage you to understand each step of the recipes and adapt to your workflows. It is organized in Audio, Video and Image+Photo sections.
I use Fedora Linux and I mention Fedora package names to be installed. You can easily find same packages on your Ubuntu, Debian, Gentoo etc, and use these same recipes.
ffprobe file.mp3
ffprobe file.m4v
ffprobe file.mkv
ls *flac | while read f; do
	ffmpeg -i "$f" -acodec alac -vn "${f[@]/%flac/m4a}" < /dev/null;
done
ls *flac | while read f; do
   ffmpeg -i "$f" -qscale:a 2 -vn "${f[@]/%flac/mp3}" < /dev/null;
done
First, make sure you have Negativo17 build of FFMPEG, so run this as root:
dnf config-manager --add-repo=http://negativo17.org/repos/fedora-multimedia.repo
dnf update ffmpeg
Now encode:
ls *flac | while read f; do
   ffmpeg -i "$f" -vn -c:a libfdk_aac -vbr 5 -movflags +faststart "${f[@]/%flac/m4a}" < /dev/null;
done
Has been said the Fraunhofer AAC library can’t be legally linked to ffmpeg due to license terms violation. In addition, ffmpeg’s default AAC encoder has been improved and is almost as good as Fraunhofer’s, specially for constant bit rate compression. In this case, this is the command:
ls *flac | while read f; do
   ffmpeg -i "$f" -vn -c:a aac -b:a 256k -movflags +faststart "${f[@]/%flac/m4a}" < /dev/null;
done
This is one of my favorites, extremely powerful. Very useful when you get a Hi-Fi, complete but useless WMA-Lossless collection and need to convert it losslesslly to something more portable, ALAC in this case. Change the FMT=flac to FMT=wav or FMT=wma (only when it is WMA-Lossless) to match your source files. Don’t forget to tag the generated files.
FMT=flac
# Create identical directory structure under new "alac" folder
find . -type d | while read d; do
   mkdir -p "alac/$d"
done

find . -name "*$FMT" | sort | while read f; do
   ffmpeg -i "$f" -acodec alac -vn "alac/${f[@]/%$FMT/m4a}" < /dev/null;
   mp4tags -E "Deezer lossless files (https://github.com/Ghostfly/deezDL) + 'ffmpeg -acodec alac'" "alac/${f[@]/%$FMT/m4a}";
done
iPhone and iPod music player can display the file’s embedded lyrics and this is a cool feature. There are several ways to get lyrics into your music files. If you download music from Deezer using SMLoadr, you’ll get files with embedded lyrics. Then, the FLAC to ALAC process above will correctly transport the lyrics to the M4A container. Another method is to use beets music tagger and one of its plugins, though it is very slow for beets to fetch lyrics of entire albums from the Internet.
The third method is manual. Let lyrics.txt be a text file with your lyrics. To tag it into your music.m4a, just do this:
mp4tags -L "$(cat lyrics.txt)" music.m4a
And then check to see the embedded lyrics:
ffprobe music.m4a 2>&1 | less
If some of your friends has the horrible tendency to commit this crime and rip CDs as 1 file for entire CD, there is an automation to fix it. APE is the most difficult and this is what I’ll show. FLAC and WAV are shortcuts of this method.
ffmpeg -i audio-cd.ape audio-cd.wav
iconv -f Latin1 -t UTF-8 audio-cd.cue | shnsplit -t "%n · %p ♫ %t" audio-cd.wav
ls *wav | while read f; do
   ffmpeg -i "$f" -acodec alac -vn "${f[@]/%wav/m4a}" < /dev/null;
done
This will get you lossless ALAC files converted from the intermediary WAV files. You can also convert them into FLAC or MP3 using variations of the above recipes.
Now the files are ready for your tagger.
This is a lossless and fast process, chapters and subtitles are added as tags and streams to the file; audio and video streams are not reencoded.
bash$ file subtitles_file.srt
subtitles_file.srt: ISO-8859 text, with CRLF line terminators
It is not UTF-8 encoded, it is some ISO-8859 variant, which I need to know to correctly convert it. My example uses a Brazilian Portuguese subtitle file, which I know is ISO-8859-15 (latin1) encoded because most latin scripts use this encoding.
bash$ iconv -f latin1 -t utf8 subtitles_file.srt > subtitles_file_utf8.srt
bash$ file subtitles_file_utf8.srt
subtitles_file_utf8.srt: UTF-8 Unicode text, with CRLF line terminators
bash$ cat chapters.txt
CHAPTER01=00:00:00.000
CHAPTER01NAME=Chapter 1
CHAPTER02=00:04:31.605
CHAPTER02NAME=Chapter 2
CHAPTER03=00:12:52.063
CHAPTER03NAME=Chapter 3
…
MP4Box -ipod \
       -itags 'track=The Movie Name:cover=cover.jpg' \
       -add 'subtitles_file_utf8.srt:lang=por' \
       -chap 'chapters.txt:lang=eng' \
       movie.mp4
The MP4Box command is part of GPac.
OpenSubtitles.org has a large collection of subtitles in many languages and you can search its database with the IMDB ID of the movie. And ChapterDB has the same for chapters files.
Since iTunes can tag and beautify your movie files in Windows and Mac, libmp4v2 can do the same on Linux. Here we’ll use it to add the movie cover image we downloaded from IMDB along with some movie metadata for Woody Allen’s 2011 movie Midnight in Paris:
mp4tags -H 1 -i movie -y 2011 -a "Woody Allen" -s "Midnight in Paris" -m "While on a trip to Paris with his..." "Midnight in Paris.m4v"
mp4art -k -z --add cover.jpg "Midnight in Paris.m4v"
This way the movie file will look good and in the correct place when transferred to your iPod/iPad/iPhone.
Of course, make sure the right package is installed first:
dnf install libmp4v2
File extensions MOV, MP4, M4V, M4A are the same format from the ISO MPEG-4 standard. They have different names just to give a hint to the user about what they carry.
dnf -y install libdvdcss vobcopy
mount /dev/sr0 /mnt/dvd;
cd /target/folder;
vobcopy -m /mnt/dvd .
You’ll get a directory tree with decrypted VOB and BUP files. You can generate an ISO file from them or, much more practical, use HandBrake to convert the DVD titles into MP4/M4V (more compatible with wide range of devices) or MKV/WEBM files.
Modern iPhones can record videos at 240 or 120fps so when you’ll watch them at 30fps they’ll look slow-motion. But regular players will play them at 240 or 120fps, hiding the slo-mo effect.
We’ll need to handle audio and video in different ways. The video FPS fix from 240 to 30 is loss less, the audio stretching is lossy.
# make sure you have the right packages installed
dnf install mkvtoolnix sox gpac faac
#!/bin/bash

# Script by Avi Alkalay
# Freely distributable

f="$1"
ofps=30
noext=${f%.*}
ext=${f##*.}

# Get original video frame rate
ifps=`ffprobe -v error -select_streams v:0 -show_entries stream=r_frame_rate -of default=noprint_wrappers=1:nokey=1 "$f" < /dev/null  | sed -e 's|/1||'`
echo

# exit if not high frame rate
[[ "$ifps" -ne 120 ]] && [[ "$ifps" -ne 240 ]] && exit

fpsRate=$((ifps/ofps))
fpsRateInv=`awk "BEGIN {print $ofps/$ifps}"`

# loss less video conversion into 30fps through repackaging into MKV
mkvmerge -d 0 -A -S -T \
	--default-duration 0:${ofps}fps \
	"$f" -o "v$noext.mkv"

# loss less repack from MKV to MP4
ffmpeg -loglevel quiet -i "v$noext.mkv" -vcodec copy "v$noext.mp4"
echo

# extract subtitles, if original movie has it
ffmpeg -loglevel quiet -i "$f" "s$noext.srt"
echo

# resync subtitles using similar method with mkvmerge
mkvmerge --sync "0:0,${fpsRate}" "s$noext.srt" -o "s$noext.mkv"

# get simple synced SRT file
rm "s$noext.srt"
ffmpeg -i "s$noext.mkv" "s$noext.srt"

# remove undesired formating from subtitles
sed -i -e 's|<font size="8"><font face="Helvetica">\(.*\)</font></font>|\1|' "s$noext.srt"

# extract audio to WAV format
ffmpeg -loglevel quiet -i "$f" "$noext.wav"

# make audio longer based on ratio of input and output framerates
sox "$noext.wav" "a$noext.wav" speed $fpsRateInv

# lossy stretched audio conversion back into AAC (M4A) 64kbps (because we know the original audio was mono 64kbps)
faac -q 200 -w -s --artist a "a$noext.wav"

# repack stretched audio and video into original file while removing the original audio and video tracks
cp "$f" "${noext}-slow.${ext}"
MP4Box -ipod -rem 1 -rem 2 -rem 3 -add "v$noext.mp4" -add "a$noext.m4a" -add "s$noext.srt" "${noext}-slow.${ext}"

# remove temporary files
rm -f "$noext.wav" "a$noext.wav" "v$noext.mkv" "v$noext.mp4" "a$noext.m4a" "s$noext.srt" "s$noext.mkv"
If the audio is already AAC-encoded (may also be ALAC-encoded), create an MP4/M4V file:
ffmpeg -loop 1 -framerate 0.2 -i photo.jpg -i song.m4a -shortest -c:v libx264 -tune stillimage -vf scale=960:-1 -c:a copy movie.m4v
The above method will create a very efficient 0.2 frames per second (-framerate 0.2) H.264 video from the photo while simply adding the audio losslessly. Such very-low-frames-per-second video may present sync problems with subtitles on some players. In this case simply remove the -framerate 0.2 parameter to get a regular 25fps video with the cost of a bigger file size.
The -vf scale=960:-1 parameter tells FFMPEG to resize the image to 960px width and calculate the proportional height. Remove it in case you want a video with the same resolution of the photo. A 12 megapixels photo file (around 4032×3024) will get you a near 4K video.
If the audio is MP3, create an MKV file:
ffmpeg -loop 1 -framerate 0.2 -i photo.jpg -i song.mp3 -shortest -c:v libx264 -tune stillimage -vf scale=960:-1 -c:a copy movie.mkv
If audio is not AAC/M4A but you still want an M4V file, convert audio to AAC 192kbps:
ffmpeg -loop 1 -framerate 0.2 -i photo.jpg -i song.mp3 -shortest -c:v libx264 -tune stillimage -vf scale=960:-1 -c:a aac -strict experimental -b:a 192k movie.m4v
See more about FFMPEG photo resizing.
There is also a more efficient and completely lossless way to turn a photo into a video with audio, using extended podcast techniques. But thats much more complicated and requires advanced use of GPAC’s MP4Box and NHML. In case you are curious, see the Podcast::chapterize() and Podcast::imagify() methods in my music-podcaster script. The trick is to create an NHML (XML) file referencing the image(s) and add it as a track to the M4A audio file.
mkdir noexif;
exiftool -filename -T -if '(not $datetimeoriginal or ($datetimeoriginal eq "0000:00:00 00:00:00"))' *HEIC *JPG *jpg | while read f; do mv "$f" noexif/; done
Warning: use this only if image files have correct creation time on filesystem and if they don’t have an EXIF header.
exiftool -overwrite_original '-DateTimeOriginal< ${FileModifyDate}' *CR2 *JPG *jpg
jhead -autorot -cmd "jpegtran -progressive '&i' > '&o'" -ft *jpg
This process will rename silly, sequential, confusing and meaningless photo file names as they come from your camera into a readable, sorteable and useful format. Example:
IMG_1234.JPG ➡ 2015.07.24-17.21.33 • Max playing with water【iPhone 6s✚】.jpg
Note that new file name has the date and time it was taken, whats in the photo and the camera model that was used.
exiftool -overwrite_original '-OriginalFileName<${filename}' *CR2 *JPG *jpg
exiftool '-filename<${DateTimeOriginal} 【${Model}】%.c.%e' -d %Y.%m.%d-%H.%M.%S *CR2 *HEIC *JPG *jpg
\ls *HEIC *JPG *jpg *heic | while read f; do
    nf=`echo "$f" | sed -e 's/0.JPG/.jpg/i; s/0.HEIC/.heic/i'`;
    t=`echo "$f" | sed -e 's/0.JPG/1.jpg/i; s/0.HEIC/1.heic/i'`;
    [[ ! -f "$t" ]] && mv "$f" "$nf";
done
Alternative for macOS without SED:
\ls *HEIC *JPG *jpg *heic | perl -e '
	while (<>) {
		chop; $nf=$_; $t=$_;
		$nf=~s/0.JPG/.jpg/i; $nf=~s/0.HEIC/.heic/i;
		$t=~s/0.JPG/1.jpg/i; $t=~s/0.HEIC/1.heic/i;
		rename($_,$nf) if (! -e $t);
	}'
\ls *HEIC *JPG | while read f; do
    nf=`echo "$f" | sed -e 's/JPG/jpg/; s/HEIC/heic/'`;
    mv "$f" "$nf";
done
\ls *HEIC *JPG *jpg *heic | while read f; do
    nf=`echo "$f" | sed -e 's/Canon PowerShot G1 X/Canon G1X/;
      s/iPhone 6s Plus/iPhone 6s✚/;
      s/iPhone 7 Plus/iPhone 7✚/;
      s/Canon PowerShot SD990 IS/Canon SD990 IS/;
      s/HEIC/heic/;
      s/JPG/jpg/;'`;
    mv "$f" "$nf";
done
You’ll get file names as 2015.07.24-17.21.33 【Canon 5D Mark II】.jpg. If you took more then 1 photo in the same second, exiftool will automatically add an index before the extension.
Subject tag\ls *【*】* | while read f; do s=`exiftool -T -Subject "$f"`; if [[ " $s" != " -" ]]; then nf=`echo "$f" | sed -e "s/ 【/ • $s 【/; s/\:/∶/g;"`; mv "$f" "$nf"; fi; done
exiftool '-filename<${DateTimeOriginal} • ${Subject} 【${Model}】%.c.%e' -d %Y.%m.%d-%H.%M.%S *CR2 *JPG *HEIC *jpg *heic
exiftool -T -Model *jpg | sort -u
Output is the list of camera models on this photos:
Canon EOS REBEL T5i
DSC-H100
iPhone 4
iPhone 4S
iPhone 5
iPhone 6
iPhone 6s Plus
CRE="John Doe";    exiftool -overwrite_original -creator="$CRE" -by-line="$CRE" -Artist="$CRE" -if '$Model=~/DSC-H100/'            *.jpg
CRE="Jane Black";  exiftool -overwrite_original -creator="$CRE" -by-line="$CRE" -Artist="$CRE" -if '$Model=~/Canon EOS REBEL T5i/' *.jpg
CRE="Mary Doe";    exiftool -overwrite_original -creator="$CRE" -by-line="$CRE" -Artist="$CRE" -if '$Model=~/iPhone 5/'            *.jpg
CRE="Peter Black"; exiftool -overwrite_original -creator="$CRE" -by-line="$CRE" -Artist="$CRE" -if '$Model=~/iPhone 4S/'           *.jpg
CRE="Avi Alkalay"; exiftool -overwrite_original -creator="$CRE" -by-line="$CRE" -Artist="$CRE" -if '$Model=~/iPhone 6s Plus/'      *.jpg
If you geometrically mark people faces and their names in your photos using tools as Picasa, you can easily search for the photos which contain “Suzan” or “Marcelo” this way:
exiftool -fast -r -T -Directory -FileName -RegionName -if '$RegionName=~/Suzan|Marcelo/' .
-Directory, -FileName and -RegionName specify the things you want to see in the output. You can remove -RegionName for a cleaner output.
The -r is to search recursively. This is pretty powerful.
Your camera will tag your photos only with local time on CreateDate or DateTimeOriginal tags. There is another set of tags called GPSDateStamp and GPSTimeStamp that must contain the UTC time the photos were taken, but your camera won’t help you here. Hopefully you can derive these values if you know the timezone the photos were taken. Here are two examples, one for photos taken in timezone -02:00 (Brazil daylight savings time) and on timezone +09:00 (Japan):
exiftool -overwrite_original '-gpsdatestamp<${CreateDate}-02:00' '-gpstimestamp<${CreateDate}-02:00' '-TimeZone<-02:00' '-TimeZoneCity<São Paulo' *.jpg
exiftool -overwrite_original '-gpsdatestamp<${CreateDate}+09:00' '-gpstimestamp<${CreateDate}+09:00' '-TimeZone<+09:00' '-TimeZoneCity<Tokio' Japan_Photos_folder
Use exiftool to check results on a modified photo:
exiftool -s -G -time:all -gps:all 2013.10.12-23.45.36-139.jpg
[EXIF]          CreateDate                      : 2013:10:12 23:45:36
[Composite]     GPSDateTime                     : 2013:10:13 01:45:36Z
[EXIF]          GPSDateStamp                    : 2013:10:13
[EXIF]          GPSTimeStamp                    : 01:45:36
This shows that the local time when the photo was taken was 2013:10:12 23:45:36. To use exiftool to set timezone to -02:00 actually means to find the correct UTC time, which can be seen on GPSDateTime as 2013:10:13 01:45:36Z. The difference between these two tags gives us the timezone. So we can read photo time as 2013:10:12 23:45:36-02:00.
Moves is an amazing app for your smartphone that simply records for yourself (not social and not shared) everywhere you go and all places visited, 24h a day.
exiftool -overwrite_original -api GeoMaxExtSecs=86400 -geotag ../moves_export/gpx/yearly/storyline/storyline_2015.gpx '-geotime<${CreateDate}-08:00' Folder_with_photos_from_trip_to_Las_Vegas
Some important notes:
montage -mode concatenate -tile 1x8 *jpg COMPOSED.JPG
montage -mode concatenate -tile 8x1 *jpg COMPOSED.JPG
montage -mode concatenate -tile 4x2 *jpg COMPOSED.JPG
The montage command is part of the ImageMagick package.

This document explains working examples on how to use Bluemix platform advanced features such as:
cf command line interface, including DockerFor this, I’ll use the following source code structure:
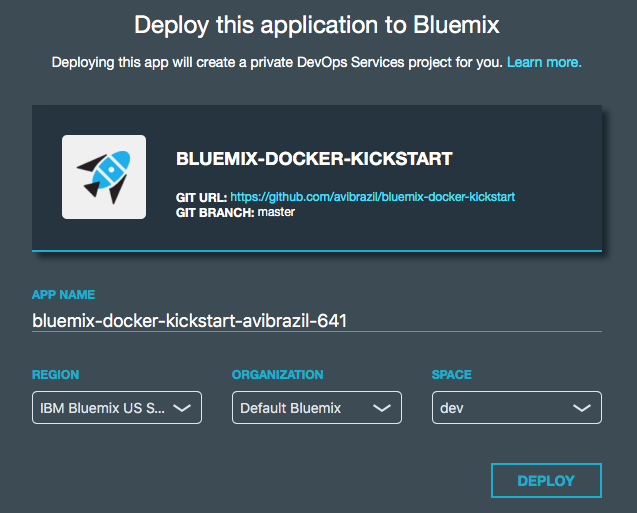
github.com/avibrazil/bluemix-docker-kickstart
The source code currently brings to life (as an example), integrated with some Bluemix services and Docker infrastructure, a PHP application (the WordPress popular blogging platform), but it could be any Python, Java, Ruby etc app.
I feel it is important to position what Bluemix really is and which of its parts we are going to use. Bluemix is composed of 3 different things:
cf command from your laptop. IBM has extended this part of Bluemix with functions not currently available on CloudFoundry, notably the capability of executing regular VMs and Docker containers.This tutorial will dive into #1 and some parts of #3, while using some services from #2.
When fully provisioned, the entire architecture will look like this. Several Bluemix services (MySQL, Object store) packaged into a CloudFoundry App (bridge app) that serves some Docker containers that in turns do the real work. Credentials to access those services will be automatically provided to the containers as environment variables (VCAP_SERVICES).
The example source code repo contains boilerplate code that is intentionally generic and clean so you can easily fork, add and modify it to fit your needs. Here is what it contains:
bridge-app folder and manifest.yml filemanifest.yml that defines app name, dependencies and other characteristics to deploy the app contents under bridge-app.containersphpinfo and wordpress directories, but there are some other useful examples you can use..bluemix folderadmin folderThe easiest way to deploy the app is through DevOps Services:

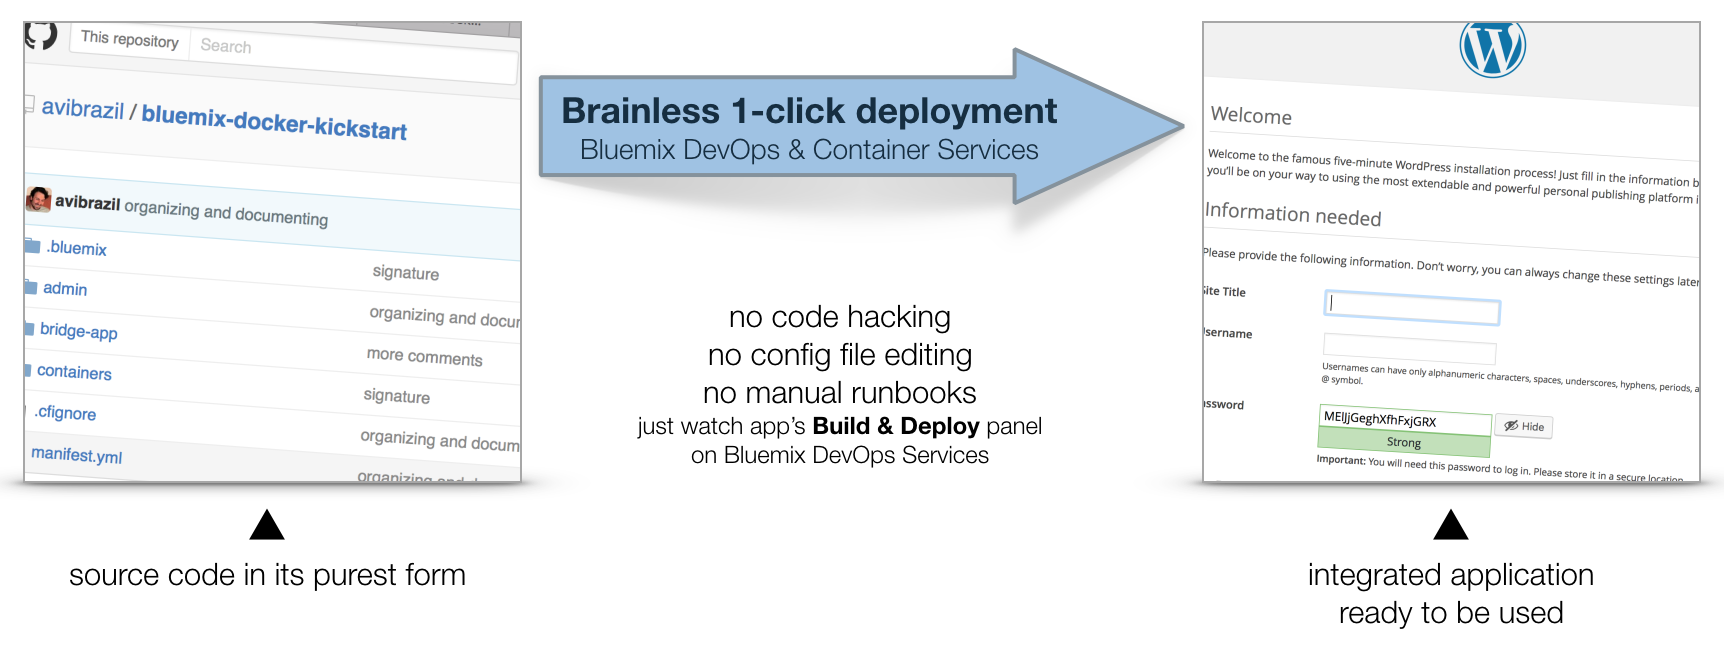
Conceptually, these are the things you need to do to fully deploy an app with Docker on Bluemix:
The idea is to encapsulate all these steps in code so deployments can be done entirely unattended. Its what I call brainless 1-click deployment. There are 2 ways to do that:
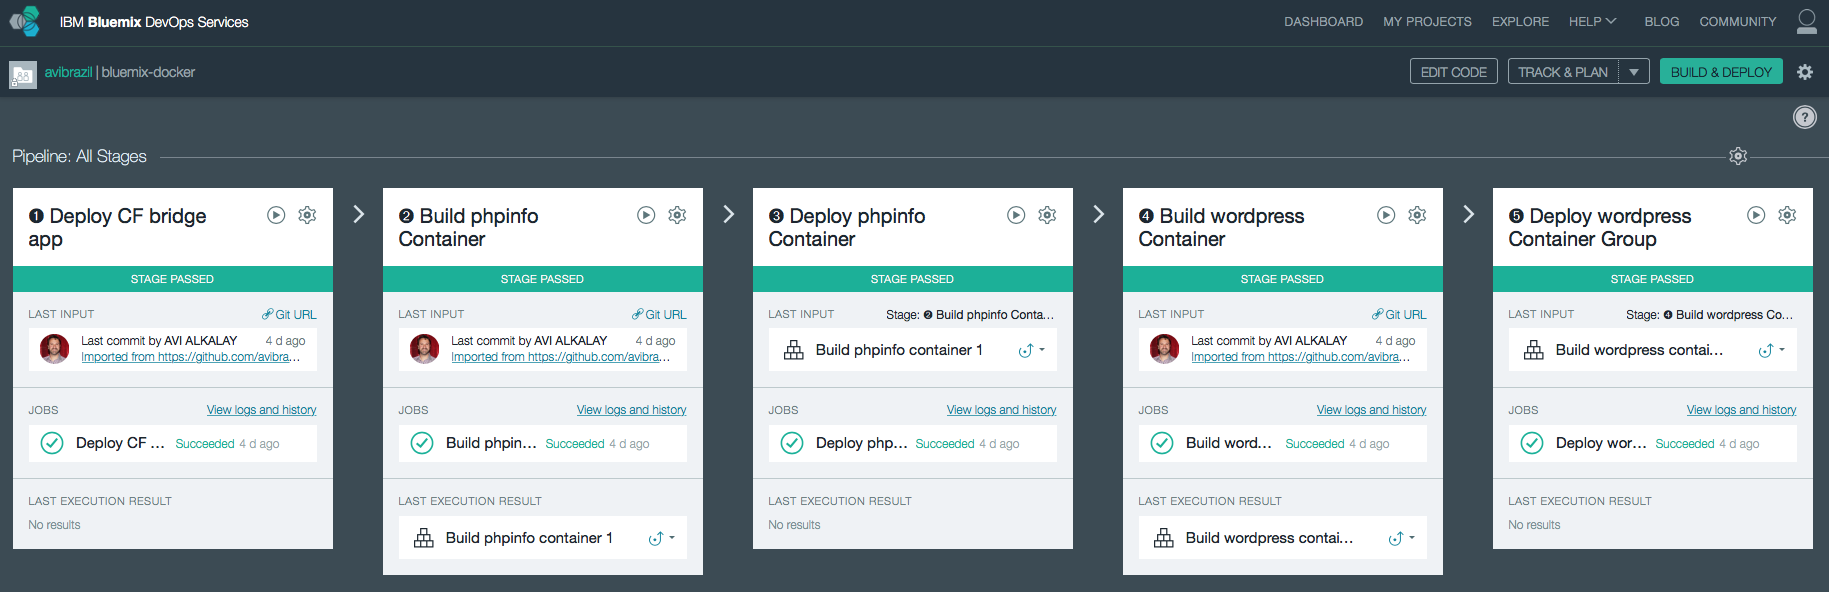
admin/deploy script in our code..bluemix/pipeline.yml file.From here, we will detail each of these steps both as commands (on the script) and as stages of the pipeline.
I used the cf marketplace command to find the service names and plans available. ClearDB provides MySQL as a service. And just as an example, I’ll provision an additional Object Storage service. Note the similarities between both methods.
cf create-service \
  cleardb \
  spark \
  bridge-app-database;

cf create-service \
  Object-Storage \
  Free \
  bridge-app-object-store;
When you deploy your app to Bluemix, DevOps Services will read your manifest.yml and automatically provision whatever is under the declared-services block. In our case:
declared-services:
  bridge-app-database:
    label: cleardb
    plan: spark
  bridge-app-object-store:
    label: Object-Storage
    plan: Free
The manifest.yml file has all the details about our CF app. Name, size, CF build pack to use, dependencies (as the ones instantiated in previous stage). So a plain cf push will use it and do the job. Since this app is just a bridge between our containers and the services, we’ll use minimum resources and the minimum noop-buildpack. After this stage you’ll be able to see the app running on your Bluemix console.
The heavy lifting here is done by the Dockerfiles. We’ll use base CentOS images with official packages only in an attempt to use best practices. See phpinfo and wordpress Dockerfiles to understand how I improved a basic OS to become what I need.
The cf ic command is basically a clone of the well known docker command, but pre-configured to use Bluemix Docker infrastructure. There is simple documentation to install the IBM Containers plugin to cf.
cf ic build \
   -t phpinfo_image \
   containers/phpinfo/;

cf ic build \
   -t wordpress_image \
   containers/wordpress/;
Stages handling this are “➋ Build phpinfo Container” and “➍ Build wordpress Container”.
Open these stages and note how image names are set.
After this stage, you can query your Bluemix private Docker Registry and see the images there. Like this:
$ cf ic images
REPOSITORY                                          TAG     IMAGE ID      CREATED     SIZE
registry.ng.bluemix.net/avibrazil/phpinfo_image     latest  69d78b3ce0df  3 days ago  104.2 MB
registry.ng.bluemix.net/avibrazil/wordpress_image   latest  a801735fae08  3 days ago  117.2 MB
A Docker image is not yet a container. A Docker container is an image that is being executed.
To make our tutorial richer, we’ll run 2 sets of containers:
cf ic run \
   -P \
   --env 'CCS_BIND_APP=bridge-app-name' \
   --name phpinfo_instance \
   registry.ng.bluemix.net/avibrazil/phpinfo_image;


IP=`cf ic ip request |
    grep "IP address" |
    sed -e "s/.* \"\(.*\)\" .*/\1/"`;


cf ic ip bind $IP phpinfo_instance;
Equivalent stage is “➌ Deploy phpinfo Container”.
Open this stage and note how some environment variables are defined, specially the BIND_TO.
Bluemix DevOps Services default scripts use these environment variables to correctly deploy the containers.
The CCS_BIND_APP on the script and BIND_TO on the pipeline are key here. Their mission is to make the bridge-app’s VCAP_SERVICES available to this container as environment variables.
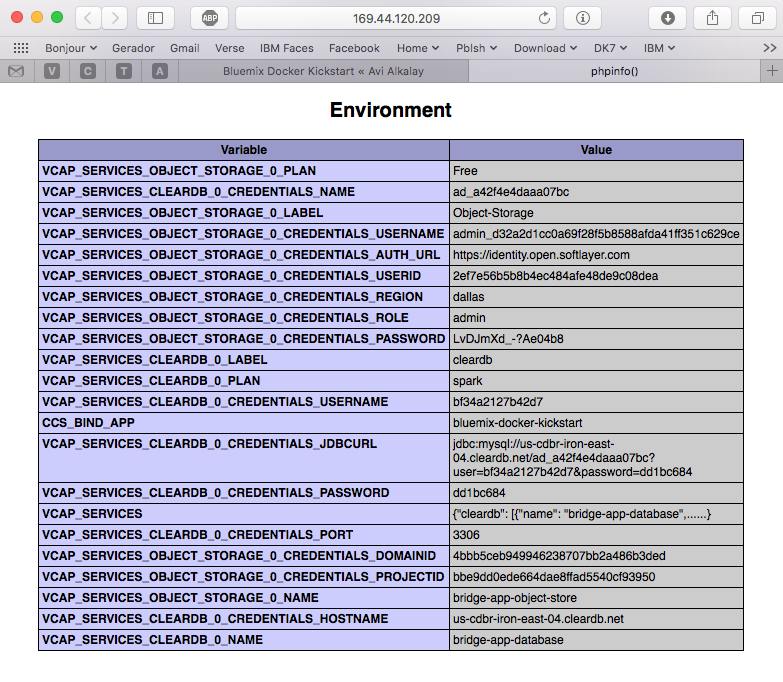
In CloudFoundry, VCAP_SERVICES is an environment variable containing a JSON document with all credentials needed to actually access the app’s provisioned APIs, middleware and services, such as host names, users and passwords. See an example below.
cf ic group create \
   -P \
   --env 'CCS_BIND_APP=bridge-app-name' \
   --auto \
   --desired 2 \
   --name wordpress_group_instance \
   registry.ng.bluemix.net/avibrazil/wordpress_image


cf ic route map \
   --hostname some-name-wordpress \
   --domain $DOMAIN \
   wordpress_group_instance
The cf ic group create creates a container group and runs them at once.
The cf ic route map command configures Bluemix load balancer to capture traffic to http://some-name-wordpress.mybluemix.net and route it to the wordpress_group_instance container group.
Equivalent stage is “➎ Deploy wordpress Container Group”.
Look in this stage’s Environment Properties how I’m configuring container group.
I had to manually modify the standard deployment script, disabling deploycontainer and enabling deploygroup.
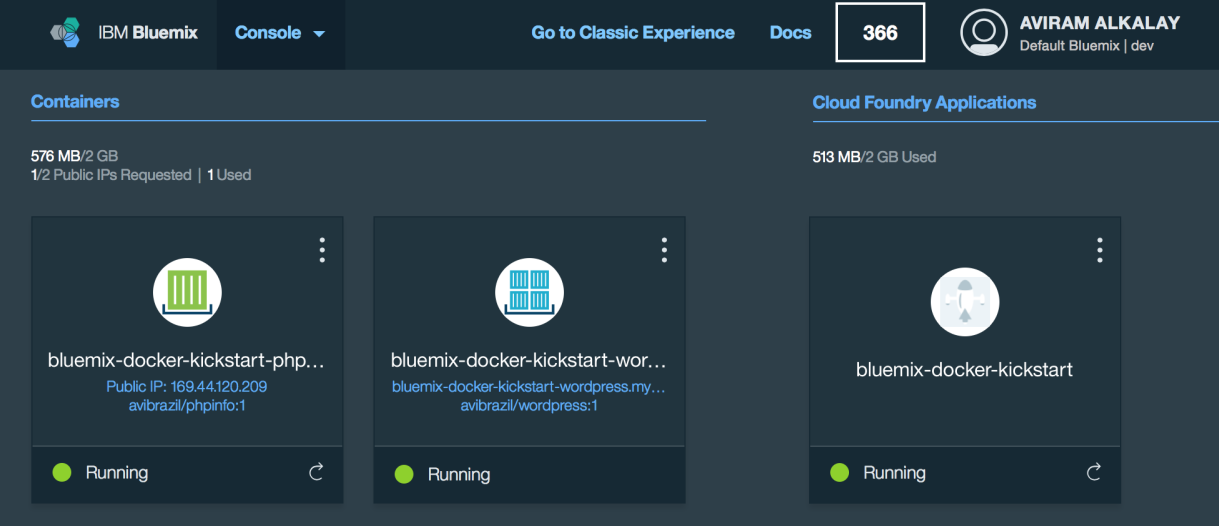
At this point, WordPress (the app that we deployed) is up and running inside a Docker container, and already using the ClearDB MySQL database provided by Bluemix. Access the URL of your wordpress container group and you will see this:
Bluemix dashboard also shows the components running:
But the most interesting evidence you can see accessing the phpinfo container URL or IP. Scroll to the environment variables section to see all services credentials available as environment variables from VCAP_SERVICES:
I use these credentials to configure WordPress while building the Dockerfile, so it can find its database when executing:
.
.
.
RUN yum -y install epel-release;\
	yum -y install wordpress patch;\
	yum clean all;\
	sed -i '\
		         s/.localhost./getenv("VCAP_SERVICES_CLEARDB_0_CREDENTIALS_HOSTNAME")/ ; \
		s/.database_name_here./getenv("VCAP_SERVICES_CLEARDB_0_CREDENTIALS_NAME")/     ; \
		     s/.username_here./getenv("VCAP_SERVICES_CLEARDB_0_CREDENTIALS_USERNAME")/ ; \
		     s/.password_here./getenv("VCAP_SERVICES_CLEARDB_0_CREDENTIALS_PASSWORD")/ ; \
	' /etc/wordpress/wp-config.php;\
	cd /etc/httpd/conf.d; patch < /tmp/wordpress.conf.patch;\
	rm /tmp/wordpress.conf.patch
.
.
.
So I’m using sed, the text-editor-as-a-command, to edit WordPress configuration file (/etc/wordpress/wp-config.php) and change some patterns there into appropriate getenv() calls to grab credentials provided by VCAP_SERVICES.
The containers folder in the source code presents one folder per image, each is an example of different Dockerfiles. We use only the wordpress and phpinfo ones here. But I’d like to highlight some best practices.
A Dockerfile is a script that defines how a container image should be built. A container image is very similar to a VM image, the difference is more related to the file formats that they are stored. VMs uses QCOW, VMDK etc while Docker uses layered filesystem images. From the application installation perspective, all the rest is almost the same. But only only Docker and its Dockerfile provides a super easy way to describe how to prepare an image focusing mostly only on your application. The only way to automate this process on the old Virtual Machine universe is through techniques such as Red Hat’s kickstart. This automated OS installation aspect of Dockerfiles might seem obscure or unimportant but is actually the core of what makes viable a modern DevOps culture.
patch command in your Dockerfile, as I did on wordpress Dockerfile.diff -Naur configfile.txt.org configfile.txt > configfile.patch
Then see the wordpress Dockerfile to understand how to apply it.
.zip or .tar.gz) from the Internet. In the wordpress Dockerfile I enabled the official EPEL repository so I can install WordPress with YUM. Same happens on the Django and NGINX Dockerfiles. Also note how I don’t have to worry about installing PHP and MySQL client libraries – they get installed automatically when YUM installs wordpress package, because PHP and MySQL are dependencies.CloudFoundry (the execution environment behind Bluemix) has its own Open Source container technology called Warden. And CloudFoundry’s Dockerfile-equivalent is called Buildpack. Just to illustrate, here is a WordPress buildpack for CloudFoundry and Bluemix.
To chose to go with Docker in some parts of your application means to give up some native integrations and facilities naturally and automatically provided by Bluemix. With Docker you’ll have to control and manage some more things for yourself. So go with Docker, instead of a buildpack, if:
The best balance is to use Bluemix services/APIs/middleware and native buildpacks/runtimes whenever possible, and go with Docker on specific situations. Leveraging the integration that Docker on Bluemix provides.
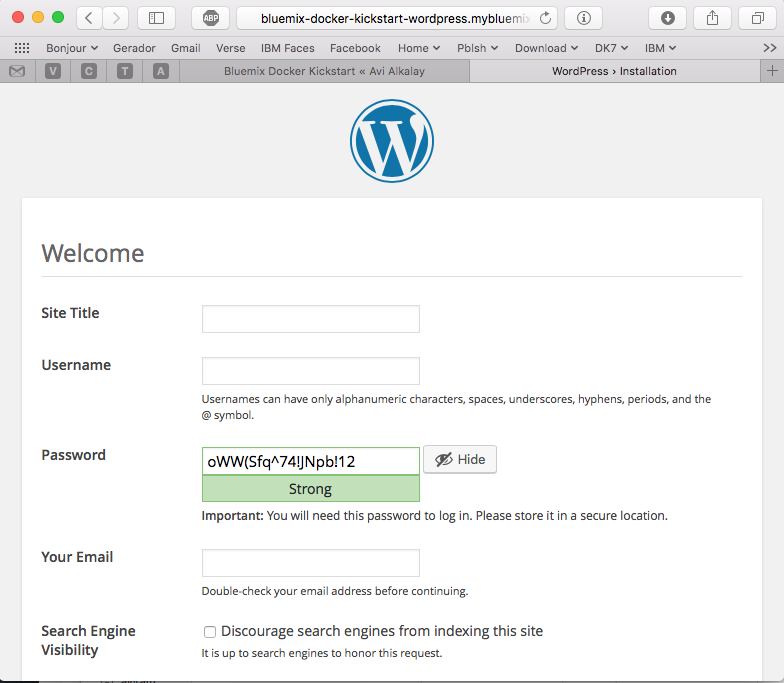
WordPress is packaged for Fedora and can be installed as a regular RPM (with DNF/YUM). The benefits of this method are that you don’t need to mess around with configuration files, filesystem permissions and since everything is pre-packaged to work together, additional configurations are minimal. At the end of this 3 minutes tutorial, you’ll get a running WordPress under an SSL-enabled Apache using MariaDB as its backend.
All commands need to be executed as root. Read More
Retina display is by far the best feature on MacBook Pros. The hardware has 3360×2100 pixels (13″ model) but Apple System Preferences app won’t let you reach that high. Read More
Com o lançamento de KVM para Power se aproximando no horizonte, tem se falado muito sobre rodar o Microsoft Windows em Power.
Só uma rápida retrospectiva, KVM é a tecnologia do Kernel do Linux que permite rodar máquinas virtuais de forma muito eficiente. E o QEMU é o software que emula diversos aspectos de um computador (portas serias, rede, BIOS/firmware, disco etc). O QEMU existia antes do projeto KVM e possibilita rodar, de forma razoavelmente lenta devido a emulação de todos os aspectos do hardware, outro sistema operacional completo dentro dele.
Since my Fedora Post-installation Configurations article, some things have changed in Fedora 20. For example, for security and economy reasons, Sendmail does not get installed anymore by default. Here are the steps to make your Linux home computer be able to send system e-mails as alerts or from things that run on cron. All commands should be run as user root. This is certified to work on Fedora 21.
Fedora 20 is the first distribution to bundle NetworkManager with bridging support. It means that the old hacks to make a virtual machine plug into current network are not required anymore. Read More
For some reason nobody published a simple guide like this. Maybe nobody tryied this way. I just tryied and it works with OS X Mountain Lion on a Mid 2012 MacBook Air.
If you have a Mac computer or laptop and want to install OS X, and all that you have is the operating system installation ISO image, you just need an external USB storage (disk or pen drive) of 5GB minimum size. Those regular 120GB or 1TB external disks will work too.
Just remember that all data on this external storage will be erased, even if the Mac OS X installation ISO is just 4.7GB. So make a backup of your files and after installtion you can re-format the external disk and recover the files on it.
To make the OS X installation ISO image file usable and bootable from the external storage, use the Mac OS terminal app or, on Linux, use the command line. This is the magic command:
dd if="OS X Install DVD.iso" of=/dev/disk1 bs=10m
You might want to change the red part of this command to the disk name that you get when inserted the external storage. Remember to not use things like disk1s1 or, on Linux, sdc1. The highlighted blue part on these examples are the partition name, and you don’t want that. You want to use the whole storage, otherwise it will not boot the computer.
After the command finishes execution, boot the Mac computer with the alt/option key pressed. Several devices will appear on screen for you to choose wich one to boot. Select the one with the USB logo and called “EFI Boot“.
Mac OS X installation app will boot and you can start the process. Remember that the default behavior here is to upgrade the installed system. If you want a clean install, select the Disk Utility app on the menu and make sure you erase and create a new partition on the Mac internal storage.
As a side technical note, this is all possible because ISO images — primarily designed for optical disks — can also be written to regular other storages as pen drives. And Apple has also put the right bits on these ISO images to allow it to boot from non-optical disks too.
Either if you are doing forensics or just want better reports about your call patterns, the iPhone Call History database can be very handfull.
If you have a jailbroken iPhone, you can access the database file directly. If you are not, you can still access it offline simply copying the file from an unencrypted iTunes backup to some other folder on you computer to manipulate it. Here are the real files path inside the iPhone and their counterparts on an iTunes backup folder:
Read More
I spent a few days to figure out how to make a simple conversion of a DBF file into a plain text file as comma separated values (CSV) or tab separated values (TSV) in a batch/command line way. I was almost setting up an OpenOffice.org server because it seamed to be the only packaged solution to read and convert DBFs.
Well, it easier than that. Read More
 Dediquei-me nos últimos meses a estudar o Drupal. Fiz isso nas horas vagas (tipo da meia noite às 6 da manhã) e foi uma longa curva de aprendizado.
Para quem não sabe, Drupal é um Sistema de Gerenciamento de Conteúdo (CMS) para a Web. Um fazedor de sites, em outras palavras. Quaisquer sites.
Umas semanas atrás ultrapassei o ponto da arrebentação. Agora é só um mar de calmaria, ou seja, a luta contra o maremoto da falta de conhecimento foi ultrapassado. Minha saga com CMSs começou com o WordPress, quando montei este blog que vos fala. A partir daí aprendi o que é um conteúdo atômico, como gerenciá-lo corretamente, taxonomias, tags, feeds, mashups, blogosfera, e as maravilhas da web semântica.
O WordPress é um CMS otimizado para blogs e por isso ele se dá ao luxo de ser fácil de usar. OK, você pode fazer outros tipos de sites com ele, mas isso exige uma violenta intervenção em seu mecanismo de temas, e ao longo do tempo esse site não-blog se tornará ingerenciável — uma aberração.
Se o WordPress foi feito para fazer blogs, Drupal foi feito para fazer qualquer tipo de site. O custo disso é que os elementos que o constituem são mais abstratos e por consequência mais difíceis de se entender. Além do mais, o Drupal Core por sí só é meio feio, pouco prático e não faz muita coisa.
No processo de aprendizado, é necessário dedicar uma boa lapa de tempo para conhecer seu ecossistema de plugin e extensões. Ultrapassar a arrebentação então constitui em vencer os seguintes passos:
Construi dois sites relativamente complexos, semânticos, com múltiplos tipos de categorias, buscas facetadas, layouts diferenciados, look profissional etc, sem escrever sequer uma linha de código. OK, para não enganar vocês escrevi umas 30 linhas de CSS para embelezar alguns elementos da página. Só. Posso dizer que há algumas dezenas de pessoas encantadas com um deles, rodando na Intranet da minha empresa — IBM— e que ele é tão funcional, simples e interessante que até meu chefe comprou a idéia e está vendendo-o empresa a dentro.
Drupal tem o mérito de juntar duas características importantíssimas que cada uma por sí só já é ultravaliosa:
Há outros CMSs por aí — Plone, Joomla etc —, não os conheço na prática. Mas acho que dificilmente alcançaram a maturidade e a solidez do Drupal. O retorno disso é que Drupal está conquistando algumas referências incríveis como o site da Casa Branca, Sony, MTV, etc.
Anotem esta previsão: Dentro de 2 ou 3 anos, Drupal estará para o mundo dos sites assim como Linux está hoje para o mundo do Sistemas Operacionais — não fará nenhum sentido criar um site sem ele.
Here are some technical details an analysis about the formats used by the Apple iPhone 3GS to record video.
This is an annotated screenshot of the excellent Mediainfo by Jerome Martinez.
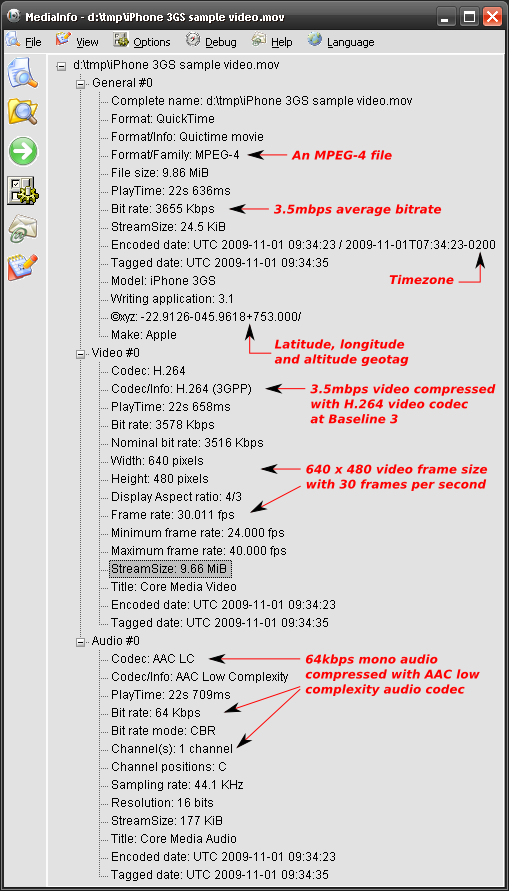
Some notes:
Having said that, videos generated by the iPhone are ready for streaming over the Internet directly to Flash multimedia players. You may need conversion/recompression/transcoding only if you want to reduce the file size and bit rate. Otherwise, current popular Flash players that you already have installed in your browser are capable of playing these video files.
Here is a more detailed analysis generated by mp4dump utility on Linux, from the mpeg4ip Open Source project.
Drupal é um dos melhores gerenciadores de conteúdo que existem e é Open Source.
Há quem diga que é porque o governo Obama incentiva Open Source blablabla etc. Mas a verdade é que provavelmente a escolha foi pelo melhor: Drupal. No blog do Tim O’reilly, há também mais detalhes sobre a infraestrutura: Red Hat Linux como SO e MySQL como DB.
Eu uso-o diariamente e posso dizer que é extremamente bem arquitetado e tem uma comunidade vibrante. Posso dizer também que não faz nenhum sentido hoje em dia criar um site do zero sem usar uma ferramenta poderosa e flexivel de gestão de conteúdo como o Drupal.
Bem, a prova que o site da Casa Branca roda sobre Drupal está em seu HTML enviado ao browser.
As partes em destaque são típicas URIs do Drupal.
Se Linux reina hoje no universo dos sistemas operacionais de servidor, Drupal reinará também no universo dos sites em 2 ou 3 anos.
This is a set of personal notes and a tutorial for everyone about how to correctly organize and tag MP3 files using the id3 command line tool.
General way to tag MP3 files:
id3 -M -2 [-v] [-t title] [-a artist] [-l album] [-n tracknr] [-y year] [-g genre] [-c comment] file.mp3
Recursively tag with ID3v2 a tree with many directories containing MP3 files, setting artist and genre:
id3 -v -2 -R -a "João Gilberto" -g "Bossa Nova" *mp3
Rewrite the Title tag of each file capitalizing the first letter of each word:
id3 -v -2 -t %+t *mp3
Rename files based on track number and song name (as “02 – Song Name.mp3”) padding a zero to track numbers smaller than 10:
id3 -v -2 -f "%#n - %t.mp3" *mp3
Add a suffix to the current Author tag:
id3 -2 -a "%a e Spokfrevo Orquestra" *mp3
Copy current Author tag to the Composer tag:
id3 -v -2 -wTCOM %a *mp3
Use the “Artist” (TPE1) and “Album Artist” (TPE2) tags in a different way to correctly group songs by album on your MP3 player:
id3 -2 -wTPE2 "Various Artists" Café_Del_Mar_*/*mp3
or, alternatively with the id3v2 program:
id3v2 --TPE2 "Various Artists" Café_Del_Mar_*/*mp3
Scan track number (%n) and song name (%t) from each file name and set them as ID3 respectivelly along with additional artist name and album name:
id3 -2 -a "The Artist Name" -l "The Album Name" -g "The Genre Name" -m "%n - %t.mp3"
The id3 program is available for multiplatforms, including Linux and Windows. You can find RPM packages for Fedora Linux on my site.
I just participated in very successful proof of technology with Siemens OpenScape video conferencing products.
We made a point-to-point SIP high definition video conference over a local area network. Another test used H.323 protocol. We also included my SIP-enabled Nokia E61i in the conference over the office WiFi network in a direct multipoint call simply calling my phone’s IP address. Crystal clear sound.
The equipment statistics showed the following:
Video
Audio
Total of aprox. 1850 kbps for excellent and smooth audio and video quality.
Can Open Source Software be more ubiquitous than this ?
A few days ago I was playing extensively with Apple’s iPhone, investigating each sub-menu and little details. There is a section listing legal stuff and software being used with each license. GPL, LGPL, BSD and other Open Source licensed software rule the iPhone.
Some I have noted:
Some friends asked so the following is how I encode (rip) DVDs.
The ripped video file format is a decision you must make. Currently my format of choice is .MKV or Matroska. I’ll explain why.
It is quite silly to say that an .MP4 movie has better quality than a .AVI or vice-verse (or any other combination of comparisons). OGG, MP4 (MPEG-4 Part 14), MKV (Matroska), AVI, WMV (or ASF) are just containers, envelopes. Video quality depends on what goes inside it.
“Multimedia” has this name because you have multiple types of media: video in multiple angles, multiple audio options including different languages and channels (stereo, 5.1, 6 channels etc), subtitles in several languages, chapter information, menu etc. Think about a DVD. So this is a graphical view of how things are organized inside a 900MB movie file in a modern format as MKV or MP4:
| Header with tags, track names, chapters info, seek positions | Main Video track (MPEG-4 AVC/H.264) | Attachments as JPG images, documents, scripts or text files | |||||||
| Video segment showing another angle (MPEG-4 ASP/Xvid/DivX) | |||||||||
| Audio track: English Dolby Surround 5.1 (AC3) | |||||||||
| Audio track: Director’s comments stereo (MP3) | |||||||||
| Audio track: Portuguese Dolby Surround 5.1 (DTS) | |||||||||
| Subtitle track: Portuguese (Unicode text) | |||||||||
| Subtitle track: Chinese (Unicode text) | |||||||||
| Subtitle track: English (VobSub) | |||||||||
| byte 100K | byte 100M | byte 200M | byte 310M | byte 420M | byte 530M | byte 650M | byte 780M | byte 895M | byte 900M |
A digital multimedia file format must be capable to contain all this different medias and multiplex them in parallel so you won’t have the video in the first 500MB of the file and the audio on the following 500MB (this can’t work for streaming). And this is exactly what modern file formats as MP4 and MKV do: they carry all your movie-related data together.
This is a comparison of all these file formats based on my personal experience with them (a more formal comparison can be found in Wikipedia):
| .MKV | .MP4 | .AVI | |
|---|---|---|---|
| Industry support | Almost none | Good and increasing, specially on Apple platforms, the mobile scene and Nero Digital ecosystem | Treated as legacy popular format |
| Usage on the web | Very popular on HD or high quality DVD rips | Very popular on HD or high quality DVD rips, supported by Flash Player, YouTube, Google Video | Popular amongst low-quality DVD rips |
| Support for advanced video formats and multiple video angles | Yes. MPEG-4 ASP (DivX, Xvid), MPEG-4 AVC (a.k.a. H.264) etc | Yes. Only MPEG-4 systems and a few others | Problematic and No |
| Support for multiple audio tracks (channels, formats, languages and “director’s comments”) | Yes | Yes. Formats are only MP3, AAC and a few others not very popular | Yes |
| Support for tags (artist, title, composer, etc as MP3’s ID3) | Yes | Can be supported by MP4 extensibility but this is not very well standardized across authoring tools (iTunes, GPAC etc) and players (Amarok, Media Player Classic, iPod, Windows Media Player etc) | No |
| Support for attachments with mime-types (used to attach movie posters images or other files) | Yes | No | |
| Support for chapter marks | Yes | No | |
| Support for multiple language embedded soft-subtitles | Yes. VobSub (as extracted from DVDs), plain timed UTF-8 text (SRT, SUB) etc | No | |
| Support for naming tracks with human names as “Director’s comments” or “Portuguese subtitles” etc | Yes | Yes | No |
| Support for carrying menus information (as in DVDs) and interaction | Yes through an XML idiom, but unsupported by most players | Yes through SVG, but unsupported by most players | No |
| The container overhead in bytes in the final file | Very small | Very small | Very big |
| Supported by free and Open Source multiplatform authoring tools | Perfect on Linux, Unix, Windows and Mac | Yes (see GPAC), with some intellectual property issues. Tools need to mature. | Yes |
| Ready for popular web streaming as in Flash player | No | Yes. The popular Flash Player that is installed on everybody’s browser supports playing MP4 files as long as they contain H.264 video and AAC audio tracks. I recommend the LongTail FLV/MP4 Player since it also plays subtitles embedded in MP4 files. | No |
Personally I believe MP4 is the multimedia file format for the future because since it is getting popular, all these non–standardized features will get stabilized. MP4 is an ISO standard and the increasing industry support can be felt on iPods and portable devices, and most notable on home DVD players capable of playing the 700MB MP4 video file burned in a CD.
By the way, remember this:
Meanwhile, MKV wins everything but on the Industry Support category. But this doesn’t really matter, and I’ll explain why. Since MKV is just a container, the large video, audio etc streams can be extracted and repackaged into MP4 and vice-versa in seconds. No transcoding (decoding followed by a lossy encoding into another format) is needed.
So today I store my videos in the most feature rich and well supported by players format: MKV.
OGG or OGM (the container file format) is practically dead in my opinion. They were created as part of the Xiph initiative for a complete open source patent-free multimedia framework, but seems nobody uses it anymore for video. From the same family, Vorbis (the audio codec compared to MP3, a.k.a. .OGG) is very good but also very not popular. Theora (the video codec) is frequently comparable to old MPEG-1 in terms of quality and compression ratio so currently, if you want quality and are not concerned about patents, MPEG-4 AVC is the best choice. FLAC, Xiph’s lossless audio codec, is the winner of the family: very popular, massively used, and recommended.
I use HandBrake, the most practical Open Source (and overall) movie encoder. It runs on Linux, Mac and Windows and uses the same Open Source libraries as ffmpeg, mplayer/mencoder, xine, etc. While these programs are generic video handlers (with thousands of confusing configuration parameters to sustain this generalistic status) HandBrake is optimized only for ripping so it is very easy to use, yet extremely powerful.
#!/bin/bash
##
## This is the script I use to make hifi DVD rips including chapter markers and
## subtitles. It uses Handbrake.
## Contains what I found to be the best quality ripping parameters and
## also let me set simple parameters I need.
##
## Avi Alkalay <avi at unix dot sh>
## http://avi.alkalay.net/2008/03/mpeg4-dvd-rip.html
##
## $Id$
##
#set -vx
HANDBRAKE=${HANDBRAKE:=~/bin/HandBrakeCLI}
#HANDBRAKE=${HANDBRAKE:="/cygdrive/c/Program Files/Handbrake/HandBrakeCLI.exe"}
## Where is the Handrake encoder executable.
## Handbrake is the most practical free, OSS, DVD riper available.
## Download HandBrake for Linux, Mac or Windows at http://HandBrake.fr
INPUT=${INPUT:=/dev/dvd}
## What to process. Can also be a mounted DVD image or simply '/dev/dvd'
TITLE=${TITLE:=L}
## The title number to rip, or empty or "L" to get the longest title
#CHAPTERS=${CHAPTERS:=7}
## Example: 0 or undefined (all chapters), 7 (only chapter 7), 3-6 (chapters 3 to 6)
#VERBOSE=${VERBOSE:="yes"}
## Wether to be verbose while processing.
SIZE=${SIZE:=1200}
## Target file size in MB. The biggest the file size, the best the quality.
## I use to use from 1000MB to 1400MB for astonishing high quality H.264 rips.
OUTPUT=${OUTPUT:="/tmp/output.mkv"}
## Output file. This will also define the file format.
## MKV (Matroska) is currently the best but MP4 is also good.
AUDIO=${AUDIO:="-E ac3 -6 dpl2 -D 1"} # For AC3 passthru (copy).
#AUDIO=${AUDIO:="-E lame -B 160"} # For MP3 reencoding. Good when input is DTS.
## Audio parameters. If input is AC3, use it without transcoding.
## If is DTS, reencode to MP3.
MATRIX=${MATRIX:=`dirname $0`/eqm_avc_hr.cfg}
## x264 matrix to use. The matrix file may increase encoding speed and quality.
## This one is Sharktooth's as found
## at http://forum.doom9.org/showthread.php?t=96298
######### Do not change anything below this line ##############
## Make some calculations regarding title and chapters based on parameters.
SEGMENT=""
if [[ "$TITLE" == "L" || -z "$TITLE" ]]; then
SEGMENT="-L"
else
SEGMENT="-t $TITLE"
fi
[[ -n "$CHAPTERS" && "$CHAPTERS" -ne 0 ]] && SEGMENT+=" -c $CHAPTERS"
[[ "$VERBOSE" != "no" ]] && VERB="-v"
# Define args for the x264 encoder. These are some values I found on the net
# which give excelent results.
X264ARGS="ref=3:mixed-refs:bframes=6:b-pyramid=1:bime=1:b-rdo=1:weightb=1"
X264ARGS+=":analyse=all:8x8dct=1:subme=6:me=umh:merange=24:filter=-2,-2"
X264ARGS+=":ref=6:mixed-refs=1:trellis=1:no-fast-pskip=1"
X264ARGS+=":no-dct-decimate=1:direct=auto"
[[ -n "$MATRIX" ]] && X264ARGS+=":cqm=$MATRIX"
# Encode...
"$HANDBRAKE" $VERB -i "$INPUT" -o "$OUTPUT" \
-S $SIZE \
-m $SEGMENT \
$AUDIO \
-e x264 -2 -T -p \
-x $X264ARGS
# Repackage to optimize file size, to include seek and to include this
# this script as a way to document the rip...
echo $OUTPUT | grep -qi ".mkv"
if [[ $? && -x `which mkvmerge` && -f $OUTPUT ]]; then
mv $OUTPUT $OUTPUT.mkv
mkvmerge -o $OUTPUT $OUTPUT.mkv \
--attachment-name "The ripping script" \
--attachment-description "How this movie was created from original DVD" \
--attachment-mime-type application/x-sh \
--attach-file $0
[[ -f $OUTPUT ]] && rm $OUTPUT.mkv
fi
The script seems long because it is fully documented but it actually only collects some parameters and simply runs the HandBrake encoder like this (passed parameters are in red):
~/bin/HandBrakeCLI -v -i /dev/dvd -o /tmp/output.mkv \ -S 1200 \ -m -L \ -E lame -B 160 \ -e x264 -2 -T -p \ -x ref=3:mixed-refs:bframes=6:b-pyramid=1:bime=1:b-rdo=1:weightb=1:analyse=all:8x8dct=1:subme=6:me=umh:merange=24:filter=-2,-2:ref=6:mixed-refs=1:trellis=1:no-fast-pskip=1:no-dct-decimate=1:direct=auto:cqm=~/src/randomscripts/videotools/eqm_avc_hr.cfg
All the rest is what I found to be the best encoding parameters.
The resulting video file (/tmp/output.mkv in this case) will contain correctly cropped video and audio quality as good as the DVD (it is almost lossless), and chapter breaks at the same positions read from the DVD.
In a Core Duo machine as my laptop running Fedora 8 or Windows XP, a 2 pass H.264 encoding (2 pass improves quality and H.264 is newer standard MPEG-4 technology better than DivX/Xvid) takes about 4 to 5 hours for a regular 2 hours movie, so leave it encoding while you go to sleep. A Pentium 4 machine running Ubuntu takes about 17 hours for the same rip.
I use to rip one chapter from the movie first (use your preferred video player or lsdvd command to find the shortest chapter), check quality, compare to DVD, fine tune, try again and then shoot full DVD ripping.
After encoding I use to repackage the audio/video stream with Matroska‘s mkvmerge (or mmg, its GUI version available on any Linux distribution as “mkvtoolnix” package, and installable for Windows or Mac OS from Matroska’s website) to optimize seeks and to include soft subtitles (that can be turned on and off as on regular DVDs), but I’ll explain that in another HOWTO.
I use to organize my media library in a standard way I invented for myself and which I suggest you to use too.
My movie file names shows everything that the file includes. Some examples:
The advantages of this scheme are:
To play this advanced Matroska media file that contains such a rich set of metainformation and highly compressed digital content you will need an advanced player too. And happens that the best players are the Open Source ones. So use these players:
These are Media Player Classic screenshots demonstrating how to activate the advanced content inside a Matroska file. Players on other platforms have similar capabilities and menus.
Activating embedded subtitles and languages
The player lets you choose the audio language and subtitles. On MPC for example, this is how you turn on and off and choose the language for subtitles.

As you can see, the player found subtitles embedded in the MKV file in English, Hebrew and Portuguese.
If the MKV file contains many audio tracks (as different languages, director’s comments etc) this is how to select it:

And to jump directly to a specific chapter on the movie, if the MKV file contains this kind of information:

Improving audio volume
If you ripped the movie without reencoding the audio, the final file will contain DVD’s original AC3 audio tracks in 6 channels (5+1). This may sound with a lower volume when played in a 2-speaker system as your laptop, iPod, etc because 4 channels are simply not being played. To remediate this the player will have to downsample the audio. In other words, it will remix the 6 channels into 2 stereo channels while playing. The Media Player Classic options should look like this:


I remember the days when I was configuring DNS and DHCP for a small home network with only 2 or 3 computers.
This is not needed anymore since the invention of Zeroconf. As Wikipedia says, “is a set of techniques that automatically create a usable IP network without configuration or special servers. This allows inexpert users to connect computers, networked printers, and other items together and expect them to work automatically.”
Zeroconf got my attention when I installed Ubuntu Linux in one of my home PCs and it automatically started to show hostnames instead of IPs of my other home computers on the same DNS-less network. On my other Fedora Linux hosts, I had to manually install the avahi-tools and nss-mdns packages and I got the same functionality — as described in the Fedora Post-Installations Configurations.
Still without a local DNS server, each host can be pinged, SSHed, browsed, SMBed, etc using the hostname.local model, not the their IP anymore. So the machine with hostname floripa broadcasts itself as floripa.local. The same happens for all machines.
But I still missed this functionality when using my laptop booted on Windows. This OS was unable to understand the Zeroronf broadcasts until I installed the Apple implementation for Windows called Bonjour that can be downloaded from here.
To have a better, visual understanding of what Zeroconf can do for you, the Avahi website (Zeroconf implementation on Linux) provides a series of screenshots of regular applications discovering services in the LAN. Most notable is Konqueror — KDE’s file manager — using the zeroconf:/ URL to browse LAN services.
Now I finally know that my home doesn’t need things like Bind/DNS anymore.
I am sort of away this days because I got a new laptop. Check it out.
My previous laptop was a IBM Thinkpad T40, Pentium M, 512MB RAM, 1024×768 screen size, CD-RW, Cisco WiFi/b, no bluetooth. Served me well for 4 years.
The new one is a Lenovo Thinkpad T61, Intel Centrino Pro (dual core), 2GB RAM, 1440×900 screen size, DVD-RW, Intel WiFi/g (see this comment to make it work), bluetooth, integrated SD/Memory Stick/xD/etc card reader, Firewire interface. Much better. Details on Smolt.
I am writing this while Fedora 8 (including some Livna packages) is being installed over the network, as you can see.
There are some situations you may want to manually change (or hack) the category numbers of your WordPress.org blog. Here is how.
Supose you have posts category named “Wine” with ID 15 and you want it to become 1015. You probably already have some posts categorized as “Wine” too and you want to make the number change reflect in their metainformation.
You’ll have to execute some SQL commands in 2 tables: wp_categories and wp_post2cat. Have access to WordPress.org blog MySQL database with PHPMyAdmin or even the plain mysql command and execute this steps.
Wine: 15 ➔ 1015
UPDATE wp_categories SET cat_ID=1015 WHERE cat_ID=15 LIMIT 1;
UPDATE wp_post2cat SET category_id=1015 WHERE category_id=15;
UPDATE wp_link2cat SET category_id=1015 WHERE category_id=15;
There is no visual change for the readers of your blog, everything will look the same. This is only for you, if you want to organize categories in ranges while WordPress.org naturally creates them in a sequence.
(This is a shared personal note, suggestions are welcome.)
Create a Subversion repository for a project, say The SVG Blog Icons:
bash$ cd src/
bash$ ls
blogicons
bash$ export EDITOR=vi
bash$ svn -m "First import" import blogicons http://svn.alkalay.net/blogicons/trunk
bash$ mv blogicons blogicons.old
bash$ svn co http://svn.alkalay.net/blogicons/trunk blogicons
bash$ svn -m "Links of official releases" mkdir http://svn.alkalay.net/blogicons/tags
bash$ svn -m "Official 20070518 version" cp http://svn.alkalay.net/blogicons/trunk http://svn.alkalay.net/blogicons/tags/20070518
Manage project files:
bash$ cd blogicons
bash$ svn add newfile.svg
bash$ svn add newfiles.*
bash$ cd blogicons
bash$ svn rm oldfile.svg
bash$ svn rm oldfiles.*
bash$ cd blogicons
bash$ echo "<!-- $Id$ -->" >> file.xml
bash$ echo "/* $Id$ */" >> file.c
bash$ echo "// $Id$" >> file.cpp
bash$ echo "# $Id$" >> file.sh
bash$ echo "# $Id$" >> Makefile
bash$ svn propset svn:keywords Id file.xml file.c file.cpp file.sh Makefile
Every time changes and commits happen, the $Id$ tag will be replaced as this examples:
<!-- $Id: file.xml 148 2007-07-28 21:30:43Z username $ -->
/* $Id: file.c 148 2007-07-28 21:30:43Z username $ */
// $Id: file.cpp 148 2007-07-28 21:30:43Z username $
# $Id: file.sh 148 2007-07-28 21:30:43Z username $
# $Id: Makefile 148 2007-07-28 21:30:43Z username $
People use to put the $Id$ tag in the beginning of source files. The example show how to put in the end, but that’s because it is easy to represent it here in the documentation. You should put $Id$ tags in the beginning of the file.
bash$ cd blogicons
bash$ svn -m "Changed color to red on icon A, moved the circle shape to left on icon C" commit
Use descriptive comments favoring WHAT changed on files and not which files changed.
So looks like some people are having problems to configure LEAP in their Nokia E-series phones as E61i or others. This is a guide:
With this configuration I am able to connect to my company’s WLAN, which uses Cisco routers and access points. By the way, EAP-LEAP is a proprietary WLAN authentication protocol created by Cisco, and looks like it is considered obsolete.
I also noticed that if the GSM SIM chip is not inserted (offline mode), the phone behavior of getting connected is more difficult. It does not recognize a Hidden WLAN and I had to force the connection. With a GSM SIM chip inserted everything works nicely and as expected.
Looks like only Nokia E-series phones (E61, E61i, E70 etc) running the S60 platform can connect to LEAP WLANs. Same generation Nokia N-series phones (N73, N80, N95) can’t, because they were not designed for business environments — the kind of environments that uses Cisco’s EAP-LEAP.
I noticed Oded’s blog was attacked which makes me remember some things:
I was once invited to analyze a Linux machine that was invaded. I ended up writing an article about it to the brazilian Linux Magazine.
The problem with the machine was a VERY weak root passw0rd. We could also find the tools they used to break that machine, cause they have installed them there to attack other machines.
We could see a file containing about 18000 user+password combinations, a modified SSH client and a script that runs it all based on an IP range. We saw also IRC bots and other stuff.
In the case of that machine, the attack was silent. They just wanted to use the machine to attack other machines. Pretty stupid.
Its easy to learn about this attacks. Just connect to the Internet a machine with a plain Linux installation and “passw0rd” as the root’s password, wait 1 or 2 weeks and your machine will be attacked. One way to verify the crackers are already in is to reinstall the netstat command (because they’ll modify your previous one) and see if there is some connection to IRC ports (around 6667).
If you investigate this IRC bot you’ll able to connect the IRC server, find the chat room, and actually talk to the cracker. I did this once and was not very funny.
More information in Attacks to GRC.com by Steve Gibson.
Just to make more generic and to simplify Liquidat’s good howto about this topic, here is a better way to install Sun, IBM or BEA Java/JVM/JDK on any modern Linux RPM-based distribution as Fedora 7, Red Hat 5, SUSE, Mandriva, etc:
bash# rpm -qpi java*nosrc.rpm
Name        : java-1.5.0-ibm               Relocations: (not relocatable)
Version     : 1.5.0.2.3                         Vendor: JPackage Project
Release     : 3jpp                          Build Date: Tue 15 Aug 2006
Install Date: (not installed)               Build Host: tortoise.toronto.redhat.com
Group       : Development/Interpreters      Source RPM: (none)
Size        : 395165271                        License: IBM Binary Code License
Signature   : (none)
Packager    : Thomas Fitzsimmons
URL         : http://ibm.com/developerworks/java/jdk/linux/download.html
Summary     : IBM Java Runtime Environment
Description :
This package contains the IBM Java Runtime Environment.
bash# cd /directory/where/binary-SDK/was/downloaded
bash# cp ibm-java2-sdk-50-linux-i386.tgz /usr/src/redhat/SOURCES
bash# cp ibm-java2-javacomm-50-linux-i386.tgz /usr/src/redhat/SOURCES
In SUSE, copy to /usr/src/rpm/SOURCES.
bash# cd /directory/where/nosrc.rpm/was/downloaded
bash# rpmbuild –-rebuild java*nosrc.rpm
bash# cd /usr/src/redhat/RPMS/i*86
bash# rpm -Uvh java*rpm
and the JVM is installed.
(All but step 5 may be done as a regular user instead of root, but explanations would be longer and more complex)
Later, you may also want to install the javaws package to have Java Web Start integrated on your browser.
By the way, JPackage Project has standarized how Java software should be packaged on Linux. And they are doing it with RPM (but the concepts may be ported to other packaging systems). It is such a great and well done standard that all RPM-based distributions such as Fedora, Red Hat Enterprise Linux, SUSE, Mandriva, etc are using it for their own Java works. It all starts with a package named jpackage-utils, probably already installed on your fresh system.
You may find many Java software as JBoss, Apache Geronimo, Ant, Eclipse, etc packaged in JPackage web site.
Inspired by an old post by Rui Moura, I’ll maintain here the plain commands needed to setup a freshly installed Fedora or Red Hat system, to include essential softwares they don’t ship by default due to legal issues.
These instructions are currently optimized for Fedora 14, 15 and 16, but most of it should work on any other Fedora and modern Red Hat Enterprise Linux too. Good suggestions provided as comments bellow will be added to this guide.
Terms highlighted in red should be changed to match your system.
This step will allow you to issue some administrative commands without having to be all the time logged in as root — the system administrator.
bash# echo 'your_plain_loginname_here ALL=(ALL) ALL' >> /etc/sudoers
Note that this is the only command throughout this guide that shows a root prompt (bash#). All other commands are indicated to be run as a regular non-root user (indicated by bash$).
After configuring sudo, every time you execute an administrative command with its help, a password is requested. This is your password (the regular user’s password), not the root password.
Install the following packages so updates will come faster:
bash$ sudo yum -y install yum-presto yum-plugin-fastestmirror
You can also get e-mail notifications about system updates:
bash$ sudo yum -y install yum-cron
bash$ sudo chkconfig yum-cron on
Then make sure your /etc/sysconfig/yum-cron file has the following lines:
CHECK_ONLY=yes
MAILTO=YOUR-EMAIL@address-com
You will get one e-mail every day with a list of updates available. E-mail delivery will only work if you configure your system for that.
After all the steps below and from time to time, update all software installed on your system with the following command:
bash$ sudo yum update
RPM Fusion is a repository of many essential multimedia and general purpose software for Fedora and Red Hat systems. It is a good idea to have it configured so you can easily install players for DVDs, MP3s amongst other useful things.
bash$ sudo rpm -Uvh http://download1.rpmfusion.org/free/fedora/rpmfusion-free-release-stable.noarch.rpm http://download1.rpmfusion.org/nonfree/fedora/rpmfusion-nonfree-release-stable.noarch.rpm
bash$ sudo yum -y install vdpau-video-freeworld libva-freeworld libva-utils vdpauinfo libva libvdpau kmod-nvidia xorg-x11-drv-nvidia
bash$ sudo rpm -Uvh http://linuxdownload.adobe.com/adobe-release/adobe-release-i386-1.0-1.noarch.rpm
bash$ sudo yum -y install flash-plugin --exclude=AdobeReader\*
On 64bit systems (x86_64) use this:
bash$ sudo rpm -Uvh http://linuxdownload.adobe.com/adobe-release/adobe-release-i386-1.0-1.noarch.rpm
bash$ sudo yum -y install flash-plugin nspluginwrapper.x86_64 nspluginwrapper.i686 alsa-plugins-pulseaudio.i686 libcurl.i686 --exclude=AdobeReader\*
bash$ mkdir -p ~/.mozila/plugins; ln -s /usr/lib/flash-plugin/libflashplayer.so ~/.mozila/plugins
Restart your browser to activate the plugin. For reference: Flash Player for Linux home page.
There are 2 ways to install Chrome or Chromium:
bash$ sudo wget -O /etc/yum.repos.d/google.repo http://avi.alkalay.net/articlefiles/2011/01/google.repo
bash$ yum -y install google-chrome-beta
You can also find Picasa on the same repo but is 32 bit only and not on the latest versions.
bash$ sudo wget -O /etc/yum.repos.d/fedora-chromium-stable.repo http://repos.fedorapeople.org/repos/spot/chromium-stable/fedora-chromium-stable.repo
bash$ sudo yum -y install chromium
You can access servers and machines on you LAN by name, instead of using their long IP address using the Zeroconf standard (implemented as Avahi in Linux). This is so useful and works out of the box in Ubuntu. The setup in Fedora is easy too, but not automatic.
bash$ sudo yum -y install avahi-tools nss-mdns
Now, instead of accessing local hosts by their IP, you can use the .local domain appended to their names. Just like this:
bash$ ssh 10.0.0.5 # stop using the IP address of dbserver
bash$ ssh dbserver.local # start using its hostname
Evnetually this will only work if you correctly configure or disable packet filtering (firewalling). To disable:
bash$ sudo service iptables stop
bash$ sudo service ip6tables stop
bash$ sudo chkconfig --del iptables  # disable even for next reboots
bash$ sudo chkconfig --del ip6tables # disable even for next reboots
Tip grabbed from Fedora Project wiki.
bash$ sudo yum install freetype-freeworld
Logoff and login again your graphical environment to this update take effect.
To understand why you need this update read this section on the Linux Font HOWTO.
The freetype-freeworld package uses a technique described in this bug report.
These packages include popular fonts as Arial, Times New Roman, Tahoma, Verdana, as well as new Windows Vista and MS Office 2007 fonts. Learn more.
bash$ sudo rpm -Uvh \
http://avi.alkalay.net/software/webcore-fonts/webcore-fonts-3.0-1.noarch.rpm \
http://avi.alkalay.net/software/webcore-fonts/webcore-fonts-vista-3.0-1.noarch.rpm
Then, configure your desktop as described in the Linux Font HOWTO, for KDE or Gnome.
For Gnome and GStreamer:
bash$ sudo yum -y install gstreamer-plugins-ugly libmad libid3tag id3v2
For KDE:
bash$ sudo yum -y install kdemultimedia-extras-nonfree id3v2
bash$ sudo yum -y install amarok-extras-nonfree
bash$ sudo wget -O /etc/yum.repos.d/atrpms.repo http://avi.alkalay.net/articlefiles/2011/01/atrpms.repo
bash$ sudo rpm --import http://packages.atrpms.net/RPM-GPG-KEY.atrpms
bash$ sudo yum --enablerepo=atrpms -y install libdvdcss
bash$ sudo yum -y install gnome-mplayer
bash$ sudo yum -y install mencoder mkvtoolnix mkvtoolnix-gui ffmpeg avidemux subtitleripper
bash$ sudo yum -y install vobcopy
Now, thanks to libdvdcss installed above, you can use vobcopy to clone DVD while removing their protections like this:
bash$ sudo mount /dev/dvd /mnt
bash$ cd /some/directory
bash$ vobcopy -m /mnt
See an updated post about it, ready for Fedora 20.
bash$ sudo yum -y install ntfs-config
Then run the ntfs-config-root graphical tool and configure your partitions to be writable and mountable.
bash$ sudo /usr/sbin/ntfs-config-root
An example of my system:
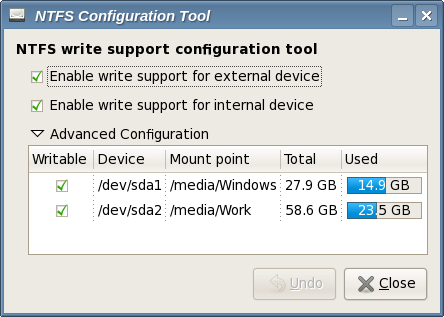
After you configure the tool and quit, your NTFS partitions will be mounted in the specified place. In my case /media/Windows and /media/Work.
This tip is for the text console.
bash$ sudo echo 'SYSFONT="lat0-08"' >> /etc/sysconfig/i18n  # set a ISO-8859-15 font
bash$ sudo echo 'fbset 1024x768-60' >> /etc/rc.d/rc.local    # set console resolution to 1024x768 @ 60Hz
These settings will take effect after a reboot, but you can test them before rebooting executing the following commands:
bash$ sudo setfont lat0-08
bash$ sudo fbset 1024x768-60
Note that you can set different resolutions than 1024×768 if you have a video card and monitor that will accept it. A full list of modes can be listed with the command:
bash$ grep "mode " /etc/fb.modes
Resolvi aderir ao meme (alguém sabe onde começou?).
floripa:~$ history|awk '{print $2}'|awk 'BEGIN {FS="|"} {print $1}'|sort|uniq -c|sort -rn|head -20
    222 ls
    140 cd
    136 ls
     52 rsync
     43 dmesg
     35 mv
     35 gmplayer
     24 sudo
     23 ps
     23 df
     19 mkvinfo
     18 rpm
     15 mkdir
     14 cat
     11 mkvextract
     11 less
     11 ffmpeg
     10 mmg
      9 ping
      9 kill
Resolvi dobrar o tamanho da lista para dar a chance das pessoas conhecerem novos comandos, menos populares, como mkvextract, mmg, mkvinfo, ffmpeg.
Queria lembrar que essa lista é uma fotografia do meu uso atual, e tenho manipulado muito vídeo últimamente. Em outros carnavais, iriam aparecer coisas como java, ssh, etc.