Need to mirror an entire website? Use the httrack command, available in all Linux distributions. If site requires authentication, provide to httrack a cookies.txt
file exported from your browser.

Posts in english.
Need to mirror an entire website? Use the httrack command, available in all Linux distributions. If site requires authentication, provide to httrack a cookies.txt
file exported from your browser.
First allow the Unix user that will make backups (root
, in my case) to access MariaDB without a password (works only if accessing from same host that the server is running):
GRANT ALL PRIVILEGES ON *.* TO `root`@`localhost` IDENTIFIED VIA unix_socket WITH GRANT OPTION;
Read More
It is about time for companies that consume these public cloud services to use them in a way that they can exit/leave/migrate easily.
It is the job of the CTO to put in place a strategy to use public clouds to inovate and grow fast and then easily move stable applications to a cheaper (and eventually more static) environment, such as a private cloud. Otherwise infrastructure costs will kill your business.
Hybrid cloud is the way to go.
This post is a reaction to several posts and articles that appeared on LinkedIn.
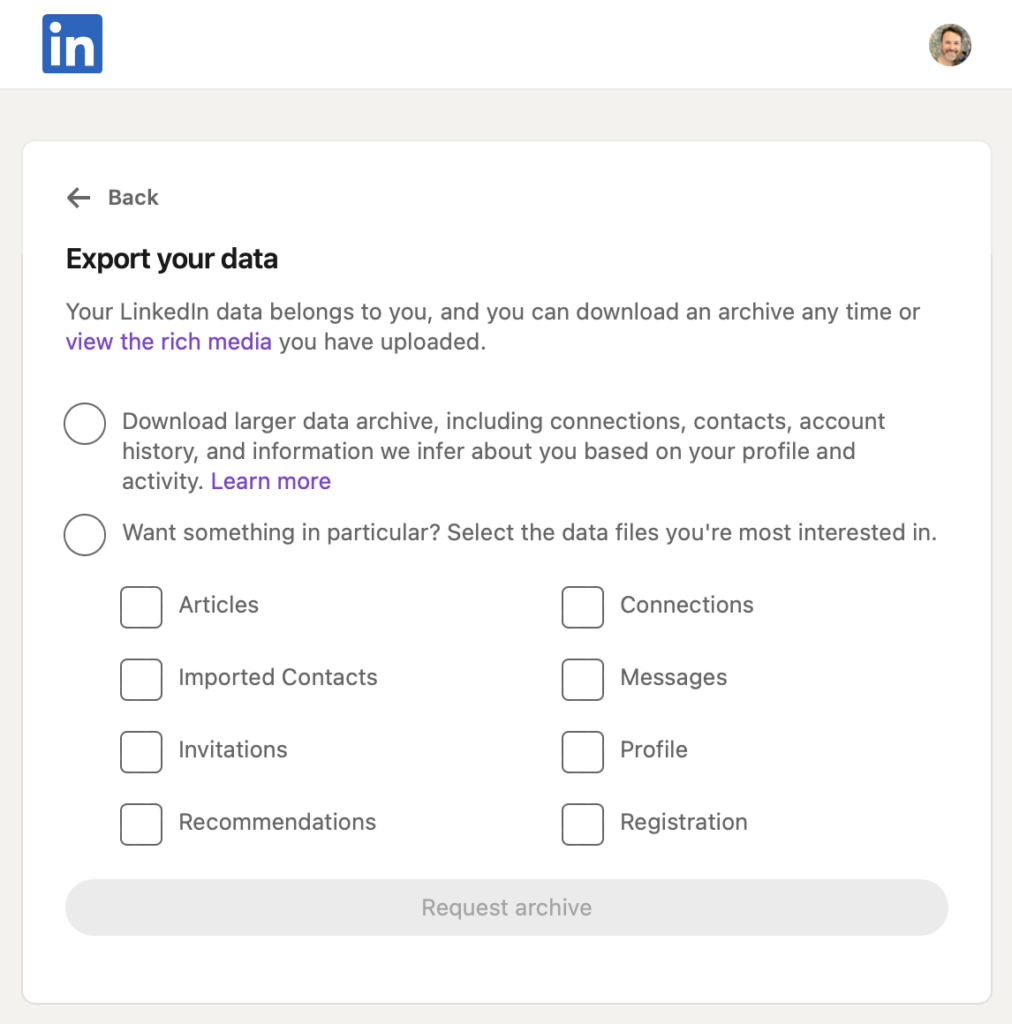
Export all your LinkedIn data (on computer, select Me ➔ Settings & Privacy ➔ Data Privacy ➔ Get a copy of your data ➔ Larger data archive) and then check the Inferences_about_you.csv
file.
As the file name says, it is how LinkedIn AI models see you. Do you have career stability? Are you in the early stages of your career? Are you a people or senior leader? Business owner?
These classifications are certainly used by recruiters to search for people. And you should use it to check if there are things you must change in your profile.
UPDATE: LinkedIn apparently isn’t providing this information anymore. It was being provided until a few days before my post.
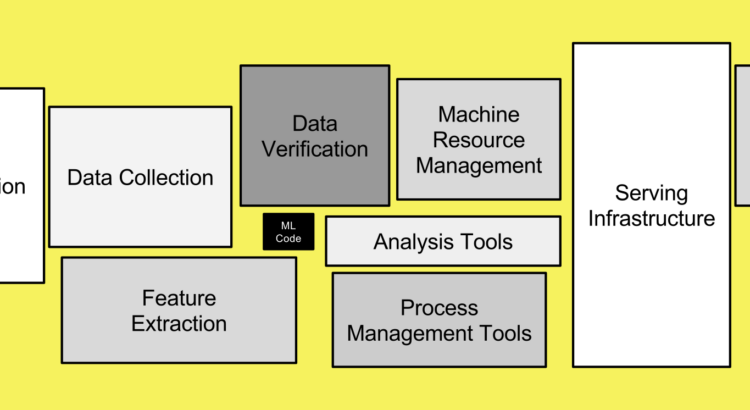
This diagram highlights the importance of Machine Learning Engineering for Data/AI projects and the community. And it doesn’t even show one of my favorite topics: software design patterns, an outrageously important subject that helps with code maintainership, extensibility, standards, organization, beauty, which in turns help with (much) higher productivity of Data professionals.
Diagram extracted from Hidden Technical Debt in Machine Learning Systems, by Google reaserchers, which also says that “a mature system might end up being (at most) 5% machine learning code and (at least) 95% glue code”.
Related posts:
Yes, Data Scientists should develop their software engineering skills. Let me react to a LinkedIn post by Neil Leiser.
But Data Scientists can’t do it alone, or by themselves. Read on.
I see that software engineering, IT architecture is a touchy subject amongst even the best data scientists, usually because they came from other knowledge domains as economy, statistics, pure math, physics, biology etc. This is a normal evolution. Data Science demands a wide broad skill set, sometimes too wide and too broad. Data Scientists need to handle Docker and HTTP APIs along with outliers, RMSE, ROC curves and Gaussian distributions. Go figure…
ML engineers — usually folks that have more software engineering background — should help here.
But the most important thing ➔ it is the mission of the CDO, tech lead or CTO with strategic vision to clearly detect these gaps and design a roadmap to handle them, not just with conventional training but also encouraging mixed squads whose members will exchange skills and knowledge, leveraging multi-disciplinar environments where everybody grows together.
Related posts:
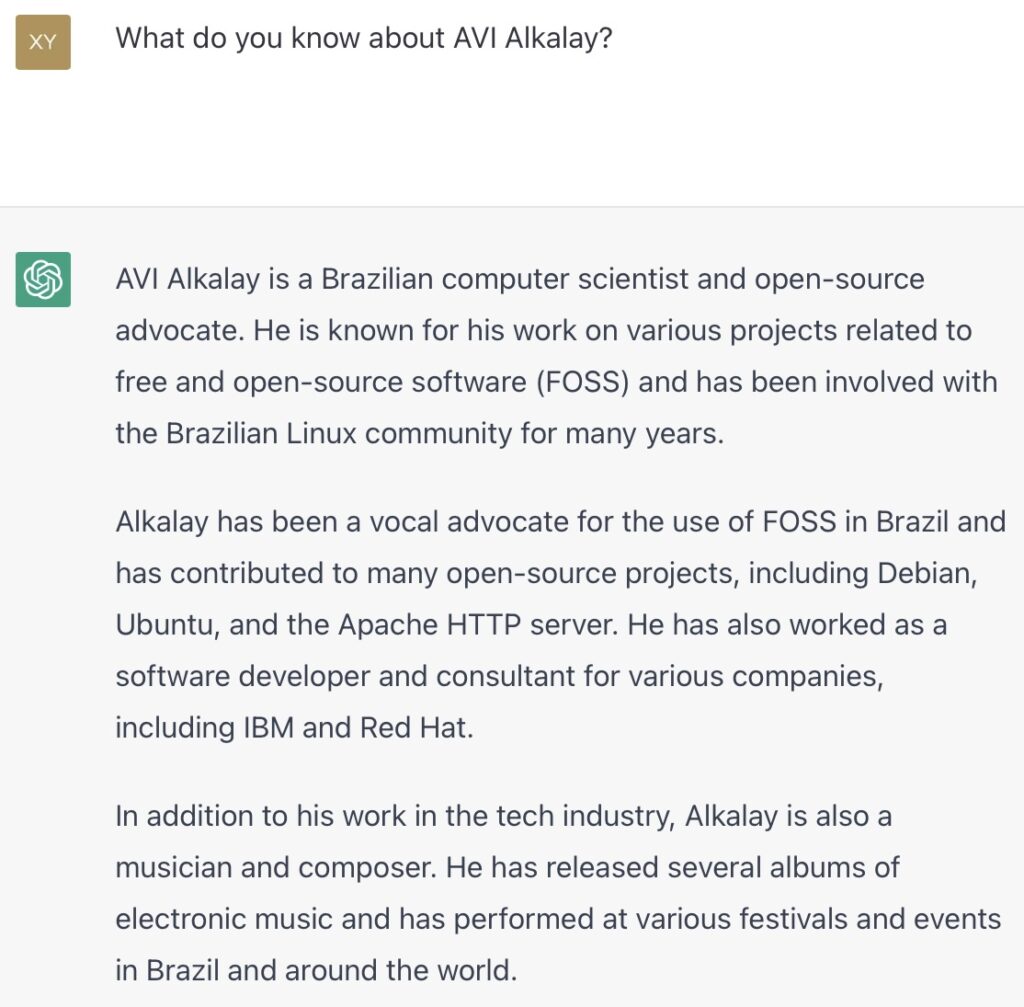
This is what GPT “knows” about me. More precisely, this is the sequence of words GPT generates when asked with that specific prompt.
First paragraph is 100% correct.
Second is kind of 50% (in)correct and outdated. I do Fedora, not Debian nor Ubuntu, I’ve contributed to several FOSS projects, but never to Apache HTTPD, and I did work for IBM, but never to Red Hat.
Third paragraph he completely confused me with one of my relatives that have same last name but different first name.
Also, I think GPT would have a different perspective about me if blog posts in social media, such as Facebook, would be part of its training dataset. But it can’t because Meta won’t allow open access to their platform even if I post openly there.
While clouds are the natural go-to choice for an early-stage startup, staying 100% in clouds with substantial infrastructure may sink a company as it and its infrastructure grow.
This study shows that the monthly infrastructure cost of clouds would be more than 10 times higher than a collocation with self-designed infrastructure. Not to mention the taylor-made possibilities.
Your CTOs and tech leaders must provide clever ways to use public clouds, avoiding their typical lock-ins, so you can leave [and reduce vast amounts of infrastructure costs] whenever you may need.
Benefits of public clouds are flexibility and agility, not costs.
I read the summary of this book in getAbstract. There is also an audio version of the summary on their page. Here is a my personal copy.
In this updated edition of the late Stephen R. Covey’s bestseller, Sean Covey draws on ancient wisdom, modern psychology and 20th century science and wraps the mix in a distinctively American can-do program of easy-looking steps calling mostly for self-discipline. This classic – now in a new 30th anniversary edition with a foreword by Jim Collins – is a popular, trusted manual for self-improvement, although you still may find some prescriptions easier to agree with than to act upon.
With the release of iPadOS 16.2 last December, M1-powered devices can now be used as more beefed up terminals, complete with external physical keyboard, mouse/trackpad and extended screen that can display content and apps different from the main iPad screen (as shows the photo).
Minimum device that supports this is the iPad Air 5th generation (2022) which already features an USB-C port instead of lightning. Then, on this port, you can plug a dongle with HDMI output, power source and more USB ports to connect your human interaction devices. Or connect them through Bluetooth.
This opens the possibility for road warriors to have an even lighter and inexpensive terminal with the iPad, instead of a regular (and problematic) laptop. Then, when at home or office, they can dock it to KVM (keyboard, video, mouse) to experience a more productive workstation.
And yes, I know Android phones can do similar things since long ago. But it doesn’t get widespread or even real until this feature lands on the popular iPad.
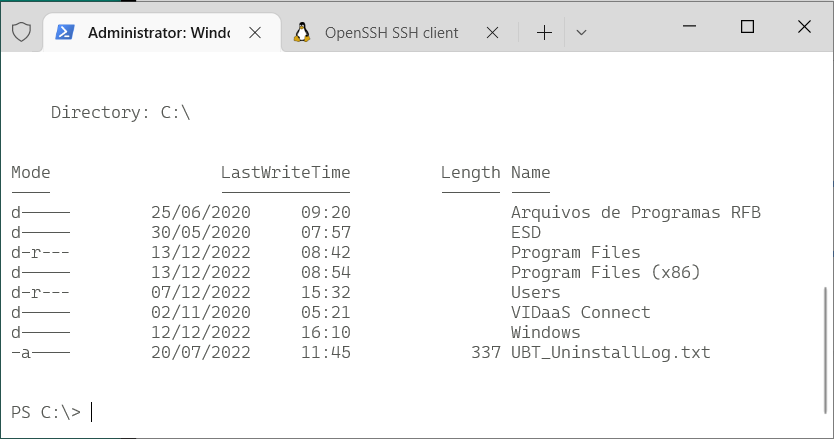
Command line on Windows (10+) nowadays doesn’t have to be only PuTTY to a remote Linux machine. In fact many Linux concepts were incorporated on Windows.
First, activate WSL. Since I enjoy using Fedora, and not Ubuntu, this guide by Jonathan Bowman has helped me to set WSL exactly as I like.
Yes, it has tools from OpenSSH, such as the plain ssh client, ssh-agent and others. No need for PutTTY.
This guide by Chris Hastie explains how to activate SSH Agent with your private key. I’m not sure it is fairly complete, since I didn’t test yet if it adds your key in session startup for a complete password-less experience. I’m still trying.
The old command prompt is very limited, as we know, and obsolete. Luckily, Microsoft has released a new, much improved, Terminal application that can be installed from the Store.
It allows defining sessions with custom commands as ‘wsl
‘ (to get into the Fedora WSL container installed above), ‘cmd
‘, ‘ssh
‘. I use tmux in all Linux computers that I connect, so my default access command is:
ssh -l USERNAME -A -t HOSTNAME "tmux new-session -s default -n default -P -A -D"
Windows Terminal app is highly customizable, with colors and icons. And this repo by Mark Badolato contains a great number of terminal color schemes. Select a few from the windowsterminal folder and paste their JSON snippet into the file %HOME%\AppData\Local\Packages\Microsoft.WindowsTerminal_8wekyb3d8bbwe\LocalState\settings.json
.
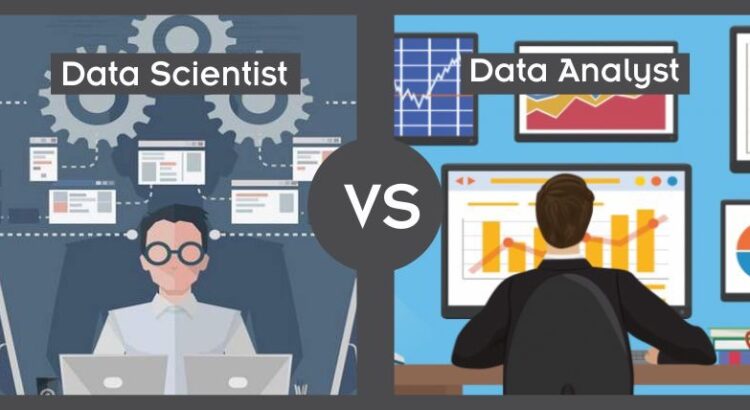
Analysts inform, explain and visualize DATA THAT EXISTS in order to help business executives make strategic decisions. Thus, data analysts live in business meetings, talk to a lot of people and create data visualizations to help others understand what is going on. Tools: SQL, BI, spreadsheets, PowerPoint.
Scientists infer and calculate INFORMATION THAT STILL DOESN’T EXIST, such as the future, usually in order to optimize each and every business transaction. Example: if you like this one product, you might also like that other product. Example: according to data from surroundings, this house price should be around $X. Example: I learned how cars look like, so there is 98% chance there is a car in this photo. Thus, they create or improve digital products using machine learning and applied statistics. To create such improved user experiences, first data scientists use advanced exploratory data analysis techniques, create data visualization only for themselves, only for their better comprehension of what is going on. Tools: SQL, Pandas, math and statistics, git, programing, containers, Linux.
Data analysts tend to have a more glamorous job, while data scientists job is more hard skills oriented. Both need to work with large amounts of information, such as tables with millions or billions of data points.
There is also the Data Engineer role, which is as important as these other data professions, and focused on data availability, consistency and performance.
Inspired by Gerson Lerner’s post, I thought I should give my take on the subject too.
22 years into 21st century but new products still feature connectors from previous century. Precisely 1996, when this very old USB connector was released.
Product designers, please upgrade to USB-C, which is already 8 years old. It’s about time!
22 years into 21st century but new products still feature connectors from previous century. Precisely 1996, when this very old USB connector was released.
Product designers, please upgrade to USB-C, which is already 8 years old. It’s about time!
5G download speed at home in São Paulo today. 420 megabits per second (mbps), equivalent to 52 megabytes per second.
It means that it takes about 10 seconds to download 1 hour of hi-fi music without any compression. But since compression is everywhere, just 2 seconds will be enough.
Upload speed gives me 10 mbps. Pretty good, though we know this is probably not for long.
What 4G, 5G speeds do you get and where?
The Windows-based laptop market is a bad joke of confusing, overlapping offerings. It operates almost like a scam to underskilled consumers because manufacturers try hard to increase their profit around a purely commodity product. The results are “creative” but quite useless features as detachable keyboards, pens and tablet PCs. If you have one of those, think about the rare situations you actually used them in a comfortable way.
For a general use laptop, a $1000 MacBook Air has all the features you need, in order of importance: great high density screen (a.k.a. Retina display, most important feature, always), light and small and elegant, fast internal storage, outstanding global customer service, enough RAM (8GB minimum, 16GB recommended), modern connectivity with USB-C. Oh, and a good CPU too.
Don’t go for less than that and be aware that a similar feature set in the Windows universe will have same price, if not more. But it will be hidden under a pile of confusing, overlapping and oversized configurations.
This post was written for your private life laptop consumer self, to help you buy your next good laptop. Not for your corporate self.
Insightful tweet by Robert Reich, Public Policy professor at UC Berkeley and Harvard:
The naturally occurring “free market” is a myth. The market is a set of rules organized and maintained by governments.
The real question isn’t free market or government — it’s whether the current rules favor the many or the few.
Java 18 was recently released and I can’t help reminding you that Java is the new Cobol: everybody heard about it, even have some legacy in production, needs to be supported, is important, but please don’t ask me to start any new project with Java, because there are much better things I can use today.
Get ready to say goodbye to password managers or even all your passwords. Thanks to FIDO, the industry is shifting to open standards password-less authentication everywhere.
Who’s been using macOS, iOS credential management, integration and synchronization already have an idea about how it works across devices, apps and websites. But now the experience will be improved, extended and made even easier.
The one single power and connectivity kit needed in your laptop backpack.
① One +65W USB-C power charger
② One USB-C 2m/6ft cable with Power Delivery
③ One USB-C kit of adapters to old USB and Micro USB
④ One USB-C adapter to Apple Lightning
This kit: Powers your modern laptop through USB-C. Charges your phone through Lightning or USB-C. Charges eventual other devices on their old USB ports. Connects all devices to one another.
Portable batteries are obsolete. Instead, use your large and powerful laptop battery to charge your phone on the road.
Streamlit (streamlit.io) is a lovely Python module that helps data scientists build interactive dataviz apps.
Use it when a BI is overkill — as this Streamlit dashboard that I wrote to manage my personal investments —, or where there is no BI, such as very small companies. Or where there is no interactive app developers to create a native app.
Streamlit proliferation in mid to large size companies might however be a bad sign of several things:
1️⃣ Application and/or integration developer’s job wrongly assigned to Data Scientists
2️⃣ Lack of a solid BI platform and practice
3️⃣ Siloed data that isn’t flowing due to lack of data streaming or API architecture
4️⃣ All the above.
Use Streamlit with caution; we don’t want it to become the new, data science-era spreadsheet for corporate reporting, with all the burden that spreadsheet proliferation have caused.
Best Data Scientist’s time is spent getting insights from Exploratory Data Analysis, and then using it to model outstanding estimators and predictors. Definitively not writing nice looking apps.
Open Data Science Conference 2022 has happened in Boston this week. Conference featured panels, workshops, presentations and a vendor expo. I attended the 3 days and here are some impressions.
I can’t stand the Mac users that use Google Chrome while they already have the Safari browser, which is lighter, more concerned about privacy, more well integrated to the platform and their other devices (iPhone etc), and is smarter in password management. I don’t even have Google Chrome installed on my Mac.
To all friends that I’ve worked with at IBM and that are now moving to Kyndryl, I wish you success and good luck. The Cloud and IT services opportunity will continue to be huge forever. The countdown you have promoted here was warm and vibrant.
For the still-on-IBM friends, please keep on doing such a great company that always was and continues to be a brilliant reference to the world, not just IT. IBM is an unforgettable school for me and for anybody else that has spent even just a minute working there.
Business worldwide, as we know it, is shaped by companies such as IBM, even if you’ve never heard about it (well, that’s quite impossible).
We the data people immediately identify a poorly designed system when we see it handling date and time as plain local time, instead of the number of seconds since January 1st 1970 of time zone 0.
Just your daily dose of nerdy facts…
Nobody here reads e-mails. Avoid sending e-mails. If you need to send an e-mail to someone, notify him/her on Slack in order to actually have them reading it.
First week on a startup.
Die, e-mail, die, die. Finally!
I’ve seen companies saying they have Big Data because they implemented Hadoop or a data lake and maybe Spark.
That’s just wrong.
Big Data, or more precisely, to be Data Driven, is a state where the data a company produces can be reused, as soon as possible, to optimize itself. And there are many ways to reuse data: all meetings and decisions happen with abundance of data, or recently generated data instantly feeds machine learning algorithms to optimize transactions, just to name a few situations.
To be Driven by Data is part culture and part infrastructure. On the infrastructure side, IT teams still struggle with limited visions about how data should flow pervasively and how access should be granted. They fear about security and performance while they should fear of missing out the data opportunity.
Data Streaming is a breakthrough recent technology that is here to help with more fluent data access. For an agile and effective data architecture, Data Streaming is much more strategic and important than just a bigger data warehouse because it is the component that can unleash your data and finally make it useful.
Apache Spark is like Python’s Pandas and is like SQL databases. It can manipulate datasets, filter, integrate, transform.
But Spark was designed from scratch with horizontal scalability and parallelism in mind, which makes it capable of handling datasets with billions or even unknown number of rows — even if a bit less flexible than Pandas.
This is not new in the industry. Enterprise editions of commercial SQL databases are parallel and scalable since a very long time, being also very expensive in all levels of the stack: service/support, software and hardware.
But Spark is free software. And can use Hadoop — also a free software — as scalable and highly available storage, on cheap commodity hardware. In addition, it has a vibrant community and a democratic ecosystem of services and support.
As with all Open Source, Apache Spark changes the economic landscape of massive data processing systems market, taking money out of a few proprietary HW and SW vendors and pulverizing it locally on people and support.
Programming is the art of creating flexible engines that can be easily extended as new features are needed over time.
Experienced programmers use Design Patterns to help make engine’s functions, features and structure (materialized as code) easily and clearly extensible.
Young programmers must learn and use Design Patterns, and Refactoring Guru has a very nice starting point.
2020 list of desired hard skills for data professionals. From the most essential to the more difficult ones.
Please remember this list has only hard skills. Ethics, domain and industry knowledge, communication are very important soft skills that won’t fit in this list.
Generally speaking, beginning of the list is where Data Analysts are (up to ≈11). Data Engineers get up to the middle of list (up to ≈18). And Scientists get all the list.
There is also the following graph that I’ve produced:
macOS Catalina doesn’t ship with Python 3, only 2. But you can still get 3 from Apple, updated regularly through system’s official update methods. You don’t need to get the awful Anaconda on you Mac to play with Python.
Python 3 is shipped by Xcode Command Line Tools. To get it installed (without the heavy Xcode GUI), type this in your terminal:
xcode-select --install
This way, every time Apple releases an update, you’ll get it.
Settings window will pop so wait 5 minutes for the installation to finish.
If you already have complete Xcode installed, this step was unnecessary (you already had Python 3 installed) and you can continue to the next section of the tutorial.
In case you already have Python installed under your user and modules downloaded with pip, remove it:
rm -rf ${HOME}/Caches/com.apple.python/${HOME}/Library/Python \ ${HOME}/Library/Python/ \ ${HOME}/Library/Caches/pip
Now that you get a useful Python 3 installation, use pip3 to install Python modules that you’ll need. Don’t forget to use –user to get things installed on your home folder so you won’t pollute your overall system. For my personal use, I need the complete machine learning, data wrangling and Jupyter suite:
pip3 install --user sqlalchemy pip3 install --user matplotlib pip3 install --user pandas pip3 install --user jupyterlab pip3 install --user PyMySQL pip3 install --user configobj pip3 install --user requests pip3 install --user seaborn pip3 install --user bs4 pip3 install --user xgboost pip3 install --user scikit_learn
But you might need other things as Django or other sqlalchemy drivers. Set yourself at home and install them with pip3.
For modules that require compilation and special library, say crypto, do it like this:
CFLAGS="-I/Library/Developer/CommandLineTools/Library/Frameworks/Python3.framework/Versions/3.7/include" \ LDFLAGS="-L/Library/Developer/CommandLineTools/Library/Frameworks/Python3.framework/Versions/3.7/lib" \ pip3 install --user pycrypto
For some reason, Apple installs many different Python 3 binaries in different places of the system. The one that gets installed on /usr/bin/python3 has problems loading some libraries and instrumentation with install_name_tool would be required. So lets just use the binary that works better:
export PATH=/Library/Developer/CommandLineTools/usr/bin:$PATH
Commands installed by pip3 will be available in the ~/Library/Python/3.7/bin/ folder, so just add it to your PATH:
export PATH=$PATH:~/Library/Python/3.7/bin/
Now I can simply type jupyter-lab anywhere in the terminal or command line to make it fire my browser and get a Jupyter environment.
Xcode Command Line Tools will get you a full hand of other useful developer tools, such as git, subversion, GCC and LLVM compilers and linkers, make, m4 and a complete Python 3 distribution. You can see most of its installation on /Library/Developer/CommandLineTools folder.
For production and high end processing I’ll still use Python on Linux with my preferred distribution’s default packages (no Anaconda). But this method of getting Python on macOS is fastest and cleanest to get you going on your own data scientist laptop without a VM nor a container.
One of the most interesting features of the new HEIF/HEIC image format — and a true expected innovation — is lossless compression.
Read MoreJupyter Notebooks are the elegant way that Data Scientists work and all software needed to run them are already pre-packaged on Fedora (and any other Linux distribution). It is encouraged to use your distribution’s packaging infrastructure to install Python packages. Avoid at any cost installing Python packages with pip, conda, anaconda and from source code. The reasons for this good practice are security, ease of use, to keep the system clean and to make installation procedures easily reproducible in DevOps scenarios.
Here is a curated list of active, responsive and valid BitTorrent trackers. Add them to the list of trackers of your torrents to increase your chance of finding peers and improve download speed.
Read More
When Sun and then Oracle bought MySQL AB, the company behind the original development, MySQL open source database development governance gradually closed. Now, only Oracle writes updates. Updates from other sources — individuals or other companies — are ignored. MySQL is still open source, but it has a closed governance.
MySQL is one of the most popular databases in the world. Every WordPress and Drupal website runs on top of MySQL, as well as the majority of generic Ruby, Django, Flask and PHP apps which have MySQL as their database of choice.
When an open source project becomes this popular and essential, we say it is gaining momentum. MySQL is so popular that it is bigger than its creators. In practical terms, that means its creators can disappear and the community will take over the project and continue its evolution. It also means the software is solid, support is abundant and local, sometimes a commodity or even free.
In the case of MySQL, the source code was forked by the community, and the MariaDB project started from there. Nowadays, when somebody says he is “using MySQL”, he is in fact probably using MariaDB, which has evolved from where MySQL stopped in time.
Open source software’s momentum serves as a powerful insurance policy for the investment of time and resources an individual or enterprise user will put into it. This is the true benefit behind Linux as an operating system, Samba as a file server, Apache HTTPD as a web server, Hadoop, Docker, MongoDB, PHP, Python, JQuery, Bootstrap and other hyper-essential open source projects, each on its own level of the stack. Open source momentum is the safe antidote to technology lock-in. Having learned that lesson over the last decade, enterprises are now looking for the new functionalities that are gaining momentum: cloud management software, big data, analytics, integration middleware and application frameworks.
On the open domain, the only two non-functional things that matter in the long term are whether it is open source and if it has attained momentum in the community and industry. None of this is related to how the software is being written, but this is exactly what open governance is concerned with: the how.
Open source governance is the policy that promotes a democratic approach to participating in the development and strategic direction of a specific open source project. It is an effective strategy to attract developers and IT industry players to a single open source project with the objective of attaining momentum faster. It looks to avoid community fragmentation and ensure the commitment of IT industry players.
Open governance alone does not guarantee that the software will be good, popular or useful (though formal open governance only happens on projects that have already captured some attention of IT industry leaders). A few examples of open source projects that have formal open governance are CloudFoundry, OpenStack, JQuery and all the projects under the Apache Software Foundation umbrella.
For users, the indirect benefit of open governance is only related to the speed the open source project reaches momentum and high popularity.
Open governance is important only for the people looking to govern or contribute. If you just want to use, open source momentum is far more important.
I once found on the internet the RDM software and found it useful.
I’ve created packages for easier installation, but I didn’t write the software. My packaging was published on GitHub but its not maintained anymore; I’m not using the software anymore.
Subject
tagCreator
tag based on camera modelThere was a time that Apple macOS was the best platform to handle multimedia (audio, image, video). This might be still true in the GUI space. But Linux presents a much wider range of possibilities when you go to the command line, specially if you want to:
The Open Source community has produced state of the art command line tools as ffmpeg
, exiftool
and others, which I use every day to do non-trivial things, along with Shell advanced scripting. Sure, you can get these tools installed on Mac or Windows, and you can even use almost all these recipes on these platforms, but Linux is the native platform for these tools, and easier to get the environment ready.
These are my personal notes and I encourage you to understand each step of the recipes and adapt to your workflows. It is organized in Audio, Video and Image+Photo sections.
I use Fedora Linux and I mention Fedora package names to be installed. You can easily find same packages on your Ubuntu, Debian, Gentoo etc, and use these same recipes.
ffprobe file.mp3
ffprobe file.m4v
ffprobe file.mkv
ls *flac | while read f; do ffmpeg -i "$f" -acodec alac -vn "${f[@]/%flac/m4a}" < /dev/null; done
ls *flac | while read f; do ffmpeg -i "$f" -qscale:a 2 -vn "${f[@]/%flac/mp3}" < /dev/null; done
First, make sure you have Negativo17 build of FFMPEG, so run this as root:
dnf config-manager --add-repo=http://negativo17.org/repos/fedora-multimedia.repo dnf update ffmpeg
Now encode:
ls *flac | while read f; do ffmpeg -i "$f" -vn -c:a libfdk_aac -vbr 5 -movflags +faststart "${f[@]/%flac/m4a}" < /dev/null; done
Has been said the Fraunhofer AAC library can’t be legally linked to ffmpeg due to license terms violation. In addition, ffmpeg’s default AAC encoder has been improved and is almost as good as Fraunhofer’s, specially for constant bit rate compression. In this case, this is the command:
ls *flac | while read f; do ffmpeg -i "$f" -vn -c:a aac -b:a 256k -movflags +faststart "${f[@]/%flac/m4a}" < /dev/null; done
This is one of my favorites, extremely powerful. Very useful when you get a Hi-Fi, complete but useless WMA-Lossless collection and need to convert it losslesslly to something more portable, ALAC in this case. Change the FMT=flac
to FMT=wav
or FMT=wma
(only when it is WMA-Lossless) to match your source files. Don’t forget to tag the generated files.
FMT=flac # Create identical directory structure under new "alac" folder find . -type d | while read d; do mkdir -p "alac/$d" done find . -name "*$FMT" | sort | while read f; do ffmpeg -i "$f" -acodec alac -vn "alac/${f[@]/%$FMT/m4a}" < /dev/null; mp4tags -E "Deezer lossless files (https://github.com/Ghostfly/deezDL) + 'ffmpeg -acodec alac'" "alac/${f[@]/%$FMT/m4a}"; done
iPhone and iPod music player can display the file’s embedded lyrics and this is a cool feature. There are several ways to get lyrics into your music files. If you download music from Deezer using SMLoadr, you’ll get files with embedded lyrics. Then, the FLAC to ALAC process above will correctly transport the lyrics to the M4A container. Another method is to use beets music tagger and one of its plugins, though it is very slow for beets to fetch lyrics of entire albums from the Internet.
The third method is manual. Let lyrics.txt
be a text file with your lyrics. To tag it into your music.m4a
, just do this:
mp4tags -L "$(cat lyrics.txt)" music.m4a
And then check to see the embedded lyrics:
ffprobe music.m4a 2>&1 | less
If some of your friends has the horrible tendency to commit this crime and rip CDs as 1 file for entire CD, there is an automation to fix it. APE is the most difficult and this is what I’ll show. FLAC and WAV are shortcuts of this method.
ffmpeg -i audio-cd.ape audio-cd.wav
iconv -f Latin1 -t UTF-8 audio-cd.cue | shnsplit -t "%n · %p ♫ %t" audio-cd.wav
ls *wav | while read f; do ffmpeg -i "$f" -acodec alac -vn "${f[@]/%wav/m4a}" < /dev/null; done
This will get you lossless ALAC files converted from the intermediary WAV files. You can also convert them into FLAC or MP3 using variations of the above recipes.
Now the files are ready for your tagger.
This is a lossless and fast process, chapters and subtitles are added as tags and streams to the file; audio and video streams are not reencoded.
bash$ file subtitles_file.srt subtitles_file.srt: ISO-8859 text, with CRLF line terminators
It is not UTF-8 encoded, it is some ISO-8859 variant, which I need to know to correctly convert it. My example uses a Brazilian Portuguese subtitle file, which I know is ISO-8859-15 (latin1) encoded because most latin scripts use this encoding.
bash$ iconv -f latin1 -t utf8 subtitles_file.srt > subtitles_file_utf8.srt bash$ file subtitles_file_utf8.srt subtitles_file_utf8.srt: UTF-8 Unicode text, with CRLF line terminators
bash$ cat chapters.txt CHAPTER01=00:00:00.000 CHAPTER01NAME=Chapter 1 CHAPTER02=00:04:31.605 CHAPTER02NAME=Chapter 2 CHAPTER03=00:12:52.063 CHAPTER03NAME=Chapter 3 …
MP4Box -ipod \ -itags 'track=The Movie Name:cover=cover.jpg' \ -add 'subtitles_file_utf8.srt:lang=por' \ -chap 'chapters.txt:lang=eng' \ movie.mp4
The MP4Box command is part of GPac.
OpenSubtitles.org has a large collection of subtitles in many languages and you can search its database with the IMDB ID of the movie. And ChapterDB has the same for chapters files.
Since iTunes can tag and beautify your movie files in Windows and Mac, libmp4v2
can do the same on Linux. Here we’ll use it to add the movie cover image we downloaded from IMDB along with some movie metadata for Woody Allen’s 2011 movie Midnight in Paris:
mp4tags -H 1 -i movie -y 2011 -a "Woody Allen" -s "Midnight in Paris" -m "While on a trip to Paris with his..." "Midnight in Paris.m4v" mp4art -k -z --add cover.jpg "Midnight in Paris.m4v"
This way the movie file will look good and in the correct place when transferred to your iPod/iPad/iPhone.
Of course, make sure the right package is installed first:
dnf install libmp4v2
File extensions MOV, MP4, M4V, M4A are the same format from the ISO MPEG-4 standard. They have different names just to give a hint to the user about what they carry.
dnf -y install libdvdcss vobcopy
mount /dev/sr0 /mnt/dvd; cd /target/folder; vobcopy -m /mnt/dvd .
You’ll get a directory tree with decrypted VOB and BUP files. You can generate an ISO file from them or, much more practical, use HandBrake to convert the DVD titles into MP4/M4V (more compatible with wide range of devices) or MKV/WEBM files.
Modern iPhones can record videos at 240 or 120fps so when you’ll watch them at 30fps they’ll look slow-motion. But regular players will play them at 240 or 120fps, hiding the slo-mo effect.
We’ll need to handle audio and video in different ways. The video FPS fix from 240 to 30 is loss less, the audio stretching is lossy.
# make sure you have the right packages installed dnf install mkvtoolnix sox gpac faac
#!/bin/bash # Script by Avi Alkalay # Freely distributable f="$1" ofps=30 noext=${f%.*} ext=${f##*.} # Get original video frame rate ifps=`ffprobe -v error -select_streams v:0 -show_entries stream=r_frame_rate -of default=noprint_wrappers=1:nokey=1 "$f" < /dev/null | sed -e 's|/1||'` echo # exit if not high frame rate [[ "$ifps" -ne 120 ]] && [[ "$ifps" -ne 240 ]] && exit fpsRate=$((ifps/ofps)) fpsRateInv=`awk "BEGIN {print $ofps/$ifps}"` # loss less video conversion into 30fps through repackaging into MKV mkvmerge -d 0 -A -S -T \ --default-duration 0:${ofps}fps \ "$f" -o "v$noext.mkv" # loss less repack from MKV to MP4 ffmpeg -loglevel quiet -i "v$noext.mkv" -vcodec copy "v$noext.mp4" echo # extract subtitles, if original movie has it ffmpeg -loglevel quiet -i "$f" "s$noext.srt" echo # resync subtitles using similar method with mkvmerge mkvmerge --sync "0:0,${fpsRate}" "s$noext.srt" -o "s$noext.mkv" # get simple synced SRT file rm "s$noext.srt" ffmpeg -i "s$noext.mkv" "s$noext.srt" # remove undesired formating from subtitles sed -i -e 's|<font size="8"><font face="Helvetica">\(.*\)</font></font>|\1|' "s$noext.srt" # extract audio to WAV format ffmpeg -loglevel quiet -i "$f" "$noext.wav" # make audio longer based on ratio of input and output framerates sox "$noext.wav" "a$noext.wav" speed $fpsRateInv # lossy stretched audio conversion back into AAC (M4A) 64kbps (because we know the original audio was mono 64kbps) faac -q 200 -w -s --artist a "a$noext.wav" # repack stretched audio and video into original file while removing the original audio and video tracks cp "$f" "${noext}-slow.${ext}" MP4Box -ipod -rem 1 -rem 2 -rem 3 -add "v$noext.mp4" -add "a$noext.m4a" -add "s$noext.srt" "${noext}-slow.${ext}" # remove temporary files rm -f "$noext.wav" "a$noext.wav" "v$noext.mkv" "v$noext.mp4" "a$noext.m4a" "s$noext.srt" "s$noext.mkv"
If the audio is already AAC-encoded (may also be ALAC-encoded), create an MP4/M4V file:
ffmpeg -loop 1 -framerate 0.2 -i photo.jpg -i song.m4a -shortest -c:v libx264 -tune stillimage -vf scale=960:-1 -c:a copy movie.m4v
The above method will create a very efficient 0.2 frames per second (-framerate 0.2) H.264 video from the photo while simply adding the audio losslessly. Such very-low-frames-per-second video may present sync problems with subtitles on some players. In this case simply remove the -framerate 0.2 parameter to get a regular 25fps video with the cost of a bigger file size.
The -vf scale=960:-1 parameter tells FFMPEG to resize the image to 960px width and calculate the proportional height. Remove it in case you want a video with the same resolution of the photo. A 12 megapixels photo file (around 4032×3024) will get you a near 4K video.
If the audio is MP3, create an MKV file:
ffmpeg -loop 1 -framerate 0.2 -i photo.jpg -i song.mp3 -shortest -c:v libx264 -tune stillimage -vf scale=960:-1 -c:a copy movie.mkv
If audio is not AAC/M4A but you still want an M4V file, convert audio to AAC 192kbps:
ffmpeg -loop 1 -framerate 0.2 -i photo.jpg -i song.mp3 -shortest -c:v libx264 -tune stillimage -vf scale=960:-1 -c:a aac -strict experimental -b:a 192k movie.m4v
See more about FFMPEG photo resizing.
There is also a more efficient and completely lossless way to turn a photo into a video with audio, using extended podcast techniques. But thats much more complicated and requires advanced use of GPAC’s MP4Box and NHML. In case you are curious, see the Podcast::chapterize()
and Podcast::imagify()
methods in my music-podcaster script. The trick is to create an NHML (XML) file referencing the image(s) and add it as a track to the M4A audio file.
mkdir noexif; exiftool -filename -T -if '(not $datetimeoriginal or ($datetimeoriginal eq "0000:00:00 00:00:00"))' *HEIC *JPG *jpg | while read f; do mv "$f" noexif/; done
Warning: use this only if image files have correct creation time on filesystem and if they don’t have an EXIF header.
exiftool -overwrite_original '-DateTimeOriginal< ${FileModifyDate}' *CR2 *JPG *jpg
jhead -autorot -cmd "jpegtran -progressive '&i' > '&o'" -ft *jpg
This process will rename silly, sequential, confusing and meaningless photo file names as they come from your camera into a readable, sorteable and useful format. Example:
IMG_1234.JPG
➡ 2015.07.24-17.21.33 • Max playing with water【iPhone 6s✚】.jpg
Note that new file name has the date and time it was taken, whats in the photo and the camera model that was used.
exiftool -overwrite_original '-OriginalFileName<${filename}' *CR2 *JPG *jpg
exiftool '-filename<${DateTimeOriginal} 【${Model}】%.c.%e' -d %Y.%m.%d-%H.%M.%S *CR2 *HEIC *JPG *jpg
\ls *HEIC *JPG *jpg *heic | while read f; do nf=`echo "$f" | sed -e 's/0.JPG/.jpg/i; s/0.HEIC/.heic/i'`; t=`echo "$f" | sed -e 's/0.JPG/1.jpg/i; s/0.HEIC/1.heic/i'`; [[ ! -f "$t" ]] && mv "$f" "$nf"; done
Alternative for macOS without SED:
\ls *HEIC *JPG *jpg *heic | perl -e ' while (<>) { chop; $nf=$_; $t=$_; $nf=~s/0.JPG/.jpg/i; $nf=~s/0.HEIC/.heic/i; $t=~s/0.JPG/1.jpg/i; $t=~s/0.HEIC/1.heic/i; rename($_,$nf) if (! -e $t); }'
\ls *HEIC *JPG | while read f; do nf=`echo "$f" | sed -e 's/JPG/jpg/; s/HEIC/heic/'`; mv "$f" "$nf"; done
\ls *HEIC *JPG *jpg *heic | while read f; do nf=`echo "$f" | sed -e 's/Canon PowerShot G1 X/Canon G1X/; s/iPhone 6s Plus/iPhone 6s✚/; s/iPhone 7 Plus/iPhone 7✚/; s/Canon PowerShot SD990 IS/Canon SD990 IS/; s/HEIC/heic/; s/JPG/jpg/;'`; mv "$f" "$nf"; done
You’ll get file names as 2015.07.24-17.21.33 【Canon 5D Mark II】.jpg. If you took more then 1 photo in the same second, exiftool will automatically add an index before the extension.
Subject
tag\ls *【*】* | while read f; do s=`exiftool -T -Subject "$f"`; if [[ " $s" != " -" ]]; then nf=`echo "$f" | sed -e "s/ 【/ • $s 【/; s/\:/∶/g;"`; mv "$f" "$nf"; fi; done
exiftool '-filename<${DateTimeOriginal} • ${Subject} 【${Model}】%.c.%e' -d %Y.%m.%d-%H.%M.%S *CR2 *JPG *HEIC *jpg *heic
exiftool -T -Model *jpg | sort -u
Output is the list of camera models on this photos:
Canon EOS REBEL T5i DSC-H100 iPhone 4 iPhone 4S iPhone 5 iPhone 6 iPhone 6s Plus
CRE="John Doe"; exiftool -overwrite_original -creator="$CRE" -by-line="$CRE" -Artist="$CRE" -if '$Model=~/DSC-H100/' *.jpg CRE="Jane Black"; exiftool -overwrite_original -creator="$CRE" -by-line="$CRE" -Artist="$CRE" -if '$Model=~/Canon EOS REBEL T5i/' *.jpg CRE="Mary Doe"; exiftool -overwrite_original -creator="$CRE" -by-line="$CRE" -Artist="$CRE" -if '$Model=~/iPhone 5/' *.jpg CRE="Peter Black"; exiftool -overwrite_original -creator="$CRE" -by-line="$CRE" -Artist="$CRE" -if '$Model=~/iPhone 4S/' *.jpg CRE="Avi Alkalay"; exiftool -overwrite_original -creator="$CRE" -by-line="$CRE" -Artist="$CRE" -if '$Model=~/iPhone 6s Plus/' *.jpg
If you geometrically mark people faces and their names in your photos using tools as Picasa, you can easily search for the photos which contain “Suzan” or “Marcelo” this way:
exiftool -fast -r -T -Directory -FileName -RegionName -if '$RegionName=~/Suzan|Marcelo/' .
-Directory, -FileName and -RegionName specify the things you want to see in the output. You can remove -RegionName for a cleaner output.
The -r is to search recursively. This is pretty powerful.
Your camera will tag your photos only with local time on CreateDate or DateTimeOriginal tags. There is another set of tags called GPSDateStamp and GPSTimeStamp that must contain the UTC time the photos were taken, but your camera won’t help you here. Hopefully you can derive these values if you know the timezone the photos were taken. Here are two examples, one for photos taken in timezone -02:00 (Brazil daylight savings time) and on timezone +09:00 (Japan):
exiftool -overwrite_original '-gpsdatestamp<${CreateDate}-02:00' '-gpstimestamp<${CreateDate}-02:00' '-TimeZone<-02:00' '-TimeZoneCity<São Paulo' *.jpg
exiftool -overwrite_original '-gpsdatestamp<${CreateDate}+09:00' '-gpstimestamp<${CreateDate}+09:00' '-TimeZone<+09:00' '-TimeZoneCity<Tokio' Japan_Photos_folder
Use exiftool to check results on a modified photo:
exiftool -s -G -time:all -gps:all 2013.10.12-23.45.36-139.jpg [EXIF] CreateDate : 2013:10:12 23:45:36 [Composite] GPSDateTime : 2013:10:13 01:45:36Z [EXIF] GPSDateStamp : 2013:10:13 [EXIF] GPSTimeStamp : 01:45:36
This shows that the local time when the photo was taken was 2013:10:12 23:45:36. To use exiftool to set timezone to -02:00 actually means to find the correct UTC time, which can be seen on GPSDateTime as 2013:10:13 01:45:36Z. The difference between these two tags gives us the timezone. So we can read photo time as 2013:10:12 23:45:36-02:00.
Moves is an amazing app for your smartphone that simply records for yourself (not social and not shared) everywhere you go and all places visited, 24h a day.
exiftool -overwrite_original -api GeoMaxExtSecs=86400 -geotag ../moves_export/gpx/yearly/storyline/storyline_2015.gpx '-geotime<${CreateDate}-08:00' Folder_with_photos_from_trip_to_Las_Vegas
Some important notes:
montage -mode concatenate -tile 1x8 *jpg COMPOSED.JPG
montage -mode concatenate -tile 8x1 *jpg COMPOSED.JPG
montage -mode concatenate -tile 4x2 *jpg COMPOSED.JPG
The montage command is part of the ImageMagick package.
This document explains working examples on how to use Bluemix platform advanced features such as:
cf
command line interface, including DockerFor this, I’ll use the following source code structure:
github.com/avibrazil/bluemix-docker-kickstart
The source code currently brings to life (as an example), integrated with some Bluemix services and Docker infrastructure, a PHP application (the WordPress popular blogging platform), but it could be any Python, Java, Ruby etc app.
I feel it is important to position what Bluemix really is and which of its parts we are going to use. Bluemix is composed of 3 different things:
cf
command from your laptop. IBM has extended this part of Bluemix with functions not currently available on CloudFoundry, notably the capability of executing regular VMs and Docker containers.This tutorial will dive into #1 and some parts of #3, while using some services from #2.
When fully provisioned, the entire architecture will look like this. Several Bluemix services (MySQL, Object store) packaged into a CloudFoundry App (bridge app) that serves some Docker containers that in turns do the real work. Credentials to access those services will be automatically provided to the containers as environment variables (VCAP_SERVICES
).
The example source code repo contains boilerplate code that is intentionally generic and clean so you can easily fork, add and modify it to fit your needs. Here is what it contains:
bridge-app
folder and manifest.yml
filemanifest.yml
that defines app name, dependencies and other characteristics to deploy the app contents under bridge-app
.containers
phpinfo
and wordpress
directories, but there are some other useful examples you can use..bluemix
folderadmin
folderThe easiest way to deploy the app is through DevOps Services:
Conceptually, these are the things you need to do to fully deploy an app with Docker on Bluemix:
The idea is to encapsulate all these steps in code so deployments can be done entirely unattended. Its what I call brainless 1-click deployment. There are 2 ways to do that:
admin/deploy
script in our code..bluemix/pipeline.yml
file.From here, we will detail each of these steps both as commands (on the script) and as stages of the pipeline.
I used the cf marketplace
command to find the service names and plans available. ClearDB provides MySQL as a service. And just as an example, I’ll provision an additional Object Storage service. Note the similarities between both methods.
cf create-service \ cleardb \ spark \ bridge-app-database; cf create-service \ Object-Storage \ Free \ bridge-app-object-store;
When you deploy your app to Bluemix, DevOps Services will read your manifest.yml
and automatically provision whatever is under the declared-services block. In our case:
declared-services: bridge-app-database: label: cleardb plan: spark bridge-app-object-store: label: Object-Storage plan: Free
The manifest.yml
file has all the details about our CF app. Name, size, CF build pack to use, dependencies (as the ones instantiated in previous stage). So a plain cf push
will use it and do the job. Since this app is just a bridge between our containers and the services, we’ll use minimum resources and the minimum noop-buildpack
. After this stage you’ll be able to see the app running on your Bluemix console.
The heavy lifting here is done by the Dockerfile
s. We’ll use base CentOS images with official packages only in an attempt to use best practices. See phpinfo and wordpress Dockerfiles to understand how I improved a basic OS to become what I need.
The cf ic
command is basically a clone of the well known docker
command, but pre-configured to use Bluemix Docker infrastructure. There is simple documentation to install the IBM Containers plugin to cf
.
cf ic build \ -t phpinfo_image \ containers/phpinfo/; cf ic build \ -t wordpress_image \ containers/wordpress/;
Stages handling this are “➋ Build phpinfo Container” and “➍ Build wordpress Container”.
Open these stages and note how image names are set.
After this stage, you can query your Bluemix private Docker Registry and see the images there. Like this:
$ cf ic images REPOSITORY TAG IMAGE ID CREATED SIZE registry.ng.bluemix.net/avibrazil/phpinfo_image latest 69d78b3ce0df 3 days ago 104.2 MB registry.ng.bluemix.net/avibrazil/wordpress_image latest a801735fae08 3 days ago 117.2 MB
A Docker image is not yet a container. A Docker container is an image that is being executed.
To make our tutorial richer, we’ll run 2 sets of containers:
cf ic run \ -P \ --env 'CCS_BIND_APP=bridge-app-name' \ --name phpinfo_instance \ registry.ng.bluemix.net/avibrazil/phpinfo_image; IP=`cf ic ip request | grep "IP address" | sed -e "s/.* \"\(.*\)\" .*/\1/"`; cf ic ip bind $IP phpinfo_instance;
Equivalent stage is “➌ Deploy phpinfo Container”.
Open this stage and note how some environment variables are defined, specially the BIND_TO
.
Bluemix DevOps Services default scripts use these environment variables to correctly deploy the containers.
The CCS_BIND_APP
on the script and BIND_TO
on the pipeline are key here. Their mission is to make the bridge-app’s VCAP_SERVICES
available to this container as environment variables.
In CloudFoundry, VCAP_SERVICES
is an environment variable containing a JSON document with all credentials needed to actually access the app’s provisioned APIs, middleware and services, such as host names, users and passwords. See an example below.
cf ic group create \ -P \ --env 'CCS_BIND_APP=bridge-app-name' \ --auto \ --desired 2 \ --name wordpress_group_instance \ registry.ng.bluemix.net/avibrazil/wordpress_image cf ic route map \ --hostname some-name-wordpress \ --domain $DOMAIN \ wordpress_group_instance
The cf ic group create
creates a container group and runs them at once.
The cf ic route map
command configures Bluemix load balancer to capture traffic to http://some-name-wordpress
.mybluemix.net and route it to the wordpress_group_instance
container group.
Equivalent stage is “➎ Deploy wordpress Container Group”.
Look in this stage’s Environment Properties how I’m configuring container group.
I had to manually modify the standard deployment script, disabling deploycontainer and enabling deploygroup.
At this point, WordPress (the app that we deployed) is up and running inside a Docker container, and already using the ClearDB MySQL database provided by Bluemix. Access the URL of your wordpress container group and you will see this:
Bluemix dashboard also shows the components running:
But the most interesting evidence you can see accessing the phpinfo container URL or IP. Scroll to the environment variables section to see all services credentials available as environment variables from VCAP_SERVICES:
I use these credentials to configure WordPress while building the Dockerfile, so it can find its database when executing:
. . . RUN yum -y install epel-release;\ yum -y install wordpress patch;\ yum clean all;\ sed -i '\ s/.localhost./getenv("VCAP_SERVICES_CLEARDB_0_CREDENTIALS_HOSTNAME")/ ; \ s/.database_name_here./getenv("VCAP_SERVICES_CLEARDB_0_CREDENTIALS_NAME")/ ; \ s/.username_here./getenv("VCAP_SERVICES_CLEARDB_0_CREDENTIALS_USERNAME")/ ; \ s/.password_here./getenv("VCAP_SERVICES_CLEARDB_0_CREDENTIALS_PASSWORD")/ ; \ ' /etc/wordpress/wp-config.php;\ cd /etc/httpd/conf.d; patch < /tmp/wordpress.conf.patch;\ rm /tmp/wordpress.conf.patch . . .
So I’m using sed
, the text-editor-as-a-command, to edit WordPress configuration file (/etc/wordpress/wp-config.php
) and change some patterns there into appropriate getenv() calls to grab credentials provided by VCAP_SERVICES
.
The containers folder in the source code presents one folder per image, each is an example of different Dockerfiles. We use only the wordpress and phpinfo ones here. But I’d like to highlight some best practices.
A Dockerfile is a script that defines how a container image should be built. A container image is very similar to a VM image, the difference is more related to the file formats that they are stored. VMs uses QCOW, VMDK etc while Docker uses layered filesystem images. From the application installation perspective, all the rest is almost the same. But only only Docker and its Dockerfile provides a super easy way to describe how to prepare an image focusing mostly only on your application. The only way to automate this process on the old Virtual Machine universe is through techniques such as Red Hat’s kickstart. This automated OS installation aspect of Dockerfiles might seem obscure or unimportant but is actually the core of what makes viable a modern DevOps culture.
patch
command in your Dockerfile, as I did on wordpress Dockerfile.diff -Naur configfile.txt.org configfile.txt > configfile.patch
Then see the wordpress Dockerfile to understand how to apply it.
.zip
or .tar.gz
) from the Internet. In the wordpress Dockerfile I enabled the official EPEL repository so I can install WordPress with YUM. Same happens on the Django and NGINX Dockerfiles. Also note how I don’t have to worry about installing PHP and MySQL client libraries – they get installed automatically when YUM installs wordpress package, because PHP and MySQL are dependencies.CloudFoundry (the execution environment behind Bluemix) has its own Open Source container technology called Warden. And CloudFoundry’s Dockerfile-equivalent is called Buildpack. Just to illustrate, here is a WordPress buildpack for CloudFoundry and Bluemix.
To chose to go with Docker in some parts of your application means to give up some native integrations and facilities naturally and automatically provided by Bluemix. With Docker you’ll have to control and manage some more things for yourself. So go with Docker, instead of a buildpack, if:
The best balance is to use Bluemix services/APIs/middleware and native buildpacks/runtimes whenever possible, and go with Docker on specific situations. Leveraging the integration that Docker on Bluemix provides.
I’ve searched for a long time and finally found a US regular bank that will let me open a free checking account. It is BBVA Compass bank.
All these services are free: ATM withdraw and deposit (BBVA’s and AllPoint ATMs), full featured Internet banking, full featured mobile banking, Visa debit card, Apple Pay and more. The non-free services are listed here and exact rates depend on the US state where the account was opened.
To open a checking account, you must personally visit a physical branch in US and spend 40 minutes on an interview. You will leave the branch with an open account and routing numbers containing a $26 balance plus valid user and password that can be used on BBVA’s app and Internet banking. Free Visa debit card will arrive to some US address in a week or two, so no ATM until then.
They have 2 free checking account types. You should chose the one that includes free or charge AllPoint ATM usage which are very popular throughout US, and can be found in almost every 7 Eleven store. Use the AllPoint app to find one near you. Read More