We the data people immediately identify a poorly designed system when we see it handling date and time as plain local time, instead of the number of seconds since January 1st 1970 of time zone 0.
This post was published on 1,626,425,523 (UTC, always UTC).
Jesus was born -62,399,513,432.
Man visited the moon between -14,552,880 and 93,172,200.
Nobody here reads e-mails. Avoid sending e-mails. If you need to send an e-mail to someone, notify him/her on Slack in order to actually have them reading it.
I’ve seen companies saying they have Big Data because they implemented Hadoop or a data lake and maybe Spark.
That’s just wrong.
Big Data, or more precisely, to be Data Driven, is a state where the data a company produces can be reused, as soon as possible, to optimize itself. And there are many ways to reuse data: all meetings and decisions happen with abundance of data, or recently generated data instantly feeds machine learning algorithms to optimize transactions, just to name a few situations.
To be Driven by Data is part culture and part infrastructure. On the infrastructure side, IT teams still struggle with limited visions about how data should flow pervasively and how access should be granted. They fear about security and performance while they should fear of missing out the data opportunity.
Data Streaming is a breakthrough recent technology that is here to help with more fluent data access. For an agile and effective data architecture, Data Streaming is much more strategic and important than just a bigger data warehouse because it is the component that can unleash your data and finally make it useful.
Cartão de Crédito nada mais é do que empréstimo de dinheiro pré-aprovado a juros altíssimos, disponível na hora que se deseja/precisa usar.
Sua fatura mensal é uma comodidade banal para quem tem dinheiro, mas é a corda no pescoço para o pobre no caixa do supermercado com a compra de comida para a família. Na farmácia e na loja de indulgências também. Uma corda que sempre aperta mais e ele não vê perspectiva de soltar. Mesmo que num mês irreal ele não gaste nada, os juros farão trazer uma fatura sempre mais alta.
E aí numa conversa descobri que meu ideal sagitariano e estóico de riqueza não é muito comum.
Prá começar, carro de luxo nem pensar. Prá que continuar preocupado com multas, batidas, lugar prá estacionar, depreciação? Quando eu for rico, só vou andar de táxi. Atravessar a cidade prá visitar a irmã? Táxi. Viagenzinha pro interior com a família? Táxi. Prá ver a paisagem, ler, conversar, cochilar.
Refeições eu faria em restaurantes. Todas as 3 refeições do dia. Todos os dias. Nunca mais me preocuparia se tá faltando ovo e brócolis e nem se as coisas na geladeira já vão estragar. Louça suja não existiria para mim. E o melhor: nunca mais teria que pensar 3 vezes ao dia o que preparar para as crianças comerem. Eu quero é ver o cardápio. Mas aí eu seria tão rico que também teria nutricionista prá prestar serviço ao vivo de montar refeição saudável e balanceada em todos os lugares que fossemos comer.
Cobertura? Casa de luxo? Faço nenhuma questão porque ainda teria que me preocupar com decoração que impressione amigos, manutenções sem fim, despensa de comida e material de limpeza, o que acumular e o que jogar fora. Quero não. Eu moraria em hotel mesmo. Cinco estrelas, claro. Tipo suíte do Copacabana Palace ou do Tangará, que já provei e aprovei para morar longas temporadas. Enjoei da decoração, do bairro, da cidade? Fácil, é só pagar a conta e ir a outro hotel. Ou resort. Ou outro lugar com serviço completo, daqueles que você sai para tomar café e volta e já tá tudo arrumado e dobrado.
“Ah, mas alguma hora cê não vai querer voltar prum canto que é só seu?” Não. Entendo que “voltar” presume “ter ido embora”, e creio que nunca fui embora de mim mesmo. A nossa morada somos nós mesmos, né não?!
“Ah, mas onde você vai guardar suas coisas?” Na nuvem e numas 2 malas de roupas, ou menos. O resto das coisas eu abriria mão imediatamente por esse estilo de vida desprendido e sem planejamento.
“Ah, mas aí cê estraga os filhos”. Verdade, eu precisaria pensar melhor nessa parte, mas dá uma preguiça…
Dizem que eu tenho uma concepção de pobre sobre essa riqueza pretérita. Chame do que quiser, eu só não quero compromissos, responsabilidades, ter que fazer compras, contratar manutenções para eletrodomésticos etc. Desprendimento seria o centro. Até a própria riqueza seria um acessório só para viabilizar conforto e mais desprendimento.
Se homens nadam e mulheres voam, não vamos esperar que mulheres queiram nadar e vice-versa.
É inegável que mulheres e homens são diferentes. Eu não sei como e porque isso acontece. E me é difícil entender se essas diferenças (ou partes delas) são causadas pela sociedade e ambiente (preconceitos) ou se são naturais. Só sei que não podemos mais tolerar as diferenças causadas claramente por preconceitos, enquanto devemos sim estimular e aproveitar diferenças naturais para que cada ser humano realize o máximo de sua natureza e potencial.
Tudo isso também se aplica a outros tipos de diversidade. LGBT, PcD, grupos étnicos etc.
— extraído de comentário que escrevi num post da colega Cintia Barcelos
Me colocaram num grupo de nômades digitais cujas discussões são nada menos que absolutamente inspiradoras.
São pessoas desprendidas e provavelmente sem filhos que têm profissões que levam de forma remota, pela Internet, e que passam a vida viajando.
Discutem se os próximos meses devem passar nas Maldivas, Tenerife ou Tailândia. Contam o paraíso que foi tal e tal lugar onde ficaram N meses.
Não é algo novo, mas a cultura do trabalho remoto recebeu o aval maior pela pandemia e a Nação dos Nômades Digitais deve crescer nos próximos anos.
Claro que algumas coisas ajudam: ter renda em moeda forte — para pagar barato por produtos e serviços em lugares distantes do planeta —, ter um trabalho que permite essa situação — ou ser rico mesmo — e não ter filhos — para ser desprendido e ganhar agilidade para ir e vir.
Mesmo achando que já vivo no paraíso, preciso confessar que esse modo de viver me atrai e faço planos secretos de catar a namorada e virarmos nômades assim que os filhos alcançarem a alta adolescência.
Alguns lugares que eu voltaria ou passaria com prazer uma temporada:
Hibiki, Tashkent, Nova York, interiorizão dos EUA, Piemonte, Tenerife, Hamburgo, Carolina do Norte em maio, Addis Abeba, Ibiza, Belém do Pará…
Eu não concordo com essa tese de que “o bozo tá aí por causa do petêêê”. É tentativa de lacração batida, surrada e simplória de mais. Só mané compra isso.
O genocida tá aí porque os eleitores jogaram a toalha depois de terem sido massacrados com anos de manchetes sobre 1 assunto singular e monotemático — corrupção — sem ter a capacidade de entender o contexto político do Brasil onde reina o famigerado Presidencialismo de Coalizão e onde a PGR era independente pela 1ª vez.
O mentecapto tá aí porque o assunto de corrupção fez as pessoas só se preocuparem com dinheiro e esquecerem completamente a importância de políticas públicas e projetos sociais, ambientais, educacionais e de saúde, coisas importantes que o pequi-roído mostrou inépcia já na campanha de 1º turno e em seu programa escrito de governo.
O infame tá aí porque ele é populista. Aproveitou astutamente toda essa situação, promete o impossível, o povo tem zero educação política e acreditou. Prova é que inúmeros votaram nele já no 1º turno. Ele tá aí porque eleitores são, em geral, iletrados políticos. Não fez muita diferença terem alta formação em medicina, economia ou ciência de dados.
O sádico tá aí porque eleitores jogaram a toalha, porque são analfabetos políticos, porque só se preocuparam com dinheiro, porque caíram na lábia do populista e talvez também por consequência de gestões passadas, as que vão até o século 16.
Eu lamento muito essa situação e eu espero que da próxima vez eleitores se preparem melhor para votar, começando por se livrarem de alguns vícios mentais e conceitos pré-fabricados, começando por sermos adultos e não terceirizar a culpa. Não falta informação gratuita, analítica e de boa qualidade.
Apache Spark is like Python’s Pandas and is like SQL databases. It can manipulate datasets, filter, integrate, transform.
But Spark was designed from scratch with horizontal scalability and parallelism in mind, which makes it capable of handling datasets with billions or even unknown number of rows — even if a bit less flexible than Pandas.
This is not new in the industry. Enterprise editions of commercial SQL databases are parallel and scalable since a very long time, being also very expensive in all levels of the stack: service/support, software and hardware.
But Spark is free software. And can use Hadoop — also a free software — as scalable and highly available storage, on cheap commodity hardware. In addition, it has a vibrant community and a democratic ecosystem of services and support.
As with all Open Source, Apache Spark changes the economic landscape of massive data processing systems market, taking money out of a few proprietary HW and SW vendors and pulverizing it locally on people and support.
A questão da legalização do aborto não tem nada a ver com proteger ou não bebes, levar para este lado é apelação errada e desonesta. A questão é a realização de que mulheres e meninas eventualmente farão aborto DE QUALQUER MANEIRA por uma opção de vida ou de situação social, não importa o que você ache disso, não nos cabe julgá-las. Por isso, a sociedade precisa garantir que elas poderão fazê-lo de forma segura, acessível, acolhida e não clandestina.
É uma questão de proteger a vida e a saúde de mulheres, meninas e filhas.
Programming is the art of creating flexible engines that can be easily extended as new features are needed over time.
Experienced programmers use Design Patterns to help make engine’s functions, features and structure (materialized as code) easily and clearly extensible.
A Decision Desk é uma empresa especializada em projeções eleitorais baseadas em estatística e dados. Usaram tendências de eleições passadas para criar modelos matemáticos que só aguardavam um influxo de votos da Pensilvânia para atingir um grau de confiança aceitável. Esse influxo chegou na sexta dia 6 de manhã e confirmou que Biden só aumentará sua vantagem naquele estado daqui prá frente. Projetaram também, as 8:50 da manhã de ontem, que Biden vencerá a contagem nacional com 273 pontos.
Decision Desk HQ projects that @JoeBiden has won Pennsylvania and its 20 electoral college votes for a total of 273.
Joe Biden has been elected the 46th President of the United States of America.
Este tipo de uso de dados e algoritmos é o mais próximo que a ciência chegou de “prever o futuro”. Chamamos isso de analítica preditiva. Ainda assim é técnica muito frágil e bem específica pois depende de dados dos mais recentes possível. Porque prever o futuro meeeesmo ninguém consegue.
Mas ainda não acabou. Espera-se que Trump judicialize a coisa toda porque é simplesmente um bad loser lunático. Processo que pode lhe custar muito caro ($$$$) pois terá que fazê-lo em múltiplos estados.
Ontem eu perdi na praia chave do carro, chinelos e máscara de mergulho.
A chave achei metros de distância embrulhada numa toalha nada a ver.
Os chinelos, depois de ½ hora procurando desesperado, o amigo me diz que foram usados prá marcar os limites do gol 50m prá lá. E tavam lá mesmo, enfiados bonitinhos na vertical na areia.
A máscara de mergulho a onda me levou num belo dum caldo que arruinou os planos de snorkeling. 3 horas depois a maré trouxe de volta e meu filho achou.
Na volta encontrei a redenção no sorvete de doce de abóbora com coco no Rocha de Maresias.
Saudade de uma bela viagem de férias. Se a pandemia nos ancora em casa, podemos pelo menos lembrar as passadas e planejar as próximas. Abaixo estão as memórias de algumas viagens que fiz e farei. Quero me inspirar com as suas também.
Saudade de férias em hotel de luxo de alguma praia europeia, Biarritz (que só passei num dia de chuva), Noli na costa da Ligúria, ou a que fiz em Sitges na Cataluña, mesmo que a trabalho. Ilha da Madeira, Tenerife, Ibiza, me aguardem!
Machine Learning algorithms for regression and classification
Calculus and Numerical Calculus (integrals, derivaties)
Natural Language Processing
Computer vision
Neural Networks
Please remember this list has only hard skills. Ethics, domain and industry knowledge, communication are very important soft skills that won’t fit in this list.
Generally speaking, beginning of the list is where Data Analysts are (up to ≈11). Data Engineers get up to the middle of list (up to ≈18). And Scientists get all the list.
There is also the following graph that I’ve produced:
O sacana do Lôs me torturou a tarde toda mandando fotos do seu coleslaw. Ai me revoltei e resolvi fazer. Ainda bem que ele se redimiu e mandou detalhes da receita e ficou na videoconf comigo ajudando na quantidade certa de vinagre e limão.
½ repolho pequeno cortado fininho
1 cenoura ralada
1 ramo de salsão picado
O molho é a alma do negócio:
maionese
leite
açúcar ou adoçante
sal
kümmel
½ limão espremido
vinagre branco de fruta
As quantidades você faz meio a olho; o total de molho para esse ½ repolho é tipo quase 1 copo de 200ml.
A receita do Lôs leva uva passa, que eu troquei por kümmel prá tentar me aproximar do melhor coleslaw do mundo, que se come no Delishop da Shoshana e do Nir, no Bom Retiro (o Delishop já fechou e ali virou o restaurante Shoshana, que é muito bom, mas não tem mais o coleslaw).
Certa vez perdi um vôo sábado cedão que voltava de Recife para São Paulo. O próximo era só lá prá hora do almoço. Com uma manhã livre, corri prá Olinda prá ver qualéqueé.
Tava tudo vazio, abrindo ainda.
Mas tinha 2 repentistas que afinavam suas violas, preparando-se para a turistada que chegaria mais tarde. Sentei com eles numa barraca de sucos e me desafiaram a escolher temas para improvisarem o repente. Acho que fiquei umas 2 horas com eles, eu lançando temas aleatórios e os safados duelando, tirando da cartola e da viola os improvisos rimados mais lindos!!
Por que muitos governos e países optam pelo isolamento generalizado ao invés de isolar só idosos, infectados e grupos de risco (isolamento vertical)? Eis a resposta, da perspectiva de ciência de dados e gestão de decisões críticas:
Podemos agradecer ao virus corona por ajudar a erradicar os leitores de dedo para uso banal como catraca de academias, recepções de prédios comerciais e residenciais etc. Eu nunca relei meus dedos nesses leitores e você deveria fazer o mesmo, pois da perspectiva de Segurança da Informação aquilo é um engodo. E da perspectiva de Higiene, é nojento.
Leitores de dedo são uma “maravilha” para armazenar e socializar germes, bem como sucos vitais que todos nós expelimos (suor e todo tipo de meleca). Se você está envolvido em projetos que implantam esse tipo de tecnologia, prefira outras biometrias superiores que já estão em todo lugar, como reconhecimento facial de múltiplas câmeras.
Este post tem a objetiva intenção de te dar asco de leitores de dedo.
Sobre esse tweet, eu queria dizer que não é bem isso; deixe-me explicar do ponto de vista de um vegetariano.
Nós VGs, passamos muito bem sem carne. E também nem faço questão da tal proteína vegetal texturizada (imitação de carne) porque não é assim “gostoso” e é muito processado.
A questão central é que é muito fácil fazer comida gostosa com carne. Só por um salzinho e fritar que fica ótimo. Dá muito mais trabalho cozinhar gostoso sem carne, exige mais temperos, mais conhecimento de pratos internacionais, mais ingredientes, mais tempo de preparo etc. E os estabelecimentos geralmente não estão preparados para isso, ou não têm tempo, ou seus cozinheiros têm conhecimento elementar (só sabem cozinhar gostoso com carne). Isso acontece com todas as pessoas que cozinham para nós, em todos os lugares e épocas da nossa vida.
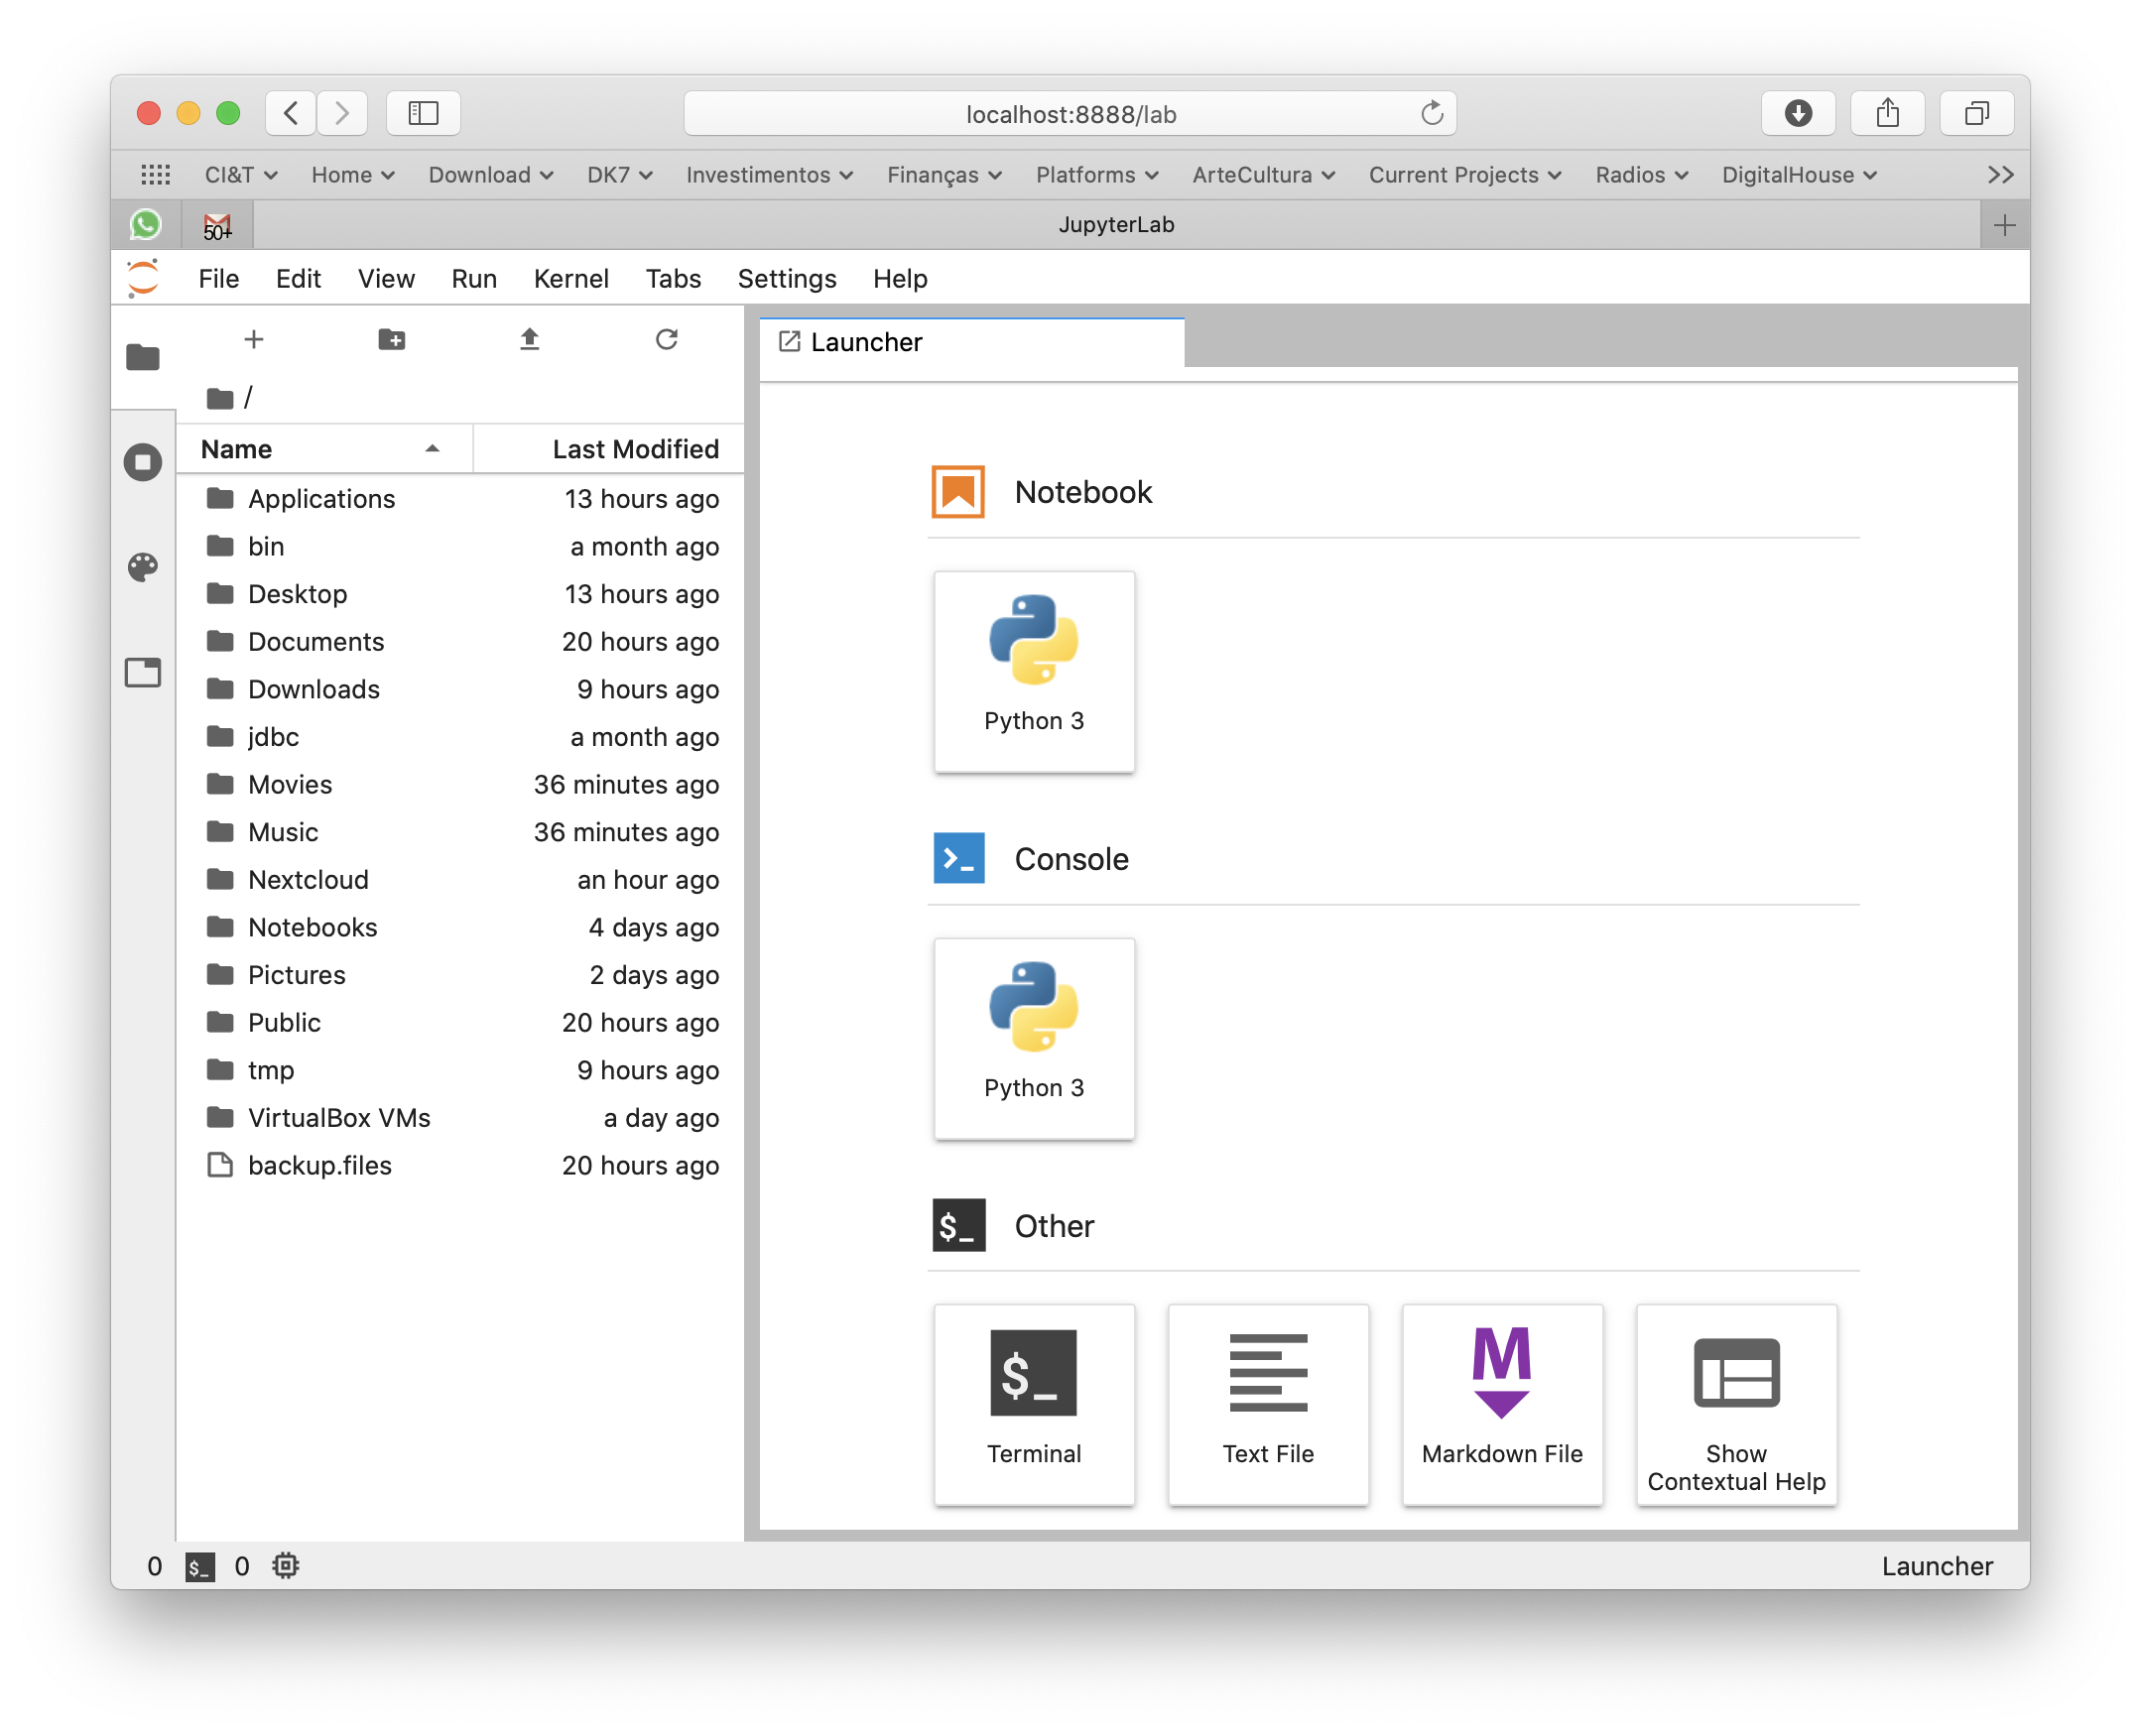
macOS Catalina doesn’t ship with Python 3, only 2. But you can still get 3 from Apple, updated regularly through system’s official update methods. You don’t need to get the awful Anaconda on you Mac to play with Python.
Python 3 is shipped by Xcode Command Line Tools. To get it installed (without the heavy Xcode GUI), type this in your terminal:
xcode-select --install
This way, every time Apple releases an update, you’ll get it.
Settings window will pop so wait 5 minutes for the installation to finish.
If you already have complete Xcode installed, this step was unnecessary (you already had Python 3 installed) and you can continue to the next section of the tutorial.
Clean Old Python Modules
In case you already have Python installed under your user and modules downloaded with pip, remove it:
Now that you get a useful Python 3 installation, use pip3 to install Python modules that you’ll need. Don’t forget to use –user to get things installed on your home folder so you won’t pollute your overall system. For my personal use, I need the complete machine learning, data wrangling and Jupyter suite:
For some reason, Apple installs many different Python 3 binaries in different places of the system. The one that gets installed on /usr/bin/python3 has problems loading some libraries and instrumentation with install_name_tool would be required. So lets just use the binary that works better:
Commands installed by pip3 will be available in the ~/Library/Python/3.7/bin/ folder, so just add it to your PATH:
export PATH=$PATH:~/Library/Python/3.7/bin/
Now I can simply type jupyter-lab anywhere in the terminal or command line to make it fire my browser and get a Jupyter environment.
More about Xcode Command Line Tools
Xcode Command Line Tools will get you a full hand of other useful developer tools, such as git, subversion, GCC and LLVM compilers and linkers, make, m4 and a complete Python 3 distribution. You can see most of its installation on /Library/Developer/CommandLineTools folder.
Um conhecido do ex-trabalho, alto executivo, boa gente de mais, mandou uma propaganda do governo sobre o projeto de lei anti-crime do Moro argumentando que não apoiar o projeto é como ser a favor de crime e corrupção.
Respondi que não há quem goste de crime e corrupção. Mas que juristas e especialistas chamam tal projeto de “anti-medo” porque ele é de fato inefetivo contra o crime. E que, desnecessária e inconstitucionalissimamente, coloca o policial num nível de super-ser acima da lei com licença para matar, que dá medo. Que eu não apoio tal projeto mas que, como ele, sou também contra crime e corrupção. Recomendei também ouvir especialistas no assunto, não só propaganda do governo.
Se sua missão é entregar dados a usuários, soluções de Business Intelligence open source baseadas em Python emergem como opções muito atrativas frente aos proprietários MicroStrategy, PowerBI, Cognos, Google Data Studio, Tableau etc.
No circuito dos restaurantes bem-brasileiros de São Paulo, lanço aqui 3 que são notáveis: o Capim Santo, o Jiquitaia e o Tordesilhas. Valorizam tudo da nossa cultura, culinária, música, decoração e sobremesas e por isso são também ótimas opções para turistas que visitam a cidade.
A foto é do maravilhoso curry de camarão com leite de coco do Capim Santo, onde há também um delicioso caldinho de milho entre outras entradas muito elaboradas. Do Tordesilhas, lembro da maravilhosa seleção de cachaças, loucas para se misturarem aos cajus e maracujás, e também os bobós, moquecas, farofas, xinxins e pimentas. O Jiquitaia também tem batidas inusitadas, ingredientes brasileiríssimos e uma mão no fusion.
Toda baianidade também se experimenta no Rota do Acarajé, lá na Santa Cecília, onde além dos pratos impecáveis, oferecem um extenso cardápio de cachaças e batidas de frutas. O Mestiço também tem alma brazuca mas criou uma ponte de sabores com a Ásia remota.
E não se pode esquecer os milhares de restaurantes de esquina paulistanos que tipicamente e religiosamente servem toda 2ª virado à paulista e feijoada na 4ª. Mas não se comparam a busca da perfeição em todos os sentidos dos que citei no começo.
O problema dos agrotóxicos, se bem entendi (e não sou especialista no assunto), é menor para quem consome os alimentos e maior, bem maior, para quem os aplica, quem mora perto de onde são aplicados e principalmente para os insetos bem-vindos perto das lavouras, como as abelhas, que são essenciais para todo o ciclo das plantas.
Minha headline no LinkedIn é só prá inglês ver. Esta é a verdadeira:
Notório Saber em gostosuras do milho, especialmente O Sorvete • Crítico de Margherita das pizzarias paulistanas • PhD em Audição Musical com doutorado em Música Instrumental Brasileira e mestrado em Música Clássica
A profissão de Cientista de Dados ganhou notoriedade e eminência nos últimos anos. Uma figura que tem saído do círculo hipster das startups e invadindo empresas de todos os tamanhos. Até os mais tradicionais executivos já compreendem que, tendo seu negócio entrando na era da informação e se tornado uma usina de dados, há que se lançar mão de profissionais especializados, que saibam como tirar proveito de todos esses dados.
Mas será que está claramente compreendido qual é o papel do Cientista de Dados? Sabe-se o que esperar dele? Consegue-se usufruir de todo o seu potencial?
Enquanto os outros profissionais da área de dados, se aproximam ou mais do TI (como o engenheiro de dados) ou mais do negócio (como o analista de dados), o Cientista trabalha o tempo todo junto às duas áreas.
Enquanto os outros profissionais de dados tratam da curadoria, performance, qualidade, apresentação de informações que existem, o foco principal do Cientista de Dados é calcular tendências e inferir dados que ainda não existem.
Os Dados que Não Existem e seu Valor para o Negócio
O Cientista de Dados está próximo do negócio. Entende sua semântica, desafios e necessidades. E tem plena consciência das informações que tem a sua disposição, sejam privadas ou públicas. E quais novas informações pode derivar delas. Navegar nesses dois mundos — dados e negócios — permite ao Cientista de Dados fazer melhores perguntas e já trazer respostas sobre o negócio — respostas que são os dados que ainda não existem. Por exemplo:
Quem são os clientes que têm mais tendência para comprar produto A ou B ?
Quais estudantes têm propensão para abandonar o curso? Para cada um deles, quais os fatores que mais influenciam o abandono ?
Quais clientes têm propensão para cancelar contratos e por que? Para evitar, devo dar desconto, mudar o atendimento ou resolver certo problema ?
Quais características físico-químicas (densidade, cor, concentração de álcool) de um determinado vinho influenciaram positivamente sua nota? Quais características influenciaram negativamente ?
Quais característica fisiológicas de um bebê prematuro estão relacionadas a doenças que se desenvolvem mais tarde em sua vida ?
Quais imóveis estão super-valorizados? E quais têm preço muito bom e representam uma oportunidade ?
Como salvar proativamente o paciente de um infarto ?
No meu conjunto de processos judiciais, quais tenho mais propensão de ganhar? E de perder ?
Qual é o melhor equilíbrio entre risco e oportunidade ?
Qual equipamento vai falhar e quando ?
Quem está me fraudando e quais são os padrões comportamentais de fraudadores ?
Quando terei um pico incomum de chamados no meu call center ?
Quais grupos de clientes tenho? Como agrupá-los por características ocultas comuns ?
Repare que muitas dessas perguntas estão relacionadas ao futuro, a informações que não existem ainda. Cientistas de Dados conseguem prever o futuro — ou a probabilidades de eventos acontecerem — e é por isso que são verdadeiros oráculos.
Essa capacidade do Cientista de Dados também coloca-o na posição de literalmente poder calcular a chance de sucesso de uma determinada iniciativa de negócio.
O Cientista de Dados no Mapa da TI Corporativa
Em 2013, Gartner explicou ao mundo o nexo das novas forças de TI, onde Dados, Mobilidade e Redes Sociais têm um papel determinante para o sucesso de qualquer empresa que quer se manter moderna.
Fica claro que a Mobilidade é a rota para uma organização chegar nas pessoas, sejam elas clientes ou colaboradores. Alavancar também o poder colaborativo das Redes Sociais para fomentar uso e fazer os Dados circularem. No começo dessa era, houve uma corrida para empresas criarem suas apps, que nada mais eram do que o catálogo digital de seus produtos, ou seu site institucional no smartphone, ou até mesmo prover diretamente os dados a seus usuários, como seu saldo ou extrato. Pouca novidade até aqui. Mas a era da Mobilidade representa o momento histórico em que organizações passam a estar constantemente ao lado de seus clientes e colaboradores, quando acordam, quando trabalham, quando almoçam, quando vão dormir. Mais ainda: se o usuário der permissão para a app, ela poderá chamá-lo para interagir ou entregar uma novidade, através das notificações que aparecem na tela.
Mas qual informação a app vai entregar proativamente ao usuário? Quando? Onde? É o Cientista de Dados que tem a responsabilidade de fazer a ponte entre os dados virgens e a app do usuário, no sentido de entregar a informação certa na hora e no lugar adequado, com o objetivo de tocar o coração de quem usa.
As possibilidades são infinitas. Um exemplo no varejo é determinar quais são os clientes que devem receber uma notificação às 11:45 da manhã informando que já está disponível na loja nas redondezas onde ele costuma almoçar um produto que vai lhes interessar.
Um outro campo interessantíssimo para o Cientista de Dados é próximo ao fenômeno da Internet das Coisas, onde sensores coletam constantemente dados do ambiente a sua volta. Inclui-se aqui também sensores biométricos, que medem indicadores do corpo humano, como características do sono, pressão sangüínea, alimentação etc. O Cientista de Dados é a figura que agrega esses dados — que isoladamente têm baixa significância — encontra correlações pouco óbvias e é capaz de re-injetá-los no processo do negócio para assim transformá-lo, otimizando ações que outrora eram reativas, em proativas.
A Caixa de Ferramentas do Cientista de Dados
Dizem que o Cientista de Dados é um estatístico que conhece mais ferramentas computacionais que um estatístico médio. Ou também um programador que conhece mais estatística que um programador médio.
Base sólida em matemática, probabilidade e pensamento estatístico, boas noções de econometria, bons conhecimentos em ferramentas computacionais como machine learning, fazem um Cientista de Dados ser prático e mão-na-massa. Multidisciplinaridade e traquejo para circular nos corredores do negócio são extremamente importantes também. Apesar de seu pé na programação, o estereótipo engraçado do programador que vive a base de pizza e cafeina não combina muito bem com o Cientista de Dados.
Claro, há bons profissionais que não programam ou deixaram de ser mão-na-massa. Estes acabam atuando coma uma espécie de CDO (chief digital officer), com o adicional de que têm experiências mais concretas sobre onde pode-se chegar com os dados. Mesmo assim, ele terá que lançar mão de outros Cientistas de Dados que programam e são mais mão-na-massa.
O Cientista de Dados geralmente programa em Python, usa Jupyter e é bom conhecedor do ferramental de visualização e gráficos dessa linguagem, bem como as de machine learning e inferência estatística. SciKit Learn, StatsModel, Pandas, Seaborn, XGBoost, Shapley é o arroz-com-feijão deste profissional.
Estudo da distribuição de uma variável aleatória, extraído de um notebook de um cientista de dados
Jornada para a Ciência de Dados
Respire fundo e arregace as mangas caso escolha ser um Cientista de Dados. A gama de disciplinas exigidas é larga. Vai de matemática, programação, TI, até o negócio, cultura e intuição sobre o mundo a sua volta. Prepare-se para programar com ferramentas avançadas e que sempre estarão em voga. Prepare-se para conhecer o negócio em nível matemático e também multicultural e multidisciplinar.
Mas chegando lá, você será singular em sua roda. Terá uma posição sob os holofotes em seu meio profissional, devido a sua bagagem de conhecimentos e capacidade de transformação.
Para se apreciar uma bela vista, é necessário escalar uma alta montanha. E o Cientista de Dados é o que está em seu topo.
Esta campanha presidencial foi uma das experiências mais incríveis e inesperadas da minha vida. Contundente também.
Nos revelamos nas redes e deixamos positiva e negativamente surpresos muitos amigos. Mas nossa faceta política é só uma entre muitas que nos constituem como humanos legítimos e complexos. Se a faceta de gostos políticos de um amigo me decepcionou, sua faceta musical, profissional, culinária ou de pai/mãe pode me fascinar. E vice-versa.
Meu objetivo de vida é eliminar minhas complexidades interiores para viver em constante fascínio com todos. Conectando o meu elementar humano com o elementar humano de todos a minha volta.
Ao contrário do que se pensa, os robôs da campanha via WhatsApp não enviaram as fake news diretamente para milhões de brasileiros. Enviavam só para algumas centenas de grupos extremistas enormes como “Direita é o Poder”, “Parada Hétero” etc. A partir daí, seus usuários humanos propagavam organicamente os memes e fakes pelos seus grupos de família, escola e trabalho, que por sua vez também os propagavam. E foi assim que a maioria dos brasileiros receberam de seus próprios amigos (e não de robôs) a enxurrada de memes que vimos ao longo de setembro.
Todas as campanhas políticas da história lançaram mão de disseminação de boatos, propaganda enganosa, disseminação de medo, incerteza e dúvida. Essas construções da mente são, inclusive, uma das característica que nos diferenciam dos outros animais, conforme citam Yuval Harari em seu livro Sapiens e outros autores.
Mas na campanha presidencial brasileira de 2018 isso foi levado a níveis extremamente nocivos devido a junção inédita de 3 fatores:
Conteúdos mais acessíveis, em forma de memes, imagens, charges, videos e também artigos. As mensagens são sutis e enviesadas, nem sempre são noticias falsas, às vezes são só piadas de mau gosto. Mas o objetivo é claro e sempre o mesmo: destilar escárnio, ódio e preconceito. Seus mensageiros, quando questionados quanto a ofensa contida na mensagem, frequentemente responderão que ela contém “a mais pura verdade”. O meme é facilmente produzido pelos próprios usuários em seus celulares ou por agências profissionais contratadas. O importante é capturar imediatamente a atenção de quem recebe o conteúdo. Veja alguns exemplos neste artigo do El Pais.
Disseminação em massa do conteúdo por robôs, em grandes grupos de WhatsApp de muito interesse naquela mensagem. Trata-se de grandes grupos de WhatsApp onde a maioria dos participantes não se conhecem pessoalmente, nunca saberão se um dos números de telefone alí é um robô de disparo de mensagens. Quando o conteúdo é inserido pelo robô, a posição política coletiva do grupo entra rapidamente em sintonia com ele, e sua pitada de humor o livra de maiores questionamentos sobre sua veracidade. Um usuário mais questionador rapidamente perderia força num embate com o grupo extremista porque o massacrariam com “deixa disso”s. Depois da inserção intencional do conteúdo, começa a 2ª fase: os próprios usuários, felizes com um novo conteúdo divertido e importante, divulgam-no organicamente para seus outros grupos restritos e fechados que são da família, da escola, do trabalho e assim ele continua se propagando organicamente. A enorme maioria das pessoas acaba recebendo o conteúdo nessa segunda fase, de forma orgânica. Essa 2ª fase orgânica esconde a origem robótica e artificial da 1ª fase. A seleção inicial desses grandes grupos de WhatsApp, que têm afinidade com a mensagem que se quer transmitir, e a adição dos robôs neles, é a parte mais estratégica da campanha porque é o mecanismo para se plantar a semente. Os robôs enviam os memes somente para os grupos de interesse, nunca diretamente para pessoas avulsas, como alguns pensam.
Mobilidade pervasiva. Este fator obviamente habilitou os dois anteriores. É o celular que nos chama o tempo todo e que só saberemos se é uma emergência médica de um parente ou uma bobagem qualquer depois de dar uma olhadinha.
Foi no começo de setembro que observei um aumento expressivo na disseminação de memes nos grupos da escola e da família que faço parte. É difícil saber se é puramente orgânico ou se foi estimulado por uma campanha de robôs alguns níveis antes. No meu caso, o conteúdo era encaminhado sempre por 3 usuários, um deles declaradamente de extrema direita e muito ativo politicamente.
O video da denuncia, que mostra o próprio Bolsonaro e a tela do WhatsApp em atualização frenética devido ao envio robótico de mensagens (que emergiu em 2 de outubro de 2018), revela os grupos de muito interesse através de seus nomes: “Direita é o Poder”, “Direita Ativa”, “Direita Agreste”, “BolsoMito”, “Direita Aprendiz”, “Parada Hétero” etc. Essa lista específica de grupos, aquela alta velocidade anormal de recebimento de mensagens, nas mãos de Bolsonaro, para mim comprovam o uso consciente de robôs de envio de mensagens de campanha. Todos os brasileiros puderam observar a eficácia dessa campanha visto a enxurrada de memes de ódio e escárnio que recebemos em nossos celulares. Muitos infelizmente foram permeáveis a esse ódio constante e insistentemente comunicado.
Como levantar provas sobre o conteúdo inserido no WhatsApp, ainda para as eleições de 2018
O aplicativo registra quando uma mensagem é encaminhada, pode-se ver o “Forward” ou “Encaminhado” sobre o balão da mensagem. Por trás dos panos, o aplicativo guarda uma série de metadados sobre a mensagem que numa análise forense nos servidores do WhatsApp permitiriam recriar toda a trajetória da mensagem, mesmo que o conteúdo em si é criptografado na transmissão entre usuários. Em outras palavras, via mandado judicial ou outro pedido formal, o WhatsApp seria capaz de dar um relatório completo sobre o conteúdo, incluindo quando o meme foi inicialmente publicado na rede, de qual endereço de internet, se foi usado um computador ou celular, de qual marca, de que região do planeta, número de telefone do usuário e eventualmente até seu usuário Facebook.
Como combater esse mal de forma mais definitiva no futuro
Qualquer tipo de limitação ou restrição não é a solução de longo prazo, mesmo porque o aplicativo não sabe diferenciar entre receitas de bolo e memes de ódio. Criar restrições para um tipo, valerão desnecessariamente para o outro tipo de conteúdo.
O que falta no WhatsApp é um mecanismo para que usuários denunciem conteúdo impróprio, colocando-o numa espécie de quarentena e assim evitar que outros usuários, inclusive em outros grupos façam qualquer coisa com tal conteúdo problemático. No Facebook, funcionalidade similar já foi implementada após os problemas nas eleições do Trump. Uma proposta para o WhatsApp seria o usuário selecionar o conteúdo ofensivo e denunciá-lo via alguma opção inédita no aplicativo. Uma vez decidido que é ofensivo/falso, o conteúdo passaria a ter uma moldura vermelha ou outra marca visual clara aos usuários informando que ele é problemático. O aplicativo inibiria e bloquearia outras operações sobre esse conteúdo também, como encaminhamentos, salvar no rolo da câmera etc.
Jupyter Notebooks are the elegant way that Data Scientists work and all software needed to run them are already pre-packaged on Fedora (and any other Linux distribution). It is encouraged to use your distribution’s packaging infrastructure to install Python packages. Avoid at any cost installing Python packages with pip, conda, anaconda and from source code. The reasons for this good practice are security, ease of use, to keep the system clean and to make installation procedures easily reproducible in DevOps scenarios.
Jupyter Notebook on Fedora with MathJax and Python
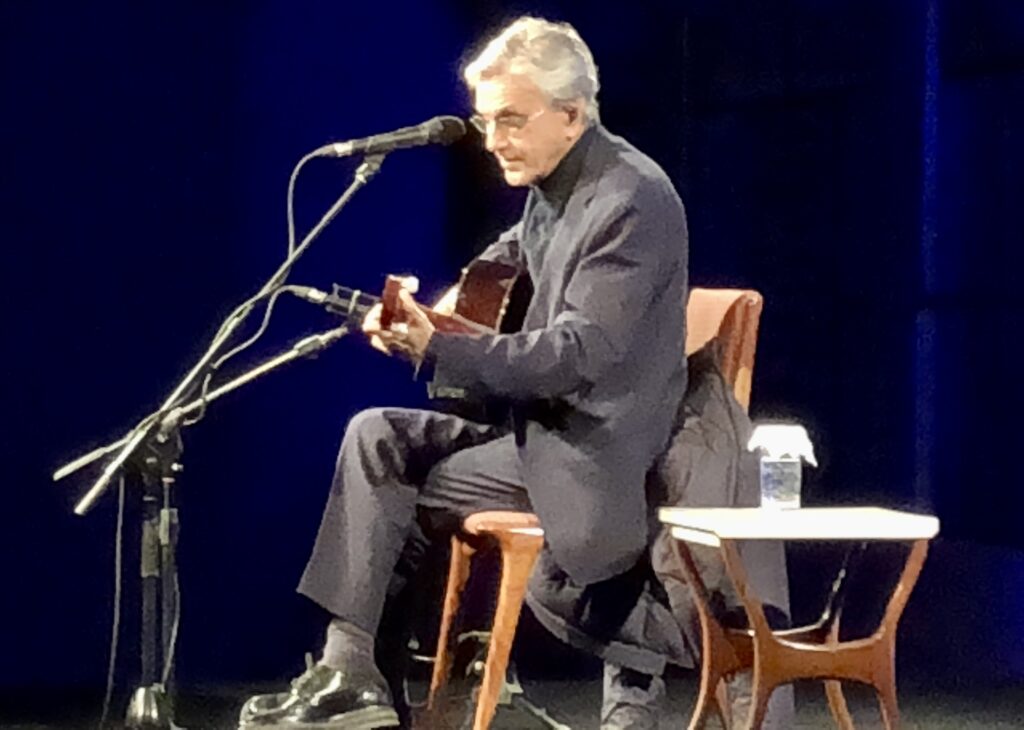
O coração pulou num show praticamente privado que Caetano Veloso nos concedeu na Casa do Povo. Uma hora de canções conhecidíssimas, que ele poderia ter extendido por muito mais tempo, pois tem repertório para tal. Performou super afinado, em ótima forma e técnica e fez questão de espontaneamente se declarar “de esquerda” no palco.
Caetano Veloso na Casa do Povo em 2018-05-27
Após o show tive o privilégio de conversar com a figura quase mítica. Contou histórias sobre as décadas de 60, 70, 80 etc. Contei que ao longo de seu show lembrei de sua canção «Prá Ninguém» e ele por sua vez contou sua história, desconhecida para mim. Em 1993 Chico Buarque escreveu a música «Para Todos» que Caetano ouviu pela primeira vez na casa do autor e chorou de emoção ali mesmo. «Prá Ninguém» é a resposta de Caetano para a canção de Chico, poema musicado que cita um monte de cantores e suas canções famosas compostas por outros. Disse também, quase como um segredo, que João Gilberto adora a canção de Chico, e a partir daí contou diversas histórias malucas sobre João.
Ovo de páscoa é 3 a 6 vezes mais caro que a mesma quantidade de chocolate em barra. Seres humanos não comem papel celofane. Nem peixes, nem tartarugas do mar, que é onde vai parar, em forma de poluição, boa parte dessas embalagens vistosas. Faça um favor à inteligência de seus filhos e à sua, e ao planeta evitando esses produtos caros e oportunistas. A páscoa e seus ovos é uma excelente oportunidade para uma aula de educação financeira no supermercado aos seus filhos, já que escolas em geral não ensinam isso. Consumo consciente.
Eis uma lista de dicas que costumo mandar para amigos que vão para Paris. Dicas que não são encontradas em qualquer lugar. Procure fazer tudo a pé.
Tem um mapa com alguns desses pontos aqui.
Instale o Google Maps no seu celular e copie esse mapa pro seu Google Drive prá fazer os landmarks aparecerem no seu celular.
Passeie pelo bairro Marais. É antigo mas cheio de jovens, ruazinhas, falafel e crepe.
Imperdível: no Marais (fale “Marré”), na minúscula rua Bourg Tibourg tem a minúscula perfumaria L’Artisain Perfumeur. Olhe pro lugar não como loja mas como um museu de cheiros sensacionais. Eu acho esse lugar incrível. Torre €90 prá comprar um frasco. Tinha uma época que a davam 20% de desconto na segunda compra, então compre uma coisa barata na primeira compra e o produto caro na segunda. Prá presente, eles tem caixas com amostras de diversos perfumes. Peça também amostras grátis que eles dão de montão.
Ao lado, tem o Mariage Frère, uma loja antiga de chás muito bons. Vendem a granel. A loja é bonita e pode-se tomar chá lá também, mas eu prefiro comprar prá fazer em casa, no Brèsille. Vá de Plain Lune, Marco Polo ou um chá salgado que eles tem. Ou escolha outros pelo cheiro.
Suba o morro até o Sacré-Cœur. O lugar é bem turístico, cheio da juventude, não falha. Desça pelo outro lado, prá conhecer mais bairros.
A torre Eiffel é muito interessante de se visitar, mas tem filas enormes prá subir. Eu nunca subi. Repare nos nomes de dezenas de cientistas e engenheiros gravados no mezanino. Muito emocionante.
No verão acontece o Paris Plages que transforma o Sena numa longa praia com pequenos eventos na beira do rio. Legal prá passear, correr, alugar bike de graça, sentir a vida parisiense. Só no verão.
Há o serviço Batobus no rio Sena que pára em várias estações. Você entra e sai onde quiser, tipo a estação da torre Eiffel. Compre passe diário e divirta-se.
Vá ao Louvre, tire fotos com as pirâmides no pátio, mas sugiro entrar somente se você for um estudioso entusiasta da arte. O museu é enorme, precisa-se de semanas para conhecê-lo direito e não vale a pena se vc tiver pouco tempo. Minha esposa conhece e gosta de arte e usou passe de longo prazo quando morava lá. É massante. Veja a Monalisa na Internet com mais calma. Eu fui prá Paris umas 4 vezes e nunca entrei no Louvre.
Vá ao museu d’Orsay. É pequeno (2 ou 3h prá visitar tudo) e muito muito bonito. Tem Rodin, Degas, Monet, Toulouse-Lautrec e outros impressionistas. Acho que existe app pro iPhone que serve de guia.
O Arco do Triunfo na Champs Élysées é uma região muito turística, cheia de gente, mas ele fica no meio do Axe historique onde uma série de monumentos se alinham e pode-se vê-los um dentro do outro…
…e o melhor lugar prá ver isso acho que é no Place de la Concorde, onde há o original obelisco egipcio.
A Ile de La Cité é a ilha central onde a cidade começou e é onde fica a Catedral Notre Dame. As pontes que conectam a ilha ao continente tem cadeados que as pessoas deixam lá como promessa.
Tem uma sorveteria muito famosa numa das ilhas. Não lembro o nome…
As pontes do Sena no verão são chão para piquenique dos parisienses no fim da tarde. Galera senta no chão e abre o vinho. Cada ponte tem uma história. A Pont Neuf é a mais antiga.
Onde se lê “é” fale “ê”. E onde se lê “è” fale “é”. Demorei prá descobrir isso.
Imperdível: vá a Fromagerie Laurent Dubois. Fromagerie é “queijaria”. Evite sábados e domingos de manhã pois há fila e você precisará de atendimento premium prá provar lascas de tudo. Prove os queijos, escolha e peça para embrulhar a vácuo e traga de presente para amigos no Brèsille. Os que mais gosto são o bleu (tipo rockfort ou o próprio rockfort verdadeiro e de origem controlada), o comté (tipo suiço) e o camembert e variações, mas tem uns 800 outros tipos lá, de cabra, de ovelha etc. Compre a vácuo prá trazer ao Brèsille no dia que você estiver voltando. Não antes. Mantenha em geladeira até o último momento e não espere muito prá comer no Brèsille. Eu costumo colocar 3 pedaços pequenos de queijos diferentes em cada envelope a vácuo e cada envelope vai de presente prum amigo diferente. Na viagem de volta, despache os envelopes com queijos na bagagem. Não traga na bagagem de mão pois vão achar que há algum defunto na cabine. Se o Dubois for fora de mão, há outras queijarias, mas não encontrei outras tão impressionantes e tradicionais. Última viagem trouxe uns 12 envelopes da felicidade prá distribuir. Não compre queijos no supermercado.
Prove também saucisson, um salame defumado muito cheiroso.
Vende-se também nos supermercados latas de escargot e de patês de fígado de pato e de ganso. Fique à vontade…
Vá a boulangers (padarias) porque os pães são ótimos, principalmente os com sementes. Tem em todo canto. Nos boulangers há o famoso pain au chocolat, uma espécie de croissant recheado de chocolate. E também o com amêndoas.
Nas patisseries (tipo de docerias) há o famoso macaron de vários sabores, que é uma espécie de sanduichinho colorido com massa de farinha de amendoa. Delícia total. Dizem que o melhor macaron de Paris é o Ladurée Royale, mas é super metido a besta; fica perto do metrô Madeleine. Sugiro não trazer pro Brèsille pq é super frágil. Coma em Paris mesmo.
Vá ao Le Calbar, um bar minúsculo numa rua minúscula cujo dono e barman é mundialmente premiado e faz uns coquetéis diferentes e decliciosos. Um amigo parisiense me levou lá e adoramos. É coisa de local, turista não conheçe.
Verão na Europa produz melões rosados sensacionais, pêssegos, ameixas e nectarinas suculentos. Dificil encontrar assim no Brèsille. Prove as frutas da estação.
Fique atento a postes baixos de metal com uma placa em formato de brasão. São pontos históricos. Nesses lugares há casas medievais curiosas e entortadas pelo tempo, ou outros monumentos históricos.
Repare na arquitetura art nouveau das estações de metrô. Adoro.
Jantamos numa sexta ou sábado num restaurante chamado La Terrasse Saint Catherine, apinhado de gente. Nem lembro da comida, mas fica numa praça charmosíssima de mesmo nome onde músicos de rua se apresentavam e crianças brincavam. Super idílico. Paris é cheia dessas micro-praças ultra-lindas. Ligue antes para reservar. Há outros restaurantes nessa praça.
Outro jantar maneiro foi no judaico Chez Marianne, no Marais. Nada de especial, mas cito porque só tenho boas lembranças. As mesas geralmente são na calçada em todos os restaurantes… as pessoas adoram ver outras pessoas passando na rua.
Aproveite a diferença de fuso prá fazer noites estendidas. Vale a pena.
Here is a curated list of active, responsive and valid BitTorrent trackers. Add them to the list of trackers of your torrents to increase your chance of finding peers and improve download speed. Read More
A Internet sofreu um ataque de grandes proporções recentemente, conhecido como WannaCry. Nada melhor do que aproveitar o medinho que isso causou nas pessoas para se protegerem de próximos ataques. Siga as dicas aqui sozinho, ou peça para um amigo te ajudar a configurar seu computador. É tudo gratuito e fácil. As duas primeiras são para Windows, o resto serve para qualquer pessoa.
Ative as atualizações automáticas do Windows, conhecido como Windows Update (Configurações ➡ Atualização e Segurança). De tempos em tempos seu computador vai pedir para reiniciar para instalar essas atualizações.
Você não precisa de anti-virus extra. O Windows já vem com um anti-virus gratuito muito bom chamado Windows Defender. Basta ativá-lo e mantê-lo atualizado (via a dica anterior). Se seu computador já veio de fábrica com o MacAfee, Symantec etc, o período de testes acabou e ele te pede para pagar para ficar protegido, desinstále-o completamente para que ele pare de te irritar (e ative o Windows Defender).
Em hipótese alguma instale o Adobe PDF Reader. Desinstale completamente se o tiver instalado. O Windows puro (e Mac e Linux) já é capaz de mostrar PDFs, sem a necessidade de programas externos. O Adobe PDF Reader é inseguro, inútil, gordo e desnecessário. Hoje serve mais como canal para a Adobe te bombardear com propaganda. Se achar que precisa realmente de um leitor de PDF, vá de Foxit, bem mais leve e menos agressivo. Sub-dica: PDF é um formato obsoleto, otimizado para a era do papel (agora já estamos na era digital). Considere parar de usar este tipo de arquivo.
Instale no navegador um bloqueador de propaganda (ad block). É muito comum as pessoas pegarem virus através de uma propaganda enganosa que aparecem inclusive em sites confiáveis. Um bloqueador tornará sua experiência na Web mais leve, limpa e segura pois evita as partes da página que contém propagandas — elas simplesmente desaparecem sem ocupar espaço nem banda de Internet. Eu uso o AdBlock Plus mas há outros, inclusive para seu smartphone.
Tenha um navegador extra para usar somente quando acessa sites suspeitos. Por exemplo, se você usa o Chrome no dia a dia, mantenha um Firefox instalado para esse uso. Ou se prefere o Firefox para o dia a dia, use o navegador do Windows como secundário. E assim por diante. No meu Mac eu uso o Safari (que vem de fábrica) e tenho o Firefox como navegador extra.
Não instale e evite usar o Adobe Flash Player. Novamente, é inseguro, pesado e obsoleto. Se não tiver jeito, instale e use-o somente no navegador extra (da dica anterior).
Mantenha seus arquivos pessoais numa pasta que sincroniza e faz backup automático em algum serviço na nuvem. O plano gratuito desses serviços costuma ser suficiente para a maioria das pessoas. Tem o Box (é o que a empresa me dá para usar) (10GB grátis), Dropbox (5GB grátis), Mega (50GB grátis); todos pedem para instalar um programa (opcional) no seu computador para o backup automático. No Windows já vem de fábrica o OneDrive (5GB grátis), no mundo Apple tem o iCloud Drive (5GB grátis). Há também o Google Drive (15GB grátis). Estes serviços mantém cópia de seus arquivos e fotos na nuvem, caso seu computador seja roubado ou pife, e permitem também acesso a eles quando você não estiver perto de seu PC, através de seu smartphone. Além disso, alguns deles oferecem também ótimos editores de planilhas e documentos em geral, tudo na nuvem, como o Google Drive, iCloud e OneDrive.
Se você usa o Gmail, use endereços especiais infinitos para se cadastrar em serviços da Internet. Por exemplo, se seu endereço é meunome@gmail.com, use meunome+assinatura_da_revista@gmail.com para se cadastrar no suposto serviço assinatura_da_revista. Tudo o que aparece entre o ‘+’ e o ‘@’ é de livre escolha sua. Quando o Gmail recebe uma mensagem para esse endereço, a entrega do mesmo jeito para você e já a marca com uma tag/etiqueta ‘assinatura_da_revista’ automaticamente. Permite também você tratar essas mensagens de forma diferente e automática, por exemplo, criando um filtro no Gmail que joga na lixeira todas as mensagens destinadas a meunome+assinatura_da_revista@gmail.com.


