Se você está numa encruzilhada para escolher uma linguagem de computador para aprender a programar, escolha Python.
Read MoreCategory: Info & Biz Technology
Information Technology for business.
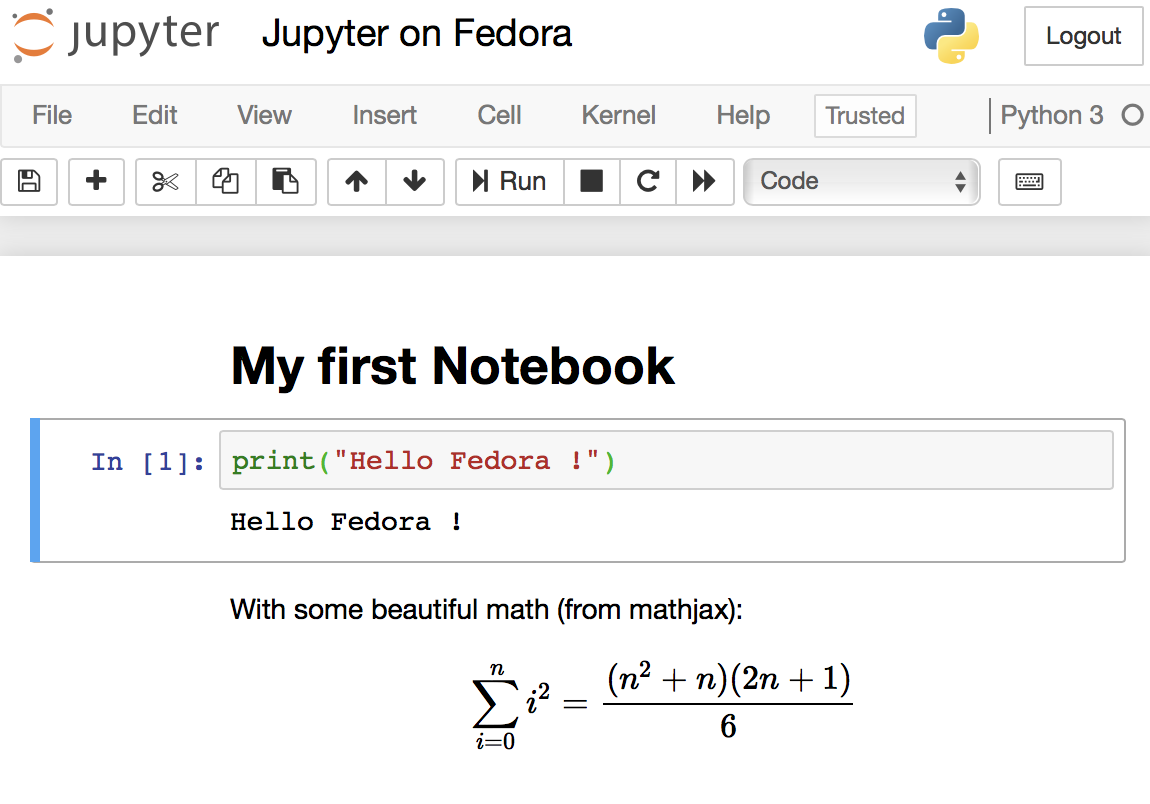
Jupyter Notebook on Fedora with official packages and SSL
Jupyter Notebooks are the elegant way that Data Scientists work and all software needed to run them are already pre-packaged on Fedora (and any other Linux distribution). It is encouraged to use your distribution’s packaging infrastructure to install Python packages. Avoid at any cost installing Python packages with pip, conda, anaconda and from source code. The reasons for this good practice are security, ease of use, to keep the system clean and to make installation procedures easily reproducible in DevOps scenarios.

O incrível Blockchain da CIP
No CIAB 2017 (semana passada) a Câmara Interbancária de Pagamentos e bancos coligados apresentaram uma importante realização com Blockchain.
Read MoreActive BitTorrent trackers
Here is a curated list of active, responsive and valid BitTorrent trackers. Add them to the list of trackers of your torrents to increase your chance of finding peers and improve download speed.
Read More
Proteja seu computador e seus arquivos de ataques e ransomware
A Internet sofreu um ataque de grandes proporções recentemente, conhecido como WannaCry. Nada melhor do que aproveitar o medinho que isso causou nas pessoas para se protegerem de próximos ataques. Siga as dicas aqui sozinho, ou peça para um amigo te ajudar a configurar seu computador. É tudo gratuito e fácil. As duas primeiras são para Windows, o resto serve para qualquer pessoa.
- Ative as atualizações automáticas do Windows, conhecido como Windows Update (Configurações ➡ Atualização e Segurança). De tempos em tempos seu computador vai pedir para reiniciar para instalar essas atualizações.
- Você não precisa de anti-virus extra. O Windows já vem com um anti-virus gratuito muito bom chamado Windows Defender. Basta ativá-lo e mantê-lo atualizado (via a dica anterior). Se seu computador já veio de fábrica com o MacAfee, Symantec etc, o período de testes acabou e ele te pede para pagar para ficar protegido, desinstále-o completamente para que ele pare de te irritar (e ative o Windows Defender).
- Em hipótese alguma instale o Adobe PDF Reader. Desinstale completamente se o tiver instalado. O Windows puro (e Mac e Linux) já é capaz de mostrar PDFs, sem a necessidade de programas externos. O Adobe PDF Reader é inseguro, inútil, gordo e desnecessário. Hoje serve mais como canal para a Adobe te bombardear com propaganda. Se achar que precisa realmente de um leitor de PDF, vá de Foxit, bem mais leve e menos agressivo. Sub-dica: PDF é um formato obsoleto, otimizado para a era do papel (agora já estamos na era digital). Considere parar de usar este tipo de arquivo.
- Instale no navegador um bloqueador de propaganda (ad block). É muito comum as pessoas pegarem virus através de uma propaganda enganosa que aparecem inclusive em sites confiáveis. Um bloqueador tornará sua experiência na Web mais leve, limpa e segura pois evita as partes da página que contém propagandas — elas simplesmente desaparecem sem ocupar espaço nem banda de Internet. Eu uso o AdBlock Plus mas há outros, inclusive para seu smartphone.
- Tenha um navegador extra para usar somente quando acessa sites suspeitos. Por exemplo, se você usa o Chrome no dia a dia, mantenha um Firefox instalado para esse uso. Ou se prefere o Firefox para o dia a dia, use o navegador do Windows como secundário. E assim por diante. No meu Mac eu uso o Safari (que vem de fábrica) e tenho o Firefox como navegador extra.
- Não instale e evite usar o Adobe Flash Player. Novamente, é inseguro, pesado e obsoleto. Se não tiver jeito, instale e use-o somente no navegador extra (da dica anterior).
- Mantenha seus arquivos pessoais numa pasta que sincroniza e faz backup automático em algum serviço na nuvem. O plano gratuito desses serviços costuma ser suficiente para a maioria das pessoas. Tem o Box (é o que a empresa me dá para usar) (10GB grátis), Dropbox (5GB grátis), Mega (50GB grátis); todos pedem para instalar um programa (opcional) no seu computador para o backup automático. No Windows já vem de fábrica o OneDrive (5GB grátis), no mundo Apple tem o iCloud Drive (5GB grátis). Há também o Google Drive (15GB grátis). Estes serviços mantém cópia de seus arquivos e fotos na nuvem, caso seu computador seja roubado ou pife, e permitem também acesso a eles quando você não estiver perto de seu PC, através de seu smartphone. Além disso, alguns deles oferecem também ótimos editores de planilhas e documentos em geral, tudo na nuvem, como o Google Drive, iCloud e OneDrive.
- Se você usa o Gmail, use endereços especiais infinitos para se cadastrar em serviços da Internet. Por exemplo, se seu endereço é meunome@gmail.com, use meunome+assinatura_da_revista@gmail.com para se cadastrar no suposto serviço assinatura_da_revista. Tudo o que aparece entre o ‘+’ e o ‘@’ é de livre escolha sua. Quando o Gmail recebe uma mensagem para esse endereço, a entrega do mesmo jeito para você e já a marca com uma tag/etiqueta ‘assinatura_da_revista’ automaticamente. Permite também você tratar essas mensagens de forma diferente e automática, por exemplo, criando um filtro no Gmail que joga na lixeira todas as mensagens destinadas a meunome+assinatura_da_revista@gmail.com.

The difference between Open Source and Open Governance
When Sun and then Oracle bought MySQL AB, the company behind the original development, MySQL open source database development governance gradually closed. Now, only Oracle writes updates. Updates from other sources — individuals or other companies — are ignored. MySQL is still open source, but it has a closed governance.
MySQL is one of the most popular databases in the world. Every WordPress and Drupal website runs on top of MySQL, as well as the majority of generic Ruby, Django, Flask and PHP apps which have MySQL as their database of choice.
When an open source project becomes this popular and essential, we say it is gaining momentum. MySQL is so popular that it is bigger than its creators. In practical terms, that means its creators can disappear and the community will take over the project and continue its evolution. It also means the software is solid, support is abundant and local, sometimes a commodity or even free.
In the case of MySQL, the source code was forked by the community, and the MariaDB project started from there. Nowadays, when somebody says he is “using MySQL”, he is in fact probably using MariaDB, which has evolved from where MySQL stopped in time.
Open source vs. open governance
Open source software’s momentum serves as a powerful insurance policy for the investment of time and resources an individual or enterprise user will put into it. This is the true benefit behind Linux as an operating system, Samba as a file server, Apache HTTPD as a web server, Hadoop, Docker, MongoDB, PHP, Python, JQuery, Bootstrap and other hyper-essential open source projects, each on its own level of the stack. Open source momentum is the safe antidote to technology lock-in. Having learned that lesson over the last decade, enterprises are now looking for the new functionalities that are gaining momentum: cloud management software, big data, analytics, integration middleware and application frameworks.
On the open domain, the only two non-functional things that matter in the long term are whether it is open source and if it has attained momentum in the community and industry. None of this is related to how the software is being written, but this is exactly what open governance is concerned with: the how.
Open source governance is the policy that promotes a democratic approach to participating in the development and strategic direction of a specific open source project. It is an effective strategy to attract developers and IT industry players to a single open source project with the objective of attaining momentum faster. It looks to avoid community fragmentation and ensure the commitment of IT industry players.
The value of momentum
Open governance alone does not guarantee that the software will be good, popular or useful (though formal open governance only happens on projects that have already captured some attention of IT industry leaders). A few examples of open source projects that have formal open governance are CloudFoundry, OpenStack, JQuery and all the projects under the Apache Software Foundation umbrella.
For users, the indirect benefit of open governance is only related to the speed the open source project reaches momentum and high popularity.
Open governance is important only for the people looking to govern or contribute. If you just want to use, open source momentum is far more important.
RDM tweaks macOS display
I once found on the internet the RDM software and found it useful.
I’ve created packages for easier installation, but I didn’t write the software. My packaging was published on GitHub but its not maintained anymore; I’m not using the software anymore.

Advanced Multimedia on the Linux Command Line
Audio
- Show information (tags, bitrate etc) about a multimedia file
- Lossless conversion of all FLAC files into more compatible, but still Open Source, ALAC
- Convert all FLAC files into 192kbps MP3
- Convert all FLAC files into ~256kbps AAC with Fraunhofer AAC encoder
- Same as above but under a complex directory structure
- Embed lyrics into M4A files
- Convert APE+CUE, FLAC+CUE, WAV+CUE album-on-a-file into a one file per track MP3 or FLAC
Picture
- Move images with no EXIF header to another folder
- Set EXIF photo create time based on file create time
- Rotate photos based on EXIF’s Orientation flag, plus make them progressive. Lossless
- Rename photos to a more meaningful filename
- Even more semantic photo file names based on
Subjecttag - Copy Subject tag to Title-related tags
- Full rename: a consolidation of some of the previous commands
- Set photo
Creatortag based on camera model - Recursively search people in photos
- Make photos timezone-aware
- Geotag photos based on time and Moves mobile app records
- Concatenate all images together in one big image
There was a time that Apple macOS was the best platform to handle multimedia (audio, image, video). This might be still true in the GUI space. But Linux presents a much wider range of possibilities when you go to the command line, specially if you want to:
- Process hundreds or thousands of files at once
- Same as above, organized in many folders while keeping the folder structure
- Same as above but with much fine grained options, including lossless processing, pixel perfectness that most GUI tools won’t give you
The Open Source community has produced state of the art command line tools as ffmpeg, exiftool and others, which I use every day to do non-trivial things, along with Shell advanced scripting. Sure, you can get these tools installed on Mac or Windows, and you can even use almost all these recipes on these platforms, but Linux is the native platform for these tools, and easier to get the environment ready.
These are my personal notes and I encourage you to understand each step of the recipes and adapt to your workflows. It is organized in Audio, Video and Image+Photo sections.
I use Fedora Linux and I mention Fedora package names to be installed. You can easily find same packages on your Ubuntu, Debian, Gentoo etc, and use these same recipes.
Audio
Show information (tags, bitrate etc) about a multimedia file
ffprobe file.mp3
ffprobe file.m4v
ffprobe file.mkv
Lossless conversion of all FLAC files into more compatible, but still Open Source, ALAC
ls *flac | while read f; do
	ffmpeg -i "$f" -acodec alac -vn "${f[@]/%flac/m4a}" < /dev/null;
done
Convert all FLAC files into 192kbps MP3
ls *flac | while read f; do
   ffmpeg -i "$f" -qscale:a 2 -vn "${f[@]/%flac/mp3}" < /dev/null;
done
Convert all FLAC files into ~256kbps VBR AAC with Fraunhofer AAC encoder
First, make sure you have Negativo17 build of FFMPEG, so run this as root:
dnf config-manager --add-repo=http://negativo17.org/repos/fedora-multimedia.repo
dnf update ffmpeg
Now encode:
ls *flac | while read f; do
   ffmpeg -i "$f" -vn -c:a libfdk_aac -vbr 5 -movflags +faststart "${f[@]/%flac/m4a}" < /dev/null;
done
Has been said the Fraunhofer AAC library can’t be legally linked to ffmpeg due to license terms violation. In addition, ffmpeg’s default AAC encoder has been improved and is almost as good as Fraunhofer’s, specially for constant bit rate compression. In this case, this is the command:
ls *flac | while read f; do
   ffmpeg -i "$f" -vn -c:a aac -b:a 256k -movflags +faststart "${f[@]/%flac/m4a}" < /dev/null;
done
Same as above but under a complex directory structure
This is one of my favorites, extremely powerful. Very useful when you get a Hi-Fi, complete but useless WMA-Lossless collection and need to convert it losslesslly to something more portable, ALAC in this case. Change the FMT=flac to FMT=wav or FMT=wma (only when it is WMA-Lossless) to match your source files. Don’t forget to tag the generated files.
FMT=flac
# Create identical directory structure under new "alac" folder
find . -type d | while read d; do
   mkdir -p "alac/$d"
done

find . -name "*$FMT" | sort | while read f; do
   ffmpeg -i "$f" -acodec alac -vn "alac/${f[@]/%$FMT/m4a}" < /dev/null;
   mp4tags -E "Deezer lossless files (https://github.com/Ghostfly/deezDL) + 'ffmpeg -acodec alac'" "alac/${f[@]/%$FMT/m4a}";
done
Embed lyrics into M4A files
iPhone and iPod music player can display the file’s embedded lyrics and this is a cool feature. There are several ways to get lyrics into your music files. If you download music from Deezer using SMLoadr, you’ll get files with embedded lyrics. Then, the FLAC to ALAC process above will correctly transport the lyrics to the M4A container. Another method is to use beets music tagger and one of its plugins, though it is very slow for beets to fetch lyrics of entire albums from the Internet.
The third method is manual. Let lyrics.txt be a text file with your lyrics. To tag it into your music.m4a, just do this:
mp4tags -L "$(cat lyrics.txt)" music.m4a
And then check to see the embedded lyrics:
ffprobe music.m4a 2>&1 | less
Convert APE+CUE, FLAC+CUE, WAV+CUE album-on-a-file into a one file per track ALAC or MP3
If some of your friends has the horrible tendency to commit this crime and rip CDs as 1 file for entire CD, there is an automation to fix it. APE is the most difficult and this is what I’ll show. FLAC and WAV are shortcuts of this method.
- Make a lossless conversion of the APE file into something more manageable, as WAV:
ffmpeg -i audio-cd.ape audio-cd.wav - Now the magic: use the metadata on the CUE file to split the single file into separate tracks, renaming them accordingly. You’ll need the shnplit command, available in the shntool package on Fedora (to install: yum install shntool). Additionally, CUE files usually use ISO-8859-1 (Latin1) charset and a conversion to Unicode (UTF-8) is required:
iconv -f Latin1 -t UTF-8 audio-cd.cue | shnsplit -t "%n · %p ♫ %t" audio-cd.wav
- Now you have a series of nicely named WAV files, one per CD track. Lets convert them into lossless ALAC using one of the above recipes:
ls *wav | while read f; do
   ffmpeg -i "$f" -acodec alac -vn "${f[@]/%wav/m4a}" < /dev/null;
done
This will get you lossless ALAC files converted from the intermediary WAV files. You can also convert them into FLAC or MP3 using variations of the above recipes.
Now the files are ready for your tagger.
Video
Add chapters and soft subtitles from SRT file to M4V/MP4 movie
This is a lossless and fast process, chapters and subtitles are added as tags and streams to the file; audio and video streams are not reencoded.
- Make sure your SRT file is UTF-8 encoded:
bash$ file subtitles_file.srt
subtitles_file.srt: ISO-8859 text, with CRLF line terminators
It is not UTF-8 encoded, it is some ISO-8859 variant, which I need to know to correctly convert it. My example uses a Brazilian Portuguese subtitle file, which I know is ISO-8859-15 (latin1) encoded because most latin scripts use this encoding.
- Lets convert it to UTF-8:
bash$ iconv -f latin1 -t utf8 subtitles_file.srt > subtitles_file_utf8.srt
bash$ file subtitles_file_utf8.srt
subtitles_file_utf8.srt: UTF-8 Unicode text, with CRLF line terminators
- Check chapters file:
bash$ cat chapters.txt
CHAPTER01=00:00:00.000
CHAPTER01NAME=Chapter 1
CHAPTER02=00:04:31.605
CHAPTER02NAME=Chapter 2
CHAPTER03=00:12:52.063
CHAPTER03NAME=Chapter 3
…
- Now we are ready to add them all to the movie along with setting the movie name and embedding a cover image to ensure the movie looks nice on your media player list of content. Note that this process will write the movie file in place, will not create another file, so make a backup of your movie while you are learning:
MP4Box -ipod \
       -itags 'track=The Movie Name:cover=cover.jpg' \
       -add 'subtitles_file_utf8.srt:lang=por' \
       -chap 'chapters.txt:lang=eng' \
       movie.mp4
The MP4Box command is part of GPac.
OpenSubtitles.org has a large collection of subtitles in many languages and you can search its database with the IMDB ID of the movie. And ChapterDB has the same for chapters files.
Add cover image and other metadata to a movie file
Since iTunes can tag and beautify your movie files in Windows and Mac, libmp4v2 can do the same on Linux. Here we’ll use it to add the movie cover image we downloaded from IMDB along with some movie metadata for Woody Allen’s 2011 movie Midnight in Paris:
mp4tags -H 1 -i movie -y 2011 -a "Woody Allen" -s "Midnight in Paris" -m "While on a trip to Paris with his..." "Midnight in Paris.m4v"
mp4art -k -z --add cover.jpg "Midnight in Paris.m4v"
This way the movie file will look good and in the correct place when transferred to your iPod/iPad/iPhone.
Of course, make sure the right package is installed first:
dnf install libmp4v2
File extensions MOV, MP4, M4V, M4A are the same format from the ISO MPEG-4 standard. They have different names just to give a hint to the user about what they carry.
Decrypt and rip a DVD the loss less way
- Make sure you have the RPMFusion and the Negativo17 repos configured
- Install libdvdcss and vobcopy
dnf -y install libdvdcss vobcopy
- Mount the DVD and rip it, has to be done as root
mount /dev/sr0 /mnt/dvd;
cd /target/folder;
vobcopy -m /mnt/dvd .
You’ll get a directory tree with decrypted VOB and BUP files. You can generate an ISO file from them or, much more practical, use HandBrake to convert the DVD titles into MP4/M4V (more compatible with wide range of devices) or MKV/WEBM files.
Convert 240fps video into 30fps slow motion, the loss-less way
Modern iPhones can record videos at 240 or 120fps so when you’ll watch them at 30fps they’ll look slow-motion. But regular players will play them at 240 or 120fps, hiding the slo-mo effect.
We’ll need to handle audio and video in different ways. The video FPS fix from 240 to 30 is loss less, the audio stretching is lossy.
# make sure you have the right packages installed
dnf install mkvtoolnix sox gpac faac
#!/bin/bash

# Script by Avi Alkalay
# Freely distributable

f="$1"
ofps=30
noext=${f%.*}
ext=${f##*.}

# Get original video frame rate
ifps=`ffprobe -v error -select_streams v:0 -show_entries stream=r_frame_rate -of default=noprint_wrappers=1:nokey=1 "$f" < /dev/null  | sed -e 's|/1||'`
echo

# exit if not high frame rate
[[ "$ifps" -ne 120 ]] && [[ "$ifps" -ne 240 ]] && exit

fpsRate=$((ifps/ofps))
fpsRateInv=`awk "BEGIN {print $ofps/$ifps}"`

# loss less video conversion into 30fps through repackaging into MKV
mkvmerge -d 0 -A -S -T \
	--default-duration 0:${ofps}fps \
	"$f" -o "v$noext.mkv"

# loss less repack from MKV to MP4
ffmpeg -loglevel quiet -i "v$noext.mkv" -vcodec copy "v$noext.mp4"
echo

# extract subtitles, if original movie has it
ffmpeg -loglevel quiet -i "$f" "s$noext.srt"
echo

# resync subtitles using similar method with mkvmerge
mkvmerge --sync "0:0,${fpsRate}" "s$noext.srt" -o "s$noext.mkv"

# get simple synced SRT file
rm "s$noext.srt"
ffmpeg -i "s$noext.mkv" "s$noext.srt"

# remove undesired formating from subtitles
sed -i -e 's|<font size="8"><font face="Helvetica">\(.*\)</font></font>|\1|' "s$noext.srt"

# extract audio to WAV format
ffmpeg -loglevel quiet -i "$f" "$noext.wav"

# make audio longer based on ratio of input and output framerates
sox "$noext.wav" "a$noext.wav" speed $fpsRateInv

# lossy stretched audio conversion back into AAC (M4A) 64kbps (because we know the original audio was mono 64kbps)
faac -q 200 -w -s --artist a "a$noext.wav"

# repack stretched audio and video into original file while removing the original audio and video tracks
cp "$f" "${noext}-slow.${ext}"
MP4Box -ipod -rem 1 -rem 2 -rem 3 -add "v$noext.mp4" -add "a$noext.m4a" -add "s$noext.srt" "${noext}-slow.${ext}"

# remove temporary files
rm -f "$noext.wav" "a$noext.wav" "v$noext.mkv" "v$noext.mp4" "a$noext.m4a" "s$noext.srt" "s$noext.mkv"
1 Photo + 1 Song = 1 Movie
If the audio is already AAC-encoded (may also be ALAC-encoded), create an MP4/M4V file:
ffmpeg -loop 1 -framerate 0.2 -i photo.jpg -i song.m4a -shortest -c:v libx264 -tune stillimage -vf scale=960:-1 -c:a copy movie.m4v
The above method will create a very efficient 0.2 frames per second (-framerate 0.2) H.264 video from the photo while simply adding the audio losslessly. Such very-low-frames-per-second video may present sync problems with subtitles on some players. In this case simply remove the -framerate 0.2 parameter to get a regular 25fps video with the cost of a bigger file size.
The -vf scale=960:-1 parameter tells FFMPEG to resize the image to 960px width and calculate the proportional height. Remove it in case you want a video with the same resolution of the photo. A 12 megapixels photo file (around 4032×3024) will get you a near 4K video.
If the audio is MP3, create an MKV file:
ffmpeg -loop 1 -framerate 0.2 -i photo.jpg -i song.mp3 -shortest -c:v libx264 -tune stillimage -vf scale=960:-1 -c:a copy movie.mkv
If audio is not AAC/M4A but you still want an M4V file, convert audio to AAC 192kbps:
ffmpeg -loop 1 -framerate 0.2 -i photo.jpg -i song.mp3 -shortest -c:v libx264 -tune stillimage -vf scale=960:-1 -c:a aac -strict experimental -b:a 192k movie.m4v
See more about FFMPEG photo resizing.
There is also a more efficient and completely lossless way to turn a photo into a video with audio, using extended podcast techniques. But thats much more complicated and requires advanced use of GPAC’s MP4Box and NHML. In case you are curious, see the Podcast::chapterize() and Podcast::imagify() methods in my music-podcaster script. The trick is to create an NHML (XML) file referencing the image(s) and add it as a track to the M4A audio file.
Image and Photo
Move images with no EXIF header to another folder
mkdir noexif;
exiftool -filename -T -if '(not $datetimeoriginal or ($datetimeoriginal eq "0000:00:00 00:00:00"))' *HEIC *JPG *jpg | while read f; do mv "$f" noexif/; done
Set EXIF photo create time based on file create time
Warning: use this only if image files have correct creation time on filesystem and if they don’t have an EXIF header.
exiftool -overwrite_original '-DateTimeOriginal< ${FileModifyDate}' *CR2 *JPG *jpg
Rotate photos based on EXIF’s Orientation flag, plus make them progressive. Lossless
jhead -autorot -cmd "jpegtran -progressive '&i' > '&o'" -ft *jpg
Rename photos to a more meaningful filename
This process will rename silly, sequential, confusing and meaningless photo file names as they come from your camera into a readable, sorteable and useful format. Example:
IMG_1234.JPG ➡ 2015.07.24-17.21.33 • Max playing with water【iPhone 6s✚】.jpg
Note that new file name has the date and time it was taken, whats in the photo and the camera model that was used.
- First keep the original filename, as it came from the camera, in the OriginalFileName tag:
exiftool -overwrite_original '-OriginalFileName<${filename}' *CR2 *JPG *jpg - Now rename:
exiftool '-filename<${DateTimeOriginal} 【${Model}】%.c.%e' -d %Y.%m.%d-%H.%M.%S *CR2 *HEIC *JPG *jpg - Remove the ‘0’ index if not necessary:
\ls *HEIC *JPG *jpg *heic | while read f; do
    nf=`echo "$f" | sed -e 's/0.JPG/.jpg/i; s/0.HEIC/.heic/i'`;
    t=`echo "$f" | sed -e 's/0.JPG/1.jpg/i; s/0.HEIC/1.heic/i'`;
    [[ ! -f "$t" ]] && mv "$f" "$nf";
done
Alternative for macOS without SED:
\ls *HEIC *JPG *jpg *heic | perl -e ' while (<>) { chop; $nf=$_; $t=$_; $nf=~s/0.JPG/.jpg/i; $nf=~s/0.HEIC/.heic/i; $t=~s/0.JPG/1.jpg/i; $t=~s/0.HEIC/1.heic/i; rename($_,$nf) if (! -e $t); }' - Optional: make lower case extensions:
\ls *HEIC *JPG | while read f; do nf=`echo "$f" | sed -e 's/JPG/jpg/; s/HEIC/heic/'`; mv "$f" "$nf"; done - Optional: simplify camera name, for example turn “Canon PowerShot G1 X” into “Canon G1X” and make lower case extension at the same time:
\ls *HEIC *JPG *jpg *heic | while read f; do
    nf=`echo "$f" | sed -e 's/Canon PowerShot G1 X/Canon G1X/;
      s/iPhone 6s Plus/iPhone 6s✚/;
      s/iPhone 7 Plus/iPhone 7✚/;
      s/Canon PowerShot SD990 IS/Canon SD990 IS/;
      s/HEIC/heic/;
      s/JPG/jpg/;'`;
    mv "$f" "$nf";
done
You’ll get file names as 2015.07.24-17.21.33 【Canon 5D Mark II】.jpg. If you took more then 1 photo in the same second, exiftool will automatically add an index before the extension.
Even more semantic photo file names based on Subject tag
\ls *【*】* | while read f; do
	s=`exiftool -T -Subject "$f"`;
	if [[ " $s" != " -" ]]; then
		nf=`echo "$f" | sed -e "s/ 【/ • $s 【/; s/\:/∶/g;"`;
		mv "$f" "$nf";
	fi;
done
Full rename: a consolidation of some of the previous commands
exiftool '-filename<${DateTimeOriginal} • ${Subject} 【${Model}】%.c.%e' -d %Y.%m.%d-%H.%M.%S *CR2 *JPG *HEIC *jpg *heic
Set photo “Creator” tag based on camera model
- First list all cameras that contributed photos to current directory:
exiftool -T -Model *jpg | sort -u
Output is the list of camera models on this photos:
Canon EOS REBEL T5i
DSC-H100
iPhone 4
iPhone 4S
iPhone 5
iPhone 6
iPhone 6s Plus
- Now set creator on photo files based on what you know about camera owners:
CRE="John Doe";    exiftool -overwrite_original -creator="$CRE" -by-line="$CRE" -Artist="$CRE" -if '$Model=~/DSC-H100/'            *.jpg
CRE="Jane Black";  exiftool -overwrite_original -creator="$CRE" -by-line="$CRE" -Artist="$CRE" -if '$Model=~/Canon EOS REBEL T5i/' *.jpg
CRE="Mary Doe";    exiftool -overwrite_original -creator="$CRE" -by-line="$CRE" -Artist="$CRE" -if '$Model=~/iPhone 5/'            *.jpg
CRE="Peter Black"; exiftool -overwrite_original -creator="$CRE" -by-line="$CRE" -Artist="$CRE" -if '$Model=~/iPhone 4S/'           *.jpg
CRE="Avi Alkalay"; exiftool -overwrite_original -creator="$CRE" -by-line="$CRE" -Artist="$CRE" -if '$Model=~/iPhone 6s Plus/'      *.jpg
Recursively search people in photos
If you geometrically mark people faces and their names in your photos using tools as Picasa, you can easily search for the photos which contain “Suzan” or “Marcelo” this way:
exiftool -fast -r -T -Directory -FileName -RegionName -if '$RegionName=~/Suzan|Marcelo/' .
-Directory, -FileName and -RegionName specify the things you want to see in the output. You can remove -RegionName for a cleaner output.
The -r is to search recursively. This is pretty powerful.
Make photos timezone-aware
Your camera will tag your photos only with local time on CreateDate or DateTimeOriginal tags. There is another set of tags called GPSDateStamp and GPSTimeStamp that must contain the UTC time the photos were taken, but your camera won’t help you here. Hopefully you can derive these values if you know the timezone the photos were taken. Here are two examples, one for photos taken in timezone -02:00 (Brazil daylight savings time) and on timezone +09:00 (Japan):
exiftool -overwrite_original '-gpsdatestamp<${CreateDate}-02:00' '-gpstimestamp<${CreateDate}-02:00' '-TimeZone<-02:00' '-TimeZoneCity<São Paulo' *.jpg
exiftool -overwrite_original '-gpsdatestamp<${CreateDate}+09:00' '-gpstimestamp<${CreateDate}+09:00' '-TimeZone<+09:00' '-TimeZoneCity<Tokio' Japan_Photos_folder
Use exiftool to check results on a modified photo:
exiftool -s -G -time:all -gps:all 2013.10.12-23.45.36-139.jpg
[EXIF]          CreateDate                      : 2013:10:12 23:45:36
[Composite]     GPSDateTime                     : 2013:10:13 01:45:36Z
[EXIF]          GPSDateStamp                    : 2013:10:13
[EXIF]          GPSTimeStamp                    : 01:45:36
This shows that the local time when the photo was taken was 2013:10:12 23:45:36. To use exiftool to set timezone to -02:00 actually means to find the correct UTC time, which can be seen on GPSDateTime as 2013:10:13 01:45:36Z. The difference between these two tags gives us the timezone. So we can read photo time as 2013:10:12 23:45:36-02:00.
Geotag photos based on time and Moves mobile app records
Moves is an amazing app for your smartphone that simply records for yourself (not social and not shared) everywhere you go and all places visited, 24h a day.
- Make sure all photos’ CreateDate or DateTimeOriginal tags are correct and precise, achieve this simply by setting correctly the camera clock before taking the pictures.
- Login and export your Moves history.
- Geotag the photos informing ExifTool the timezone they were taken, -08:00 (Las Vegas) in this example:
exiftool -overwrite_original -api GeoMaxExtSecs=86400 -geotag ../moves_export/gpx/yearly/storyline/storyline_2015.gpx '-geotime<${CreateDate}-08:00' Folder_with_photos_from_trip_to_Las_Vegas
Some important notes:
- It is important to put the entire ‘-geotime’ parameter inside simple apostrophe or simple quotation mark (‘), as I did in the example.
- The ‘-geotime’ parameter is needed even if image files are timezone-aware (as per previous tutorial).
- The ‘-api GeoMaxExtSecs=86400’ parameter should not be used unless the photo was taken more than 90 minutes of any detected movement by the GPS.
Concatenate all images together in one big image
- In 1 column and 8 lines:
montage -mode concatenate -tile 1x8 *jpg COMPOSED.JPG
- In 8 columns and 1 line:
montage -mode concatenate -tile 8x1 *jpg COMPOSED.JPG
- In a 4×2 matrix:
montage -mode concatenate -tile 4x2 *jpg COMPOSED.JPG
The montage command is part of the ImageMagick package.
Docker on Bluemix with automated full-stack deploys and delivery pipelines
Fast jump to:
Introduction
This document explains working examples on how to use Bluemix platform advanced features such as:
- Docker on Bluemix, integrated with Bluemix APIs and middleware
- Full stack automated and unattended deployments with DevOps Services Pipeline, including Docker
- Full stack automated and unattended deployments with
cfcommand line interface, including Docker
For this, I’ll use the following source code structure:
github.com/avibrazil/bluemix-docker-kickstart
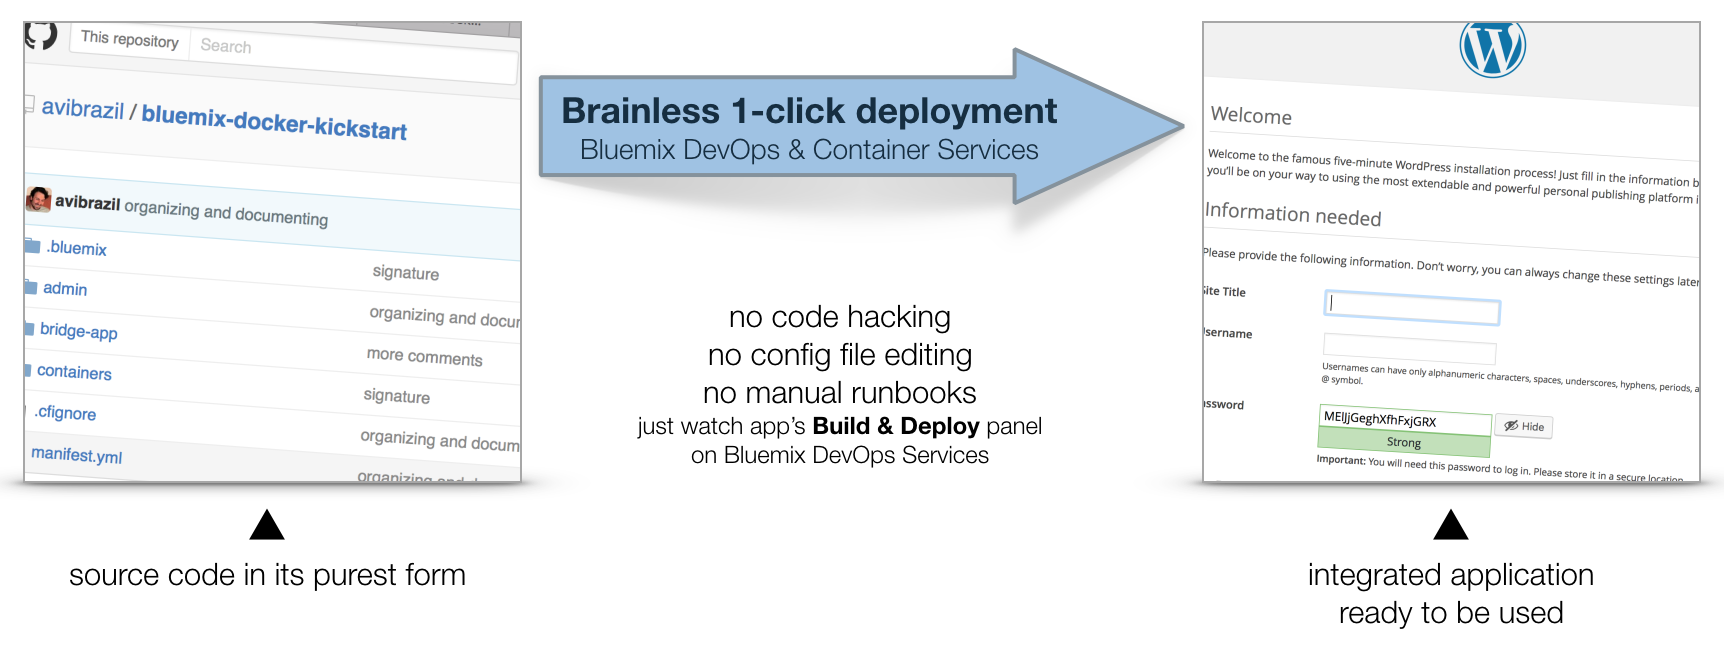
The source code currently brings to life (as an example), integrated with some Bluemix services and Docker infrastructure, a PHP application (the WordPress popular blogging platform), but it could be any Python, Java, Ruby etc app.
Before we start: understand Bluemix 3 pillars
I feel it is important to position what Bluemix really is and which of its parts we are going to use. Bluemix is composed of 3 different things:
- Bluemix is a hosting environment to run any type of web app or web service. This is the only function provided by the CloudFoundry Open Source project, which is an advanced PaaS that lets you provision and de-provision runtimes (Java, Python, Node etc), libraries and services to be used by your app. These operations can be triggered through the Bluemix.net portal or by the
cfcommand from your laptop. IBM has extended this part of Bluemix with functions not currently available on CloudFoundry, notably the capability of executing regular VMs and Docker containers. - Bluemix provides pre-installed libraries, APIs and middleware. IBM is constantly adding functions to the Bluemix marketplace, such as cognitive computing APIs in the Watson family, data processing middleware such as Spark and dashDB, or even IoT and Blockchain-related tools. These are high value components that can add a bit of magic to your app. Many of those are Open Source.
- DevOps Services. Accessible from hub.jazz.net, it provides:
- Public and private collaborative Git repositories.
- UI to build, manage and execute the app delivery pipeline, which does everything needed to transform your pure source code into a final running application.
- The Track & Plan module, based on Rational Team Concert, to let your team mates and clients exchange activities and control project execution.
This tutorial will dive into #1 and some parts of #3, while using some services from #2.
The architecture of our app

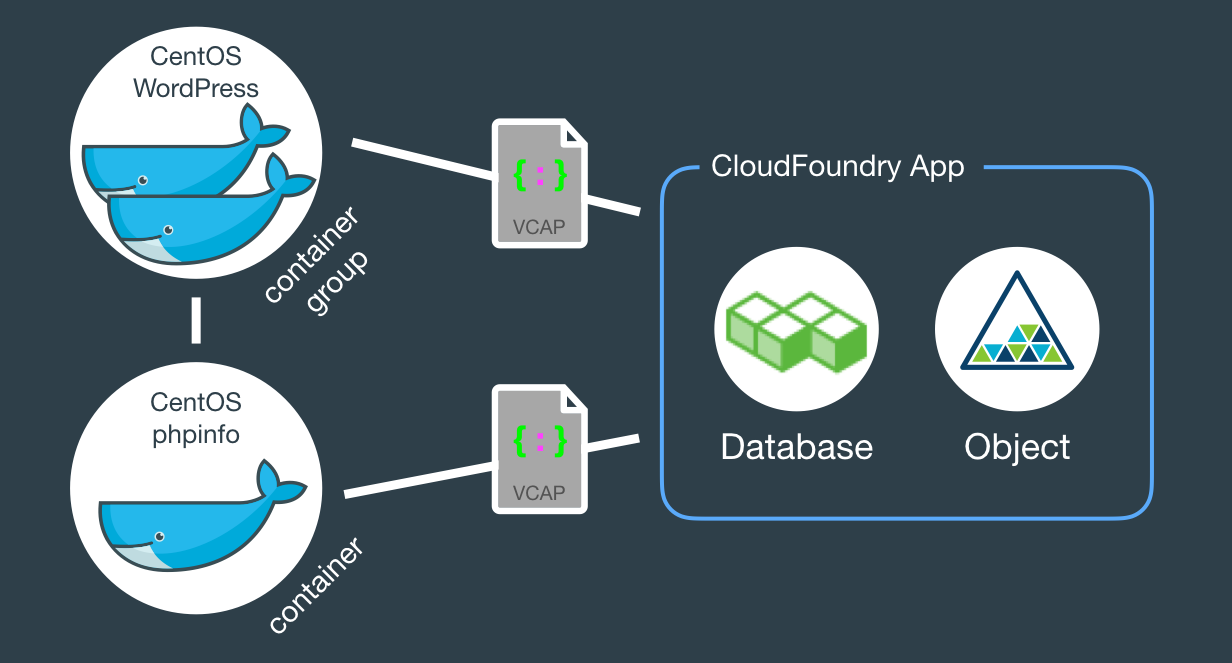
When fully provisioned, the entire architecture will look like this. Several Bluemix services (MySQL, Object store) packaged into a CloudFoundry App (bridge app) that serves some Docker containers that in turns do the real work. Credentials to access those services will be automatically provided to the containers as environment variables (VCAP_SERVICES).
Structure of Source Code
The example source code repo contains boilerplate code that is intentionally generic and clean so you can easily fork, add and modify it to fit your needs. Here is what it contains:
bridge-appfolder andmanifest.ymlfile- The CloudFoundry
manifest.ymlthat defines app name, dependencies and other characteristics to deploy the app contents underbridge-app. containers- Each directory contains a Dockerfile and other files to create Docker containers. In this tutorial we’ll use only the
phpinfoandwordpressdirectories, but there are some other useful examples you can use. .bluemixfolder- When this code repository is imported into Bluemix via the “Deploy to Bluemix” button, metadata in here will be used to set up your development environment under DevOps Services.
adminfolder- Random shell scripts, specially used for deployments.
Watch the deployment
The easiest way to deploy the app is through DevOps Services:
- Click to deploy
- Provide a unique name to your copy of the app, also select the target Bluemix space
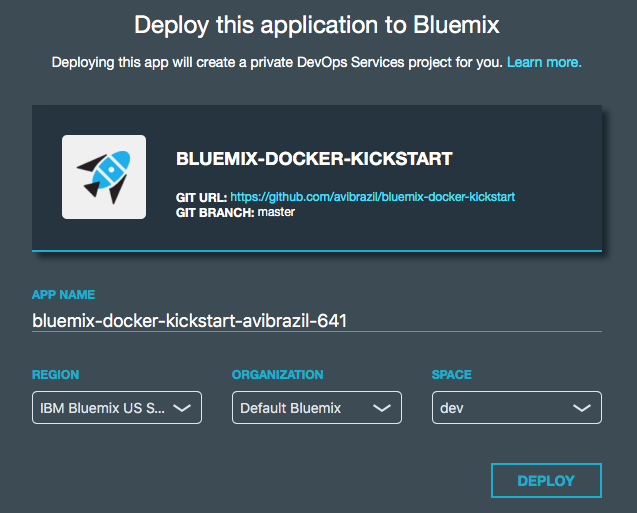
- Go to DevOps Services ➡ find your project clone ➡ select Build & Deploy tab and watch

Under the hood: understand the app deployment in 2 strategies
Conceptually, these are the things you need to do to fully deploy an app with Docker on Bluemix:
- Instantiate external services needed by your app, such as databases, APIs etc.
- Create a CloudFoundry app to bind those services so you can handle them all as one block.
- Create the Docker images your app needs and register them on your Bluemix private Docker Registry (equivalent to the public Docker Hub).
- Instantiate your images in executable Docker containers, connecting them to your backend services through the CloudFoundry app.
The idea is to encapsulate all these steps in code so deployments can be done entirely unattended. Its what I call brainless 1-click deployment. There are 2 ways to do that:
- A regular shell script that extensively uses the cf command. This is the
admin/deployscript in our code. - An in-code delivery pipeline that can be executed by Bluemix DevOps Services. This is the
.bluemix/pipeline.ymlfile.
From here, we will detail each of these steps both as commands (on the script) and as stages of the pipeline.
-
Instantiation of external services needed by the app…
I used the
cf marketplacecommand to find the service names and plans available. ClearDB provides MySQL as a service. And just as an example, I’ll provision an additional Object Storage service. Note the similarities between both methods.Deployment Scriptcf create-service \ cleardb \ spark \ bridge-app-database; cf create-service \ Object-Storage \ Free \ bridge-app-object-store;
Delivery PipelineWhen you deploy your app to Bluemix, DevOps Services will read your
manifest.ymland automatically provision whatever is under the declared-services block. In our case:declared-services: bridge-app-database: label: cleardb plan: spark bridge-app-object-store: label: Object-Storage plan: Free -
Creation of an empty CloudFoundry app to hold together these services
The
manifest.ymlfile has all the details about our CF app. Name, size, CF build pack to use, dependencies (as the ones instantiated in previous stage). So a plaincf pushwill use it and do the job. Since this app is just a bridge between our containers and the services, we’ll use minimum resources and the minimumnoop-buildpack. After this stage you’ll be able to see the app running on your Bluemix console. -
Creation of Docker images
The heavy lifting here is done by the
Dockerfiles. We’ll use base CentOS images with official packages only in an attempt to use best practices. See phpinfo and wordpress Dockerfiles to understand how I improved a basic OS to become what I need.The
cf iccommand is basically a clone of the well knowndockercommand, but pre-configured to use Bluemix Docker infrastructure. There is simple documentation to install the IBM Containers plugin tocf.Deployment Scriptcf ic build \ -t phpinfo_image \ containers/phpinfo/; cf ic build \ -t wordpress_image \ containers/wordpress/;
Delivery PipelineStages handling this are “➋ Build phpinfo Container” and “➍ Build wordpress Container”.
Open these stages and note how image names are set.
After this stage, you can query your Bluemix private Docker Registry and see the images there. Like this:
$ cf ic images
REPOSITORY                                          TAG     IMAGE ID      CREATED     SIZE
registry.ng.bluemix.net/avibrazil/phpinfo_image     latest  69d78b3ce0df  3 days ago  104.2 MB
registry.ng.bluemix.net/avibrazil/wordpress_image   latest  a801735fae08  3 days ago  117.2 MB
A Docker image is not yet a container. A Docker container is an image that is being executed.
-
Run containers integrated with previously created bridge app
To make our tutorial richer, we’ll run 2 sets of containers:
- The phpinfo one, just to see how Bluemix gives us an integrated environment
Deployment Script
cf ic run \
   -P \
   --env 'CCS_BIND_APP=bridge-app-name' \
   --name phpinfo_instance \
   registry.ng.bluemix.net/avibrazil/phpinfo_image;


IP=`cf ic ip request |
    grep "IP address" |
    sed -e "s/.* \"\(.*\)\" .*/\1/"`;


cf ic ip bind $IP phpinfo_instance;
Delivery PipelineEquivalent stage is “➌ Deploy phpinfo Container”.
Open this stage and note how some environment variables are defined, specially the
BIND_TO.Bluemix DevOps Services default scripts use these environment variables to correctly deploy the containers.
The
CCS_BIND_APPon the script andBIND_TOon the pipeline are key here. Their mission is to make the bridge-app’sVCAP_SERVICESavailable to this container as environment variables.In CloudFoundry,
VCAP_SERVICESis an environment variable containing a JSON document with all credentials needed to actually access the app’s provisioned APIs, middleware and services, such as host names, users and passwords. See an example below. - A container group with 2 highly available, monitored and balanced identical wordpress containers
Deployment Script
cf ic group create \
   -P \
   --env 'CCS_BIND_APP=bridge-app-name' \
   --auto \
   --desired 2 \
   --name wordpress_group_instance \
   registry.ng.bluemix.net/avibrazil/wordpress_image


cf ic route map \
   --hostname some-name-wordpress \
   --domain $DOMAIN \
   wordpress_group_instance
The
cf ic group createcreates a container group and runs them at once.The
cf ic route mapcommand configures Bluemix load balancer to capture traffic to http://some-name-wordpress.mybluemix.net and route it to thewordpress_group_instancecontainer group.Delivery PipelineEquivalent stage is “➎ Deploy wordpress Container Group”.
Look in this stage’s Environment Properties how I’m configuring container group.
I had to manually modify the standard deployment script, disabling deploycontainer and enabling deploygroup.
- The phpinfo one, just to see how Bluemix gives us an integrated environment
See the results
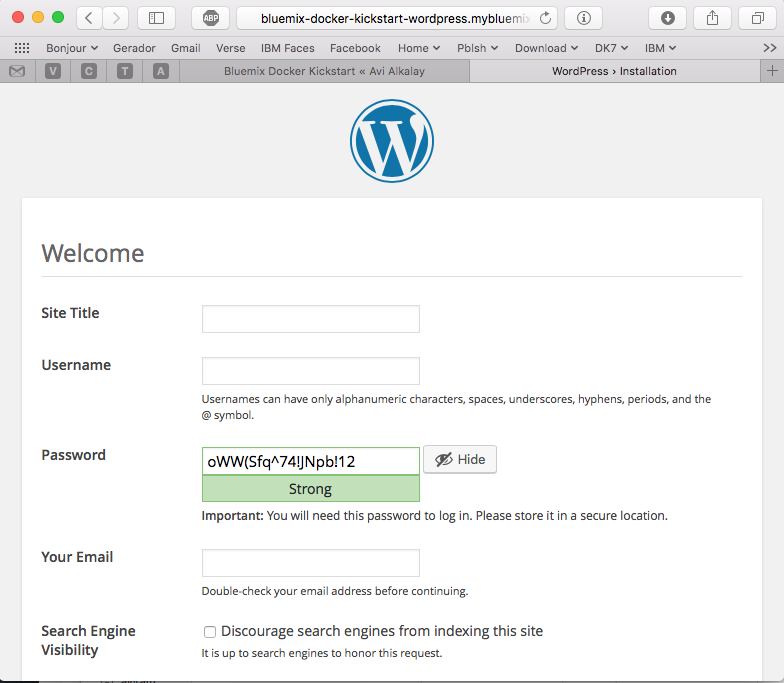
At this point, WordPress (the app that we deployed) is up and running inside a Docker container, and already using the ClearDB MySQL database provided by Bluemix. Access the URL of your wordpress container group and you will see this:
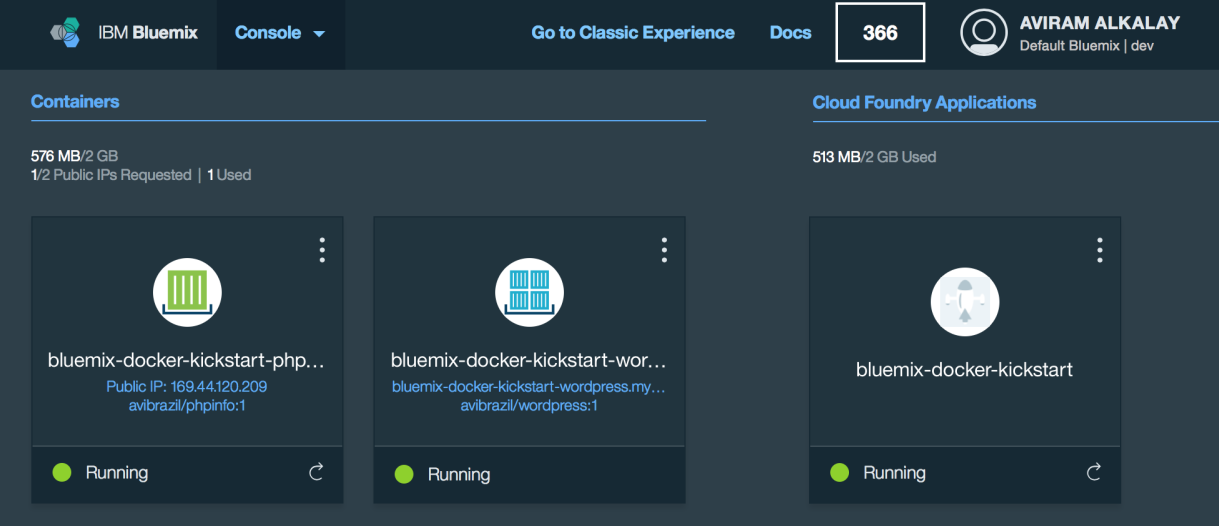
Bluemix dashboard also shows the components running:
But the most interesting evidence you can see accessing the phpinfo container URL or IP. Scroll to the environment variables section to see all services credentials available as environment variables from VCAP_SERVICES:
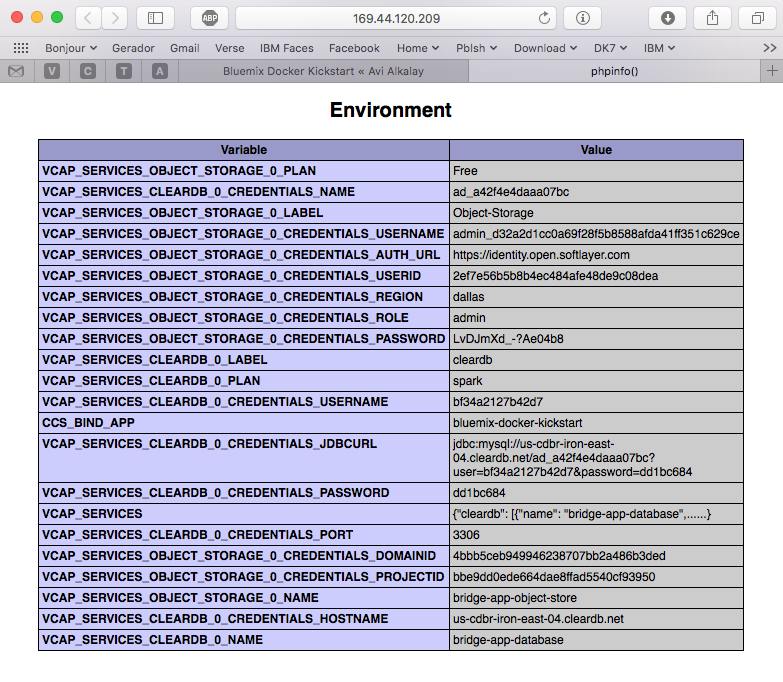
I use these credentials to configure WordPress while building the Dockerfile, so it can find its database when executing:
.
.
.
RUN yum -y install epel-release;\
	yum -y install wordpress patch;\
	yum clean all;\
	sed -i '\
		         s/.localhost./getenv("VCAP_SERVICES_CLEARDB_0_CREDENTIALS_HOSTNAME")/ ; \
		s/.database_name_here./getenv("VCAP_SERVICES_CLEARDB_0_CREDENTIALS_NAME")/     ; \
		     s/.username_here./getenv("VCAP_SERVICES_CLEARDB_0_CREDENTIALS_USERNAME")/ ; \
		     s/.password_here./getenv("VCAP_SERVICES_CLEARDB_0_CREDENTIALS_PASSWORD")/ ; \
	' /etc/wordpress/wp-config.php;\
	cd /etc/httpd/conf.d; patch < /tmp/wordpress.conf.patch;\
	rm /tmp/wordpress.conf.patch
.
.
.
So I’m using sed, the text-editor-as-a-command, to edit WordPress configuration file (/etc/wordpress/wp-config.php) and change some patterns there into appropriate getenv() calls to grab credentials provided by VCAP_SERVICES.
Dockerfile best practices
The containers folder in the source code presents one folder per image, each is an example of different Dockerfiles. We use only the wordpress and phpinfo ones here. But I’d like to highlight some best practices.
A Dockerfile is a script that defines how a container image should be built. A container image is very similar to a VM image, the difference is more related to the file formats that they are stored. VMs uses QCOW, VMDK etc while Docker uses layered filesystem images. From the application installation perspective, all the rest is almost the same. But only only Docker and its Dockerfile provides a super easy way to describe how to prepare an image focusing mostly only on your application. The only way to automate this process on the old Virtual Machine universe is through techniques such as Red Hat’s kickstart. This automated OS installation aspect of Dockerfiles might seem obscure or unimportant but is actually the core of what makes viable a modern DevOps culture.
- Being a build script, it starts from a base parent image, defined by the FROM command. We used a plain official CentOS image as a starting point. You must select very carefully your parent images, in the same way you select the Linux distribution for your company. You should consider who maintains the base image, it should be well maintained.
- Avoid creating images manually, as running a base container, issuing commands manually and then committing it. All logic to prepare the image should be scripted in your Dockerfile.
- In case complex file editing is required, capture edits in patches and use the
patchcommand in your Dockerfile, as I did on wordpress Dockerfile.
To create a patch:diff -Naur configfile.txt.org configfile.txt > configfile.patch
Then see the wordpress Dockerfile to understand how to apply it.
- Always that possible, use official distribution packages instead of downloading libraries (
.zipor.tar.gz) from the Internet. In the wordpress Dockerfile I enabled the official EPEL repository so I can install WordPress with YUM. Same happens on the Django and NGINX Dockerfiles. Also note how I don’t have to worry about installing PHP and MySQL client libraries – they get installed automatically when YUM installs wordpress package, because PHP and MySQL are dependencies.
When Docker on Bluemix is useful
CloudFoundry (the execution environment behind Bluemix) has its own Open Source container technology called Warden. And CloudFoundry’s Dockerfile-equivalent is called Buildpack. Just to illustrate, here is a WordPress buildpack for CloudFoundry and Bluemix.
To chose to go with Docker in some parts of your application means to give up some native integrations and facilities naturally and automatically provided by Bluemix. With Docker you’ll have to control and manage some more things for yourself. So go with Docker, instead of a buildpack, if:
- If you need portability, you need to move your runtimes in and out Bluemix/CloudFoundry.
- If a buildpack you need is less well maintained then the equivalent Linux distribution package. Or you need a reliable and supported source of pre-packaged software in a way just a major Linux distribution can provide.
- If you are not ready to learn how to use and configure a complex buildpack, like the Python one, when you are already proficient on your favorite distribution’s Python packaging.
- If you need Apache HTTPD advanced features as mod_rewrite, mod_autoindex or mod_dav.
- If you simply need more control over your runtimes.
The best balance is to use Bluemix services/APIs/middleware and native buildpacks/runtimes whenever possible, and go with Docker on specific situations. Leveraging the integration that Docker on Bluemix provides.
WordPress on Fedora with RPM, DNF/YUM
WordPress is packaged for Fedora and can be installed as a regular RPM (with DNF/YUM). The benefits of this method are that you don’t need to mess around with configuration files, filesystem permissions and since everything is pre-packaged to work together, additional configurations are minimal. At the end of this 3 minutes tutorial, you’ll get a running WordPress under an SSL-enabled Apache using MariaDB as its backend.
All commands need to be executed as root. Read More
Is Open Source Swift a good thing ?
 On December 3 Apple has open sourced the Swift programming language on Swift.org. The language was first released (not Open Source yet) about the same time as iOS 8 and was created by Apple to make Mac and iOS app development an easier task. Swift is welcome as one more Open Source language and project but is too early to make a lot of noise about it. Here are my arguments: Read More
A Bunch of Passbook Tickets
Click image for 9000×8250 full resolution. Read More
Cloud: Enabling innovation in the third platform era

Is the IT department in your organization overwhelmed with infrastructure plumbing that crowds out the work that can bring real value to the business? Read More

A nova TI do iPhone
Do PC ao Datacenter, como o iPhone mudou tudo o que fazíamos em TI
- Publicado também no StormTech em 09/2014
A fórmula era ambiciosa para 2007: um telefone com inovadora tela multitoque grande, teclado virtual que finalmente funcionava, SMS repensado e apresentado como uma conversa, aplicação de e-mail com interface extremamente efetiva e clara, inúmeros sensores que interagiam com o mundo físico. E, acima de tudo, um browser completo e avançado, que funcionava tão bem quanto o que tínhamos no desktop. Read More
WordPress Community is in Pain
I don’t know about you senior bloggers but I’m starting to hate the way the WordPress community has evolved and what it became.
From a warm and advanced blogging software and ecosystem it is now an aberration for poor site makers. Themes are now mostly commercial, focused on institutional/marketing sites and not blogs anymore. WordPress is simply a very poor tool for this purpose. You can see this when several themes are getting much more complex than WordPress per se. Read More
Using super high resolutions on MacBook and Apple Retina displays
Retina display is by far the best feature on MacBook Pros. The hardware has 3360×2100 pixels (13″ model) but Apple System Preferences app won’t let you reach that high. Read More
SMS sem Ansiedade
SMS, WhatsApp, iMessage, Hangouts mudaram a forma como nos comunicamos.
Só não podemos nos deixar cair na armadilha de achar que a mensagem entrou no cérebro do destinatário quando aparece ✔✔. Evite ansiedade desnecessária pois o destinatário pode estar ocupado, esqueceu de responder ou simplesmente viu mas não leu direito.
De resto essas Apps são adoráveis mesmo.
Como “Cloudificar” seu Datacenter Atual
 Os gerentes de infra-estrutura de TI de hoje em dia tem um novo concorrente inesperado: as Clouds Públicas.
Ele investiu nos últimos anos em energia, rede e computadores de alta qualidade para ver seus usuários internos acabarem preferindo as Clouds Públicas por serem mais ágeis, elásticas e com modelo de cobrança mais preciso (paga só se usar). Read More
iOS Health app and the birth of Quantified Self
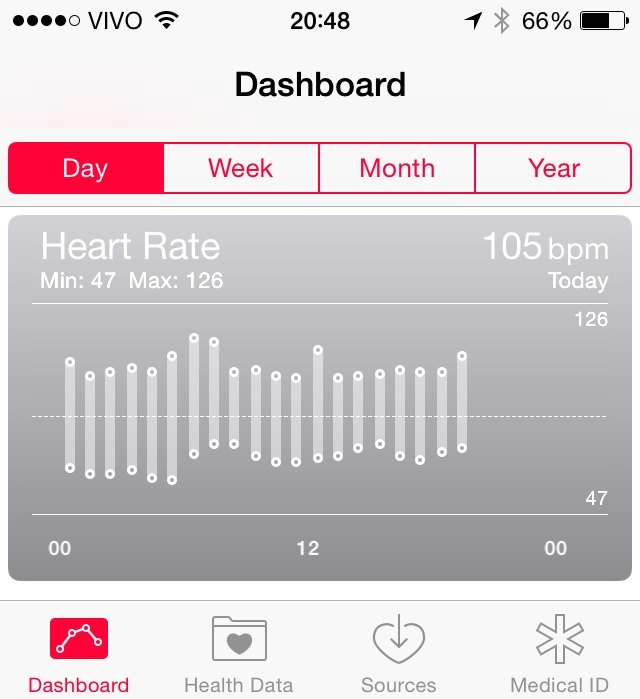
Before iOS 8, the Polar H7 heart sensor with bluetooth needed special apps to pair. Now it pairs natively on the Settings app and starts sending heart rate to the new Health app on iOS 8, which will keep recording the data and building a graph like this:
Ode às Redes Sociais e à Livre Circulação de Pensamento
Tirando uns 60% de conteúdo ainda meio supérfluo, redes como Facebook e Twitter são ferramentas sem precedentes na história da humanidade.
Se você consegue enxergar além da piadinha, da foto do bebê e do bichinho, perceberá que tratam-se de verdadeiras usinas de difusão e circulação de pensamento que mantém a mente fascinada, o raciocinio arejado e o coração aberto.
Não menospreze essas ferramentas alegando que prefere relações pessoais cara a cara. É como rejeitar voar só porque a natureza não te deu asas. É como esnobar Paris só porque você é carioca da gema. Já superamos isso, é uma desculpa ingênua, que não cola, que soa mal e não “cool”.
Seja um partícipe na circulação do pensamento. As idéias, a informação, o pensamento, tudo isso quer ser útil, de alto alcance, para transformar. Não exclusivo, não de difícil acesso e nem caro. Esses sistemas de engajamento podem completar e potencializar o melhor de você como qualquer ferramenta quando usada para o bem, só que de uma forma nunca antes vista na história desta humanidade.
Microsoft Windows na plataforma Power com KVM e QEMU
Com o lançamento de KVM para Power se aproximando no horizonte, tem se falado muito sobre rodar o Microsoft Windows em Power.
Só uma rápida retrospectiva, KVM é a tecnologia do Kernel do Linux que permite rodar máquinas virtuais de forma muito eficiente. E o QEMU é o software que emula diversos aspectos de um computador (portas serias, rede, BIOS/firmware, disco etc). O QEMU existia antes do projeto KVM e possibilita rodar, de forma razoavelmente lenta devido a emulação de todos os aspectos do hardware, outro sistema operacional completo dentro dele.
O Twitter vai acabar, Facebook vai prevalecer
Prevejo (e costumo acertar essas coisas) que a médio prazo o Twitter tende a desaparecer. Mesmo com conteúdo melhor — pelo menos das pessoas que eu sigo —, seu concorrente, o Facebook, tem mais funcionalidades e possibilidades, é mais auto-contido e é mais colorido e diverso, o que o torna mais popular também.
Então acho que muitos continuarão migrando para o Facebook e deixando gradativamente de usar o Twitter, infelizmente.
OpenShift for Platform as a Service Clouds
 At the Fedora 20 release party another guy stepped up and presented+demonstrated OpenShift, which was the most interesting new feature from Red Hat for me. First of all I had to switch my mindset about cloud from IaaS (infrastructure as a service, where the granularity are virtual machines) to PaaS. I heard the PaaS buzzword before but never took the time to understand what it really means and its implications. Well, I had to do that at that meeting so I can follow the presentation, of course hammering the presenter with questions all the time.
Read More
Fedora 20 release party in Brazil
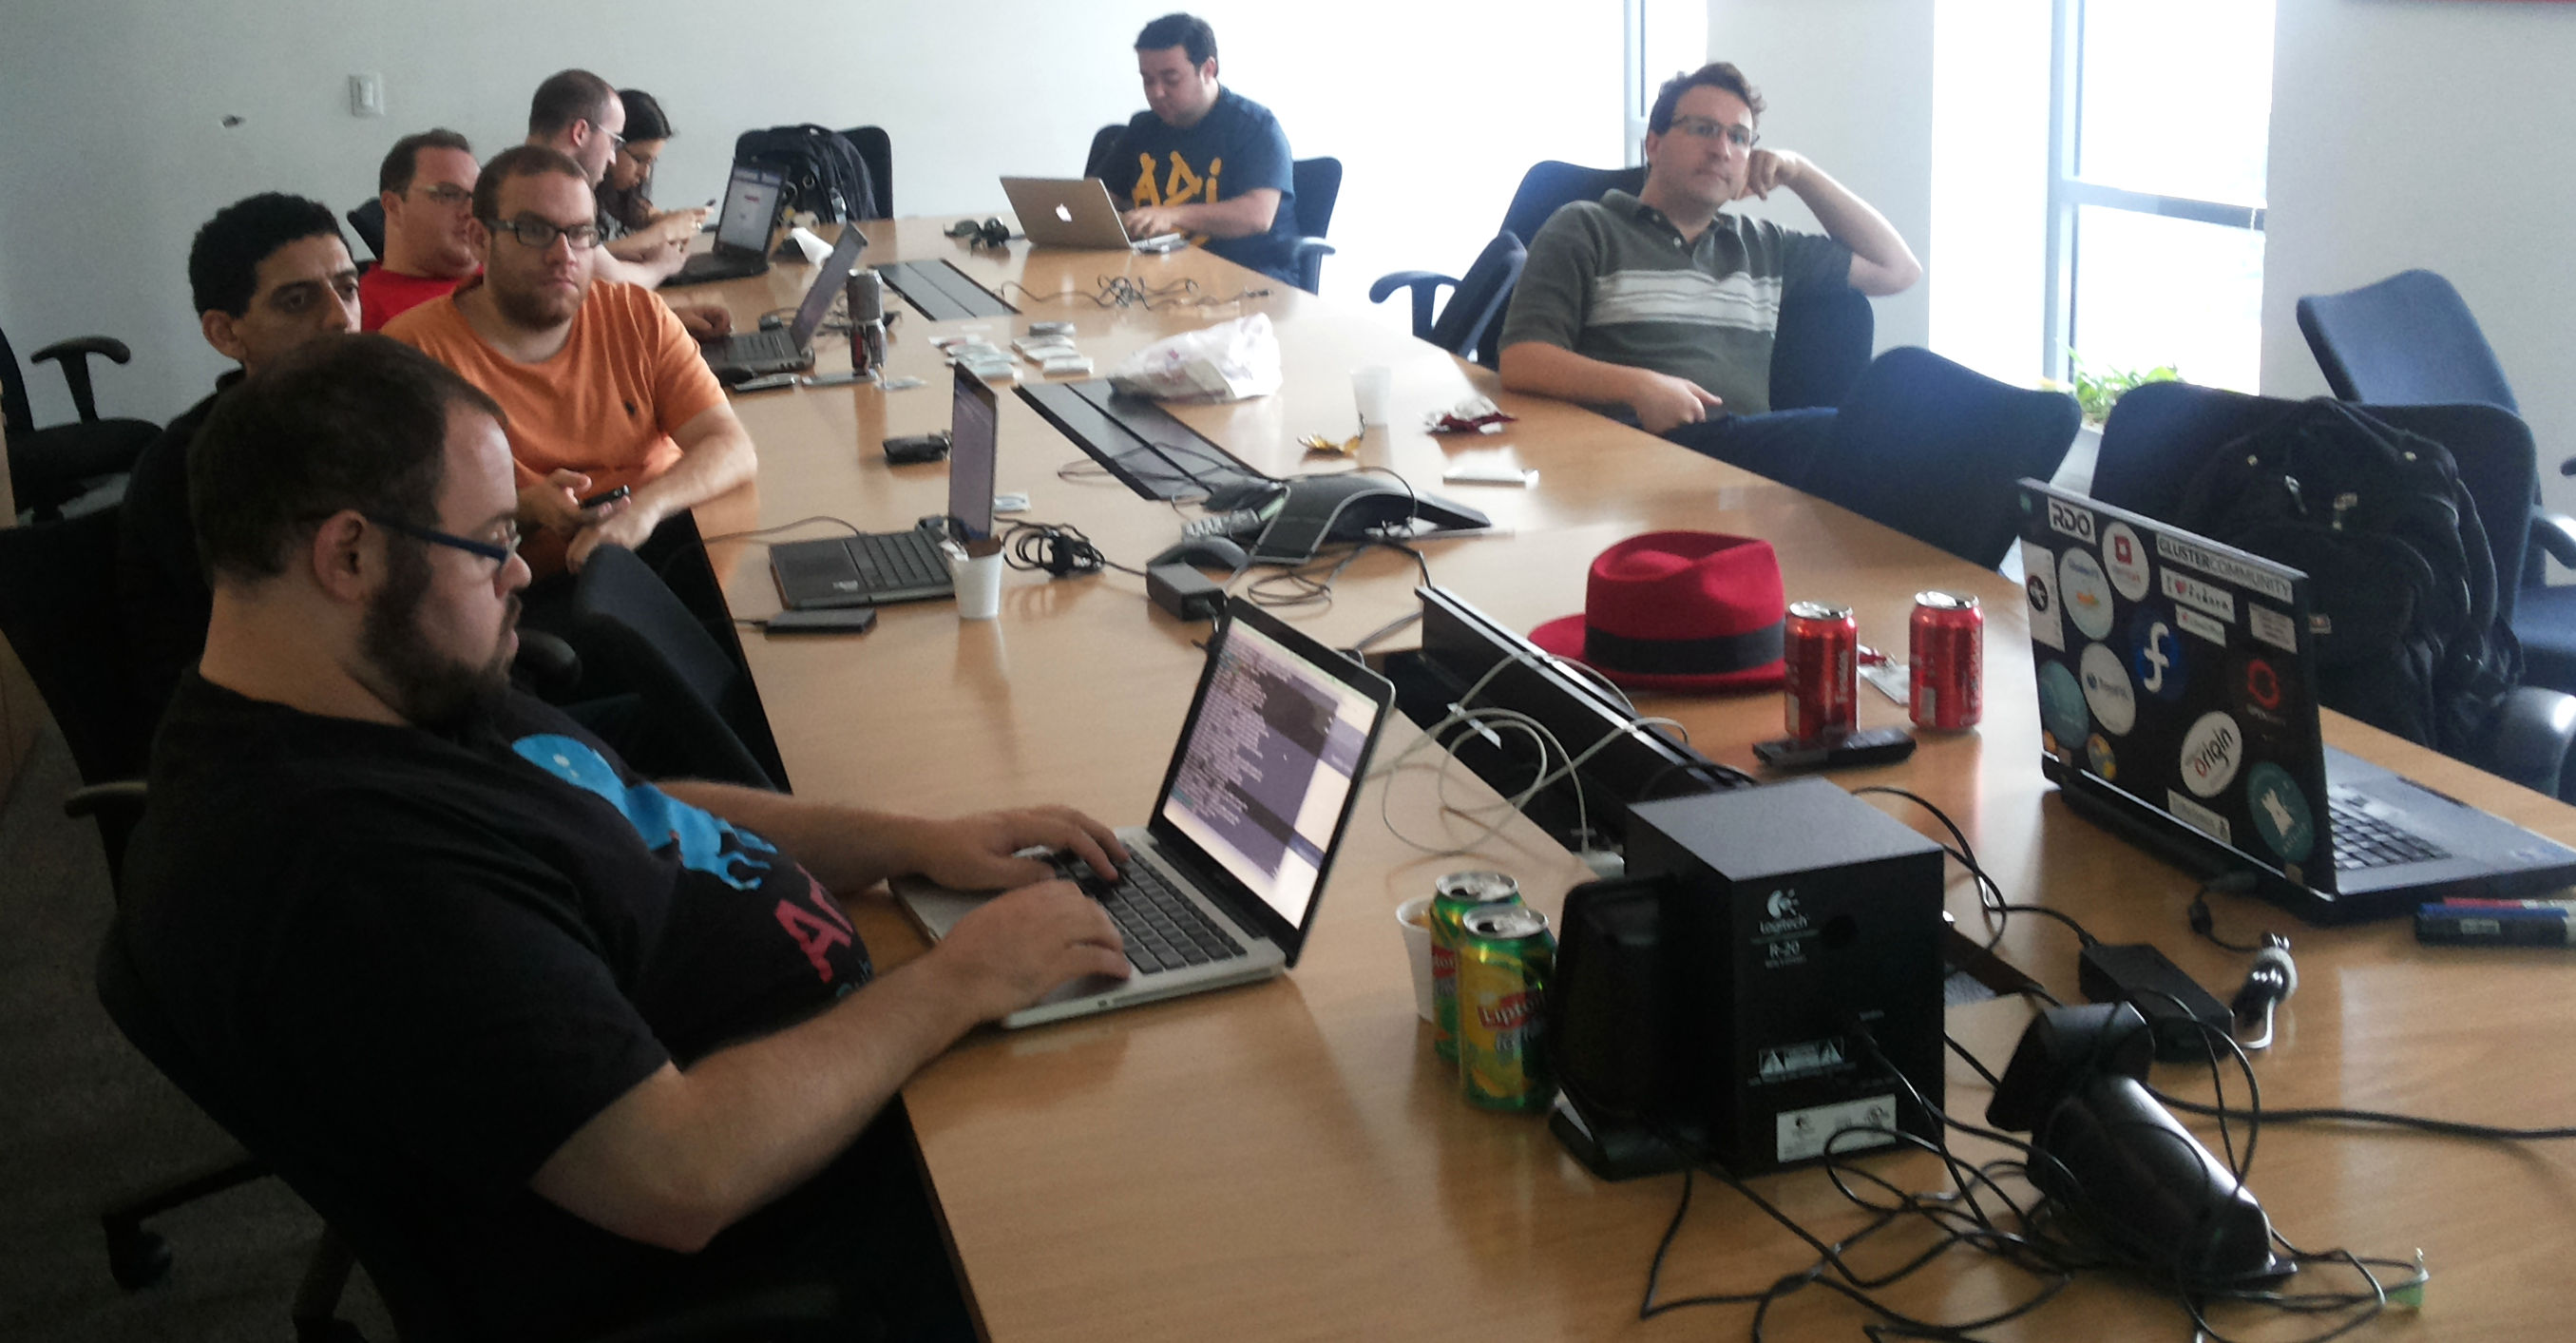
Few weeks ago I attended the Fedora 20 release party at São Paulo Red Hat offices. It was nice to hang together with other Fedora enthusiasts, get a refresh about newest Fedora features and also share my experiences as (I considere myself) a power user.
 |
 |
GMail as mail relay for your Linux home server
Since my Fedora Post-installation Configurations article, some things have changed in Fedora 20. For example, for security and economy reasons, Sendmail does not get installed anymore by default. Here are the steps to make your Linux home computer be able to send system e-mails as alerts or from things that run on cron. All commands should be run as user root. This is certified to work on Fedora 21.
Fedora 20 virtualization with NetworkManager native bridging
Fedora 20 is the first distribution to bundle NetworkManager with bridging support. It means that the old hacks to make a virtual machine plug into current network are not required anymore. Read More
Coisas que aprendi e descobri na Latinoware 2013
- MongoDB, um banco de dados NoSQL, mostrado pelo Christiano Anderson. Até então NoSQL não passava de um buzzword para mim. Christiano me mostrou o software em operação, como inserir dados (documentos), fazer buscas etc.
- Django, mostrado pelo Christiano Anderson.
- Teclado virtual com projeção a laser da Celluon, mostrado pelo Alessandro Faria.
- Ubuntu Touch, mostrado pelo Alessandro Faria.
- Diálogos gráficos em scripts com o YAD, mostrado pelo Julio Neves.
- Popularização das câmeras 3D da Intel, Alessandro Faria.
- Serviços de gestão de logs como Logstash e Greylog2, mostrado pelo Jan.
- A impressionante arte de reconstrução craniana forense com Blender, com Cicero Moraes.
- Status atual do LibreOffice versus OpenOffice.org, com Vitorio Furusho e Eliane Domingos.
- BI com o Pentaho me foi finalmente aprensentado por Alviane Miranda.
Inovação e o Filme do Steve Jobs
 Bom mesmo o filme sobre Steve Jobs, para mostrar como é árida a jornada para a Inovação. Como é solitário, como todos ficam te falando que está tudo errado.
Inovar não é repetir essa mesma palavra 800 vezes em PowerPoints. É ter Visão (A Centelha Motivadora), se preocupar com Detalhes e Persistir. Sendo que Visão é o fator menos importante porque ela muda, refina e se adapta durante a jornada. Persistir é deveras mais dispendioso para conseguir atravessar o mar de antiquados que tentarão te impedir.
Essa é pros loucos, pros deslocados, rebeldes, encrenqueiros, pros pinos redondos nos buracos quadrados… pros que vêem as coisas diferente — eles não curtem regras… Você pode citá-los, discordar deles, glorificar ou denegrí-los, mas a única coisa que você não pode fazer é ignorá-los, porque eles mudam as coisas… eles empurram a humanidade prá frente, e enquanto alguns os vêem como loucos, nós vemos genialidade, porque aqueles que são loucos o suficiente prá achar que podem mudar o mundo, são os que mudam.
Install OS X on a Mac computer from an ISO file
For some reason nobody published a simple guide like this. Maybe nobody tryied this way. I just tryied and it works with OS X Mountain Lion on a Mid 2012 MacBook Air.
If you have a Mac computer or laptop and want to install OS X, and all that you have is the operating system installation ISO image, you just need an external USB storage (disk or pen drive) of 5GB minimum size. Those regular 120GB or 1TB external disks will work too.
Just remember that all data on this external storage will be erased, even if the Mac OS X installation ISO is just 4.7GB. So make a backup of your files and after installtion you can re-format the external disk and recover the files on it.
To make the OS X installation ISO image file usable and bootable from the external storage, use the Mac OS terminal app or, on Linux, use the command line. This is the magic command:
dd if="OS X Install DVD.iso" of=/dev/disk1 bs=10m
You might want to change the red part of this command to the disk name that you get when inserted the external storage. Remember to not use things like disk1s1 or, on Linux, sdc1. The highlighted blue part on these examples are the partition name, and you don’t want that. You want to use the whole storage, otherwise it will not boot the computer.
After the command finishes execution, boot the Mac computer with the alt/option key pressed. Several devices will appear on screen for you to choose wich one to boot. Select the one with the USB logo and called “EFI Boot“.
Mac OS X installation app will boot and you can start the process. Remember that the default behavior here is to upgrade the installed system. If you want a clean install, select the Disk Utility app on the menu and make sure you erase and create a new partition on the Mac internal storage.
As a side technical note, this is all possible because ISO images — primarily designed for optical disks — can also be written to regular other storages as pen drives. And Apple has also put the right bits on these ISO images to allow it to boot from non-optical disks too.
Exchange large amounts of files with me
I maintain a large amount of browseable files at http://amp.alkalay.net/media/Musica/ that can be accessible also by SFTP on sftp://amp.alkalay.net:/home/pubsandbox/.
You can access thse files with any SFTP (Secure Shell FTP) client on sftp://everestk2:k2everest@amp.alkalay.net:/home/pubsandbox/.
There is a visual way to download files from there using FileZilla. Just follow the steps. Read More
Open Source é garantia de continuidade [MariaDB × MySQL]
MySQL é ainda o gerenciador de banco de dados mais popular do mundo em número de instalações. Muito mais usado que Oracle, DB2 ou qualquer outro SGBD comercial. Mas ele está morrendo, está sendo matado pela Oracle numa morte lenta mas não dolorosa.
Espere, isso não é uma má notícia. Read More

Unicode ♥ וניקוד ☻ Уникод ♫ يونيكود
- Publicado como um Mini Paper do Technical Leadership Council da IBM Brasil de Agosto de 2012.
- Também na Intranet da IBM
Você sabia que há pouco tempo era impossível misturar diversas línguas numa mesma frase de texto sem a ajuda de um editor multilíngue especial? Mais ainda, que havia idiomas cujas letras sequer tinham uma representação digital sendo impossível usá-las em computadores?
Tudo isso virou passado com o advento do Unicode e para entendê-lo vamos relembrar alguns conceitos:
Read MoreQual plano de celular é melhor para uma pessoa ?
Em que as pessoas se baseiam para decidirem qual plano de telefonia celular adquirir? Vejo pessoas com planos enormes de 1000 minutos ou 2GB de transferência etc, mas será que usam realmente tudo isso ? Read More
Sobre Profetas e Bolas de Cristal
Escrevi este artigo antes de “Data Science” ter sido cunhado, mas é disso que fala o artigo. Na época classifiquei o artigo como Business Intelligence, Business Analytics, Big Data e Data Mining.
- Publicado como um Mini Paper do Technical Leadership Council da IBM Brasil, em março de 2012.
- Versão em inglês
- Mais artigos
Há quem diga que os antigos profetas eram pessoas comuns que proferiam simples consequências lógicas baseadas em observação mais profunda de fatos de seu presente e passado. Tudo o que vemos à nossa volta é resultado de alguma ação, tem uma história e um motivo de ser e de existir. Em contrapartida, seguindo um mesmo raciocínio científico, se algo aparentemente “não tem explicação” é porque ninguém se aprofundou suficientemente nos fatos históricos que o causaram.
Read MoreiPhone Call History Database
Either if you are doing forensics or just want better reports about your call patterns, the iPhone Call History database can be very handfull.
If you have a jailbroken iPhone, you can access the database file directly. If you are not, you can still access it offline simply copying the file from an unencrypted iTunes backup to some other folder on you computer to manipulate it. Here are the real files path inside the iPhone and their counterparts on an iTunes backup folder:
Read More

O site de Linux da IBM Brasil foi desativado e isso é bom
O site oficial de Linux da IBM Brasil ficava em http://ibm.com/br/linux/ e lá era nosso QG virtual quando o Linux Impact Team existia e eu fazia parte dele. Nosso time foi formado na época para estabelecer a idéia de que Linux, Software Livre, Padrões Abertos etc são coisas boas, desmitificar algumas crenças confusas, ajudar clientes IBM a usar Linux com nossos produtos etc.
Read MoreIBM Smarter Planet Icons in SVG format
These are the 25 Smarter Planet icons I’ve collected on an internal work I did at IBM. They are smart and I love them. Read More
Install Drupal 7 with Drush from Git
OK, couldn’t find a good documentation about it so I had to make some research. And since I’ll do it several times, let me take a note of the procedure and share it with you at the same time.
Parts in red should be changed by you to your specific names and details. Read More
Convert DBF to CSV on Linux with Perl and XBase
I spent a few days to figure out how to make a simple conversion of a DBF file into a plain text file as comma separated values (CSV) or tab separated values (TSV) in a batch/command line way. I was almost setting up an OpenOffice.org server because it seamed to be the only packaged solution to read and convert DBFs.
Well, it easier than that. Read More
Querem usar meu blog para publicar “sugestões de pauta”
É a segunda vez que uma mesma assessoria de imprensa me envia “sugestão de pauta” para que eu fale aqui sobre os produtos tecnológicos de seus clientes. Read More

